Posted: Thu Jul 03, 2008 11:33 am Post subject: TRSM Dima - Stalky GC
TRSM Dima - Stalky GC
May the best man win!
Game: GJS TRSM ver 0.97-e & Stalkys map fixes
Players: UK as AT_Stalky, vs Germans as AT_Dima
Rules: Geneva convention, but only when the sun shines,
Settings: 20min, 95%, morale off, 2 min warning,
Other: No retreat from beaches in first game.
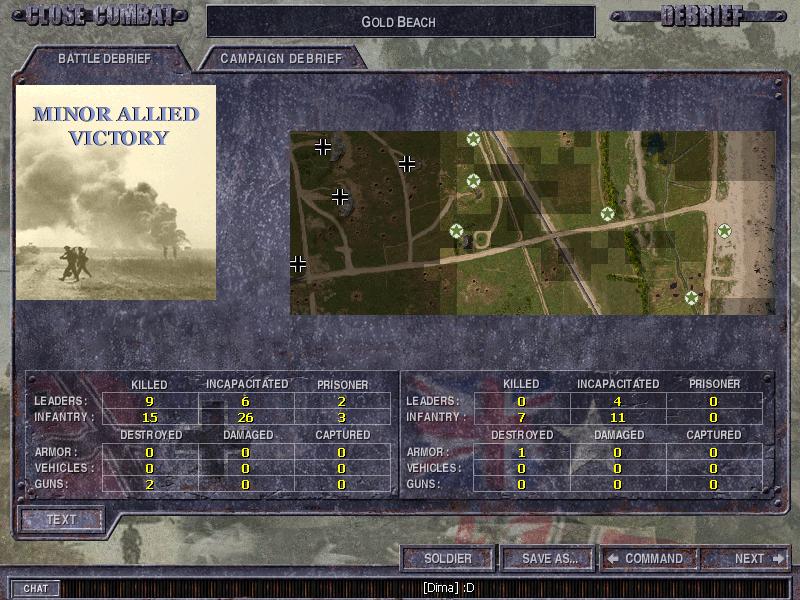
Day 6 th 06,00
Map: Gold
Move move move, take the map in one go.
Well that’s was the plan anyway. Seem Dima had other plans. Some gun through a spanner in the works.
Around the central house I meet stubborn resistance and my poor infantry men got some hits.
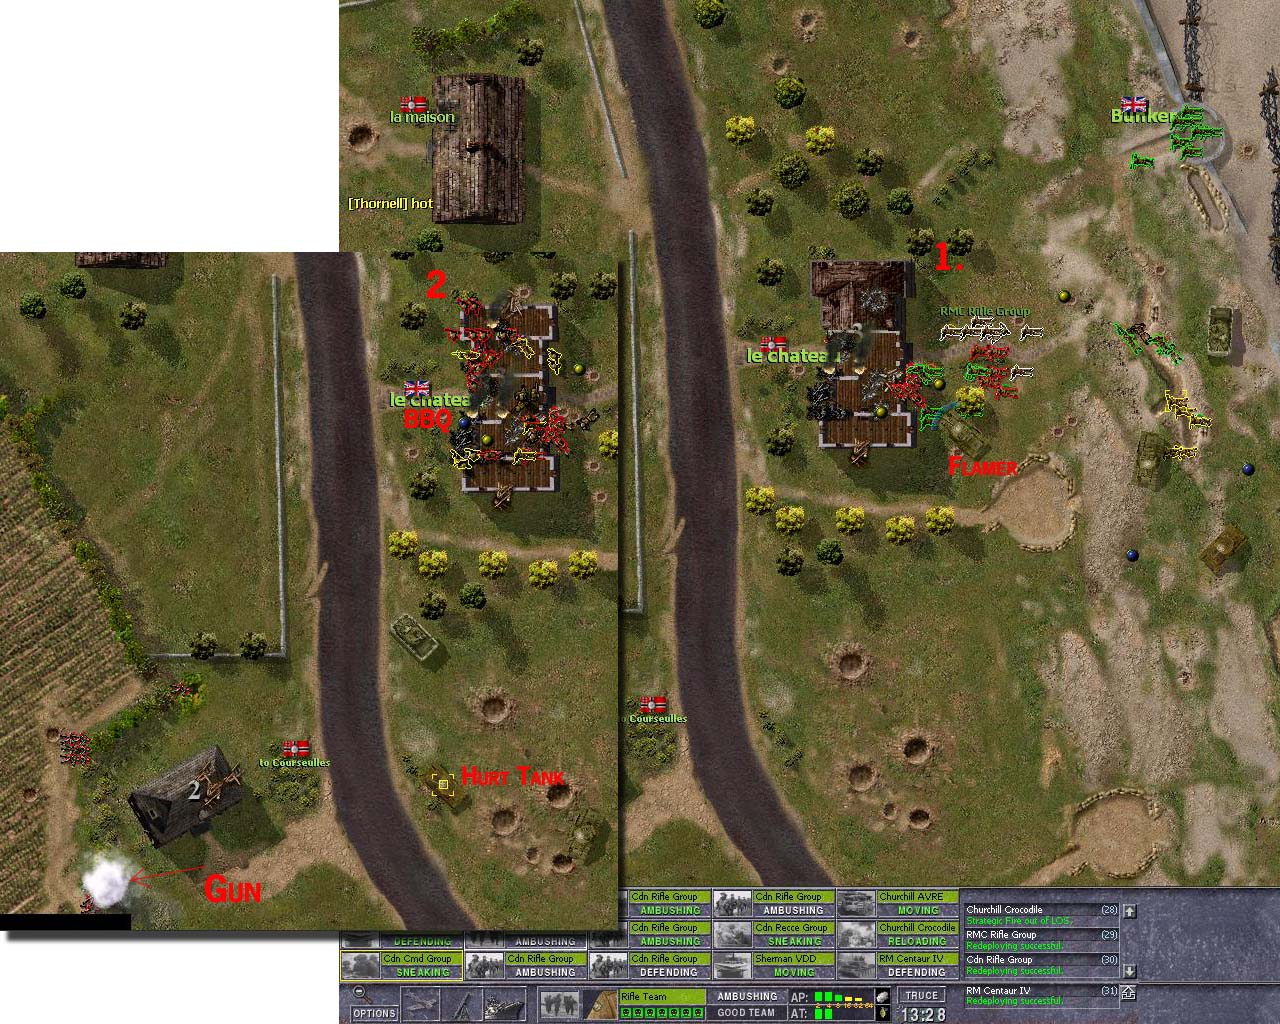
Day 6 th 06,00
Map: Juno
Just pin them down, saturate em with HE, and gently crawl in.
A flamer tank is making things more easy, just up front.
Enemy guns may lurk somewhere but naval take care of em.
Well, so I thought anyway a 95mm How was lost to a gun in south edge (see image to right).
Germans put up resistance, but they should have taken my advice and pointed at the sky (with both hands).
Damned they damaged one more tank, but, Detroit make many of em..
Day 6 th 06,00
Map: CSM
Hm, take the exit V L must be main prio. Smoke and tank gun cover, a 20mm help to.
Main force follow left side, and some tanks follows to make things more easy.
A 88 is placed in the left down corner, well hidden and it killes one of my poor tanks. In some strange way,
I believe it survived even though I moved my inf down there.
But hey my men are sloppy, and just eager to do the job fast.
And there will be plenty of opportunities to kill that damned 88 later.
I lost some other tanks not sure how, for I know one may driven into the water?
Any what Dima sat there most likely in his bunker and commanded his troops over radio, with a cruel smile on his face, no doubt.
Day 6 th 06,00
Map: Oistre
Men, we shall not be pinned down here.
We may lose some men even many in a fears fast moving fight here today, that don’t matter,
I rather lose 50 men and take map in one go, rather then lose 20 men in many battle, and have to fight here 5 time or more...
Make a pocket of the main city and the enemy have to retreat, or die next time.
And we will be happy to help him with that. Dima place his men with care, he will try to maximize the power of his Georgians,
but they are hardly made of steel.
But for a moment I thought so, not for there moustaches, but for there strong resistance in the Right South bunker,
they run back and forth and took shoot at my fine man as they moved in,
and as they went in even more was killed.
In the end he coused me heavy casualty’s, but mission is a success.
Due to some misshapes in the development the films from some beaches and the AB/AL units are lost for 6 th 06.00
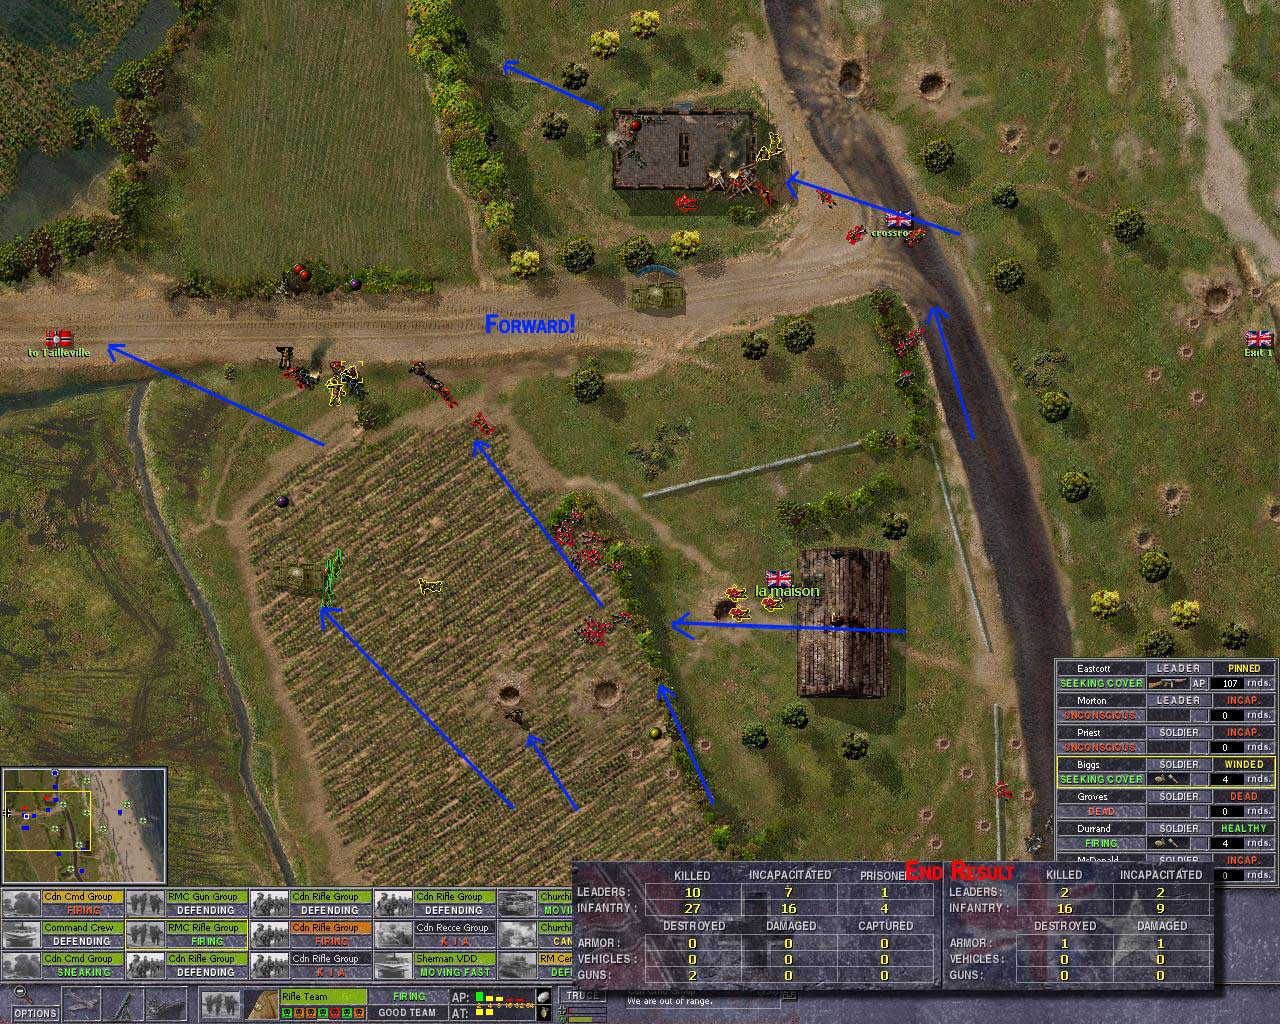
Day 6 th 02,00PM
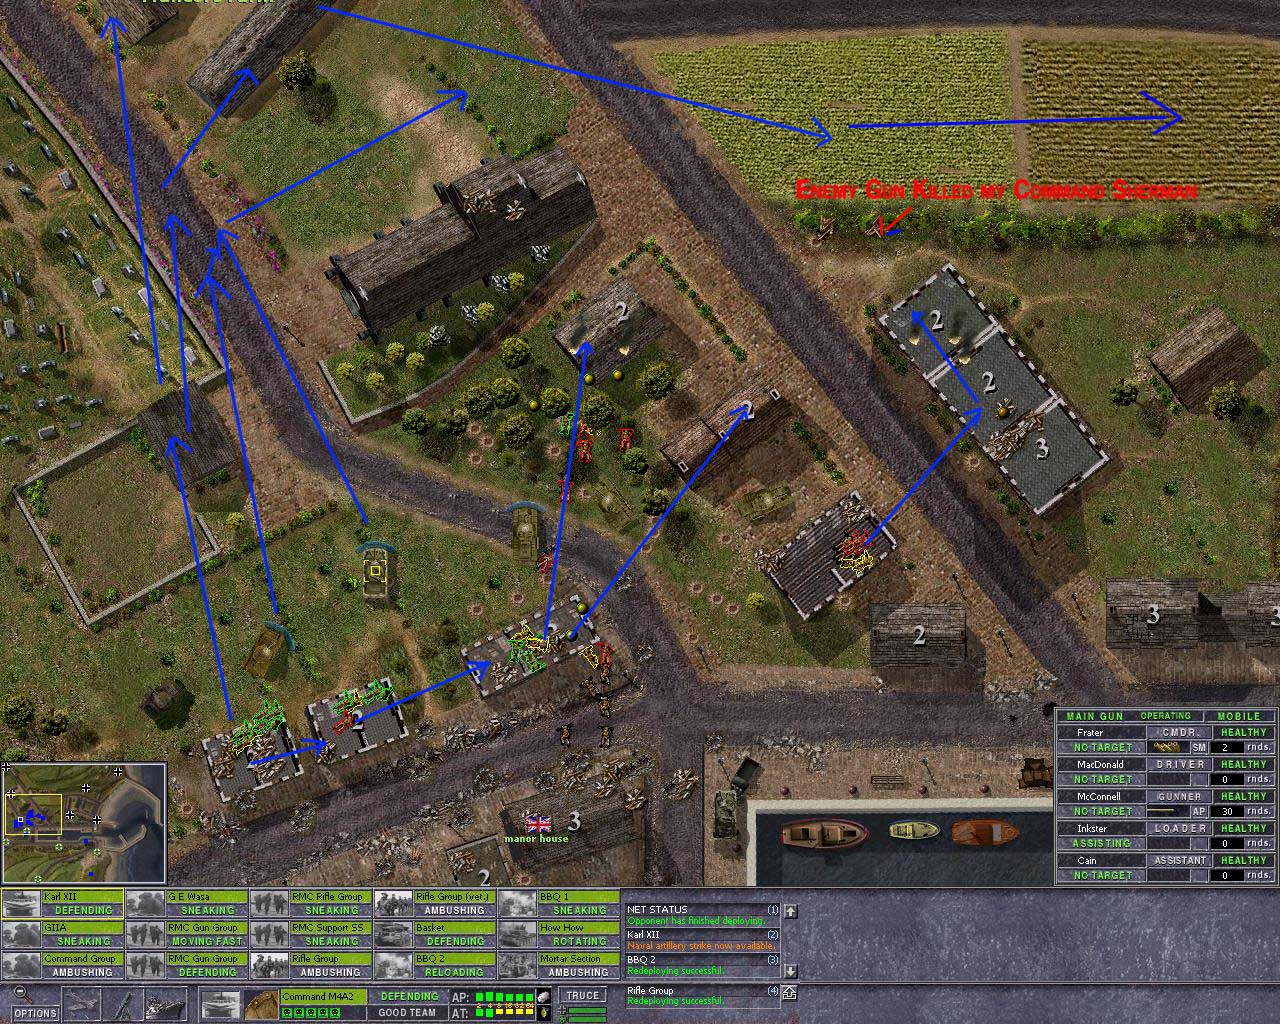
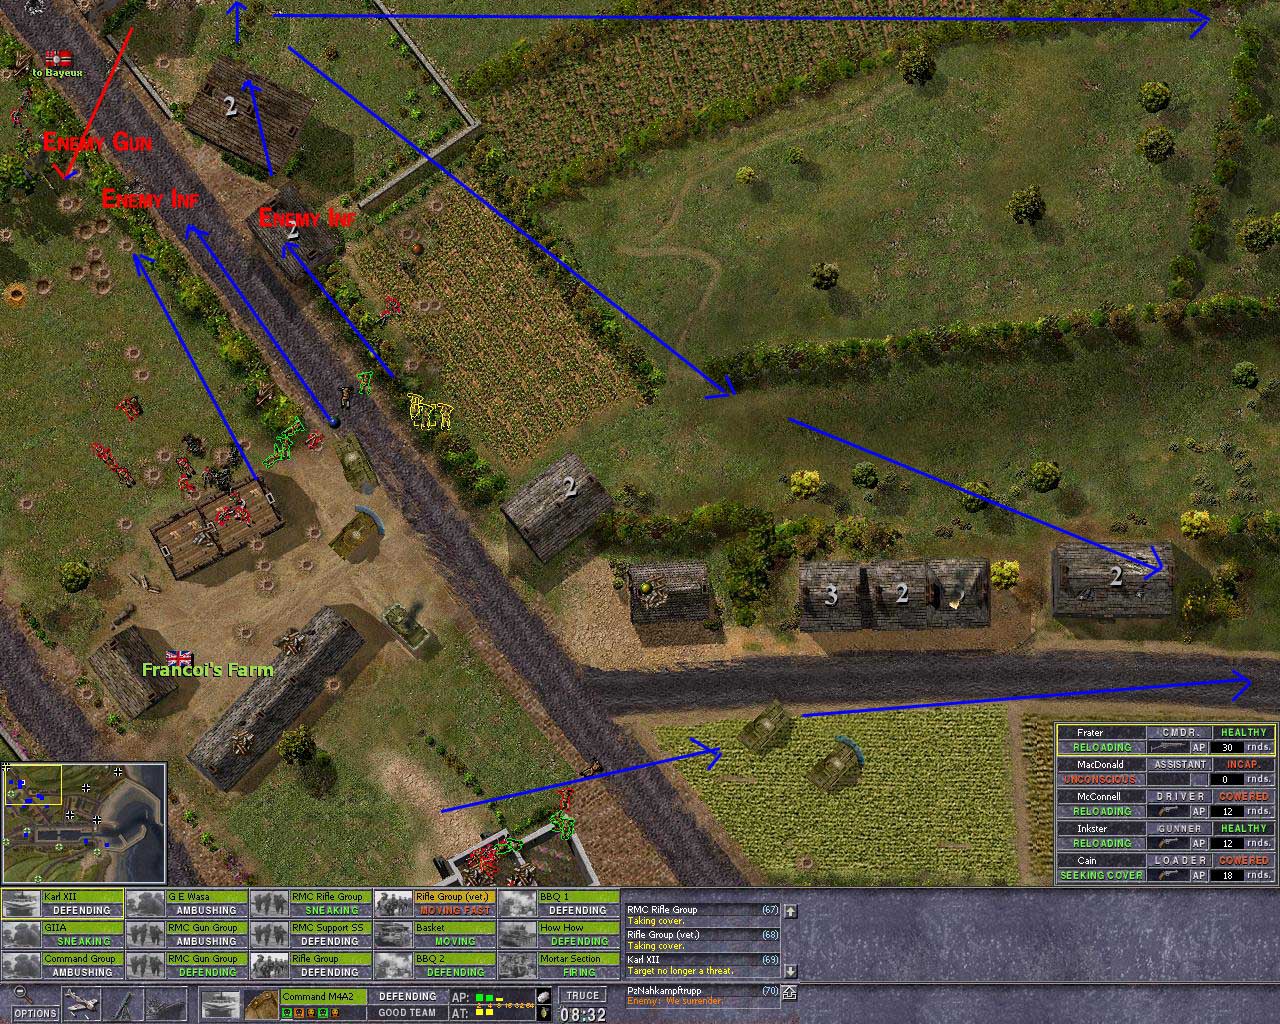
Map: PEB
I moved of Gold Beach and meet the Germans here.
What to do? I must have the Left side VL, the Exits, I don’t whant this Ge unit end up in Bayoux,
I belive that what Dima plan.. So he will be heavy in the Left side,
and Im temted to go Right and make that part collapse, but fight Dima in city’s is anything but fun, (if one is not a fakir, that is).
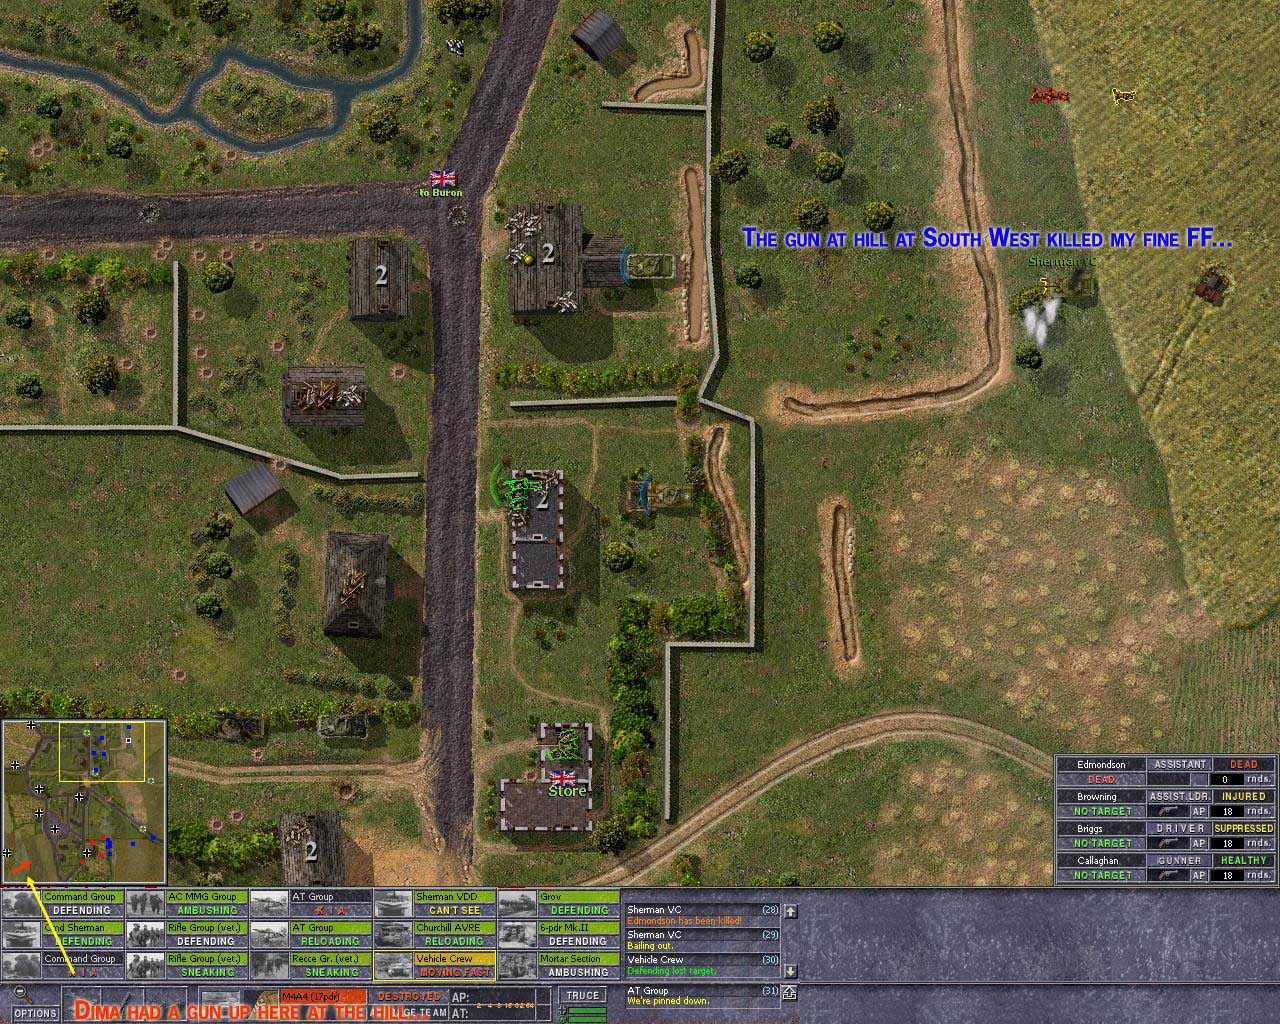
No, It has to be Left side, and heavy tank support, 2 AVRE, 1 Flamer, one command and one 95mm How.
I thought A Com Sherman was lost due to that gun placed where I just can’t see it (see image),
but now I see Sherman is lost due to the top Left gun.
I have Dima/Germans MGs and small arms fire slow my progress. But the mission is carried out.
Day 6 th 02,00 PM
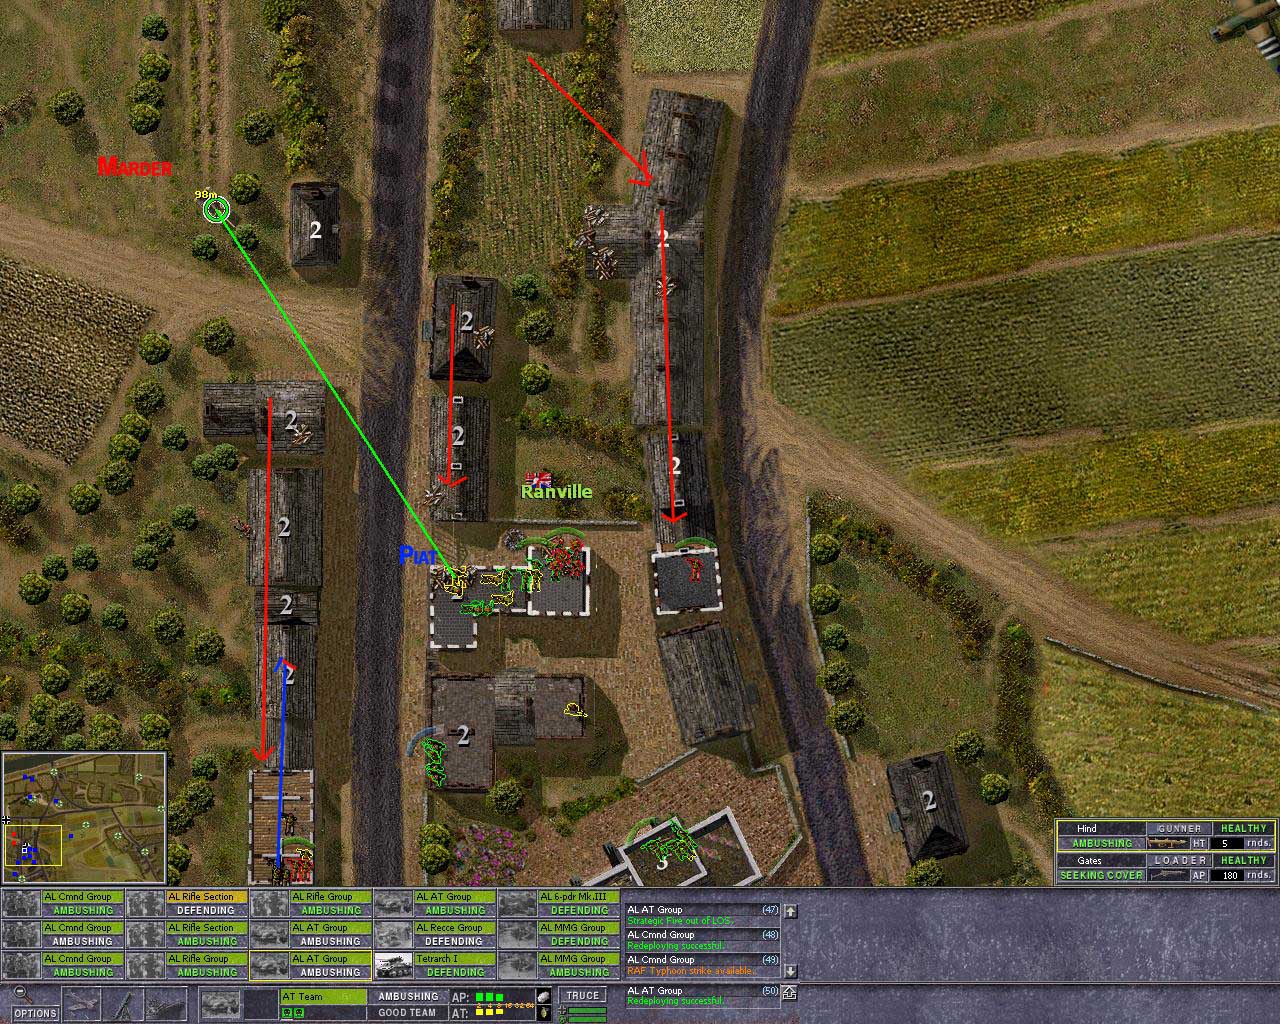
Map: Ranville
Germans/Dima, moved in from mid Left. It was a strange battle, and I shold have known he had a grander plan, just to clean out some of the city.
He redraw this BG in next round, and moved in a new BG from Left South VL,
thus was in control of all city.
Last edited by AT_Stalky on Sun Dec 21, 2008 4:31 pm; edited 1 time in total
That’s how it looked from the German side.
Reports are fragmental as a lot of papers and data were lost during fast advance of the Allies.
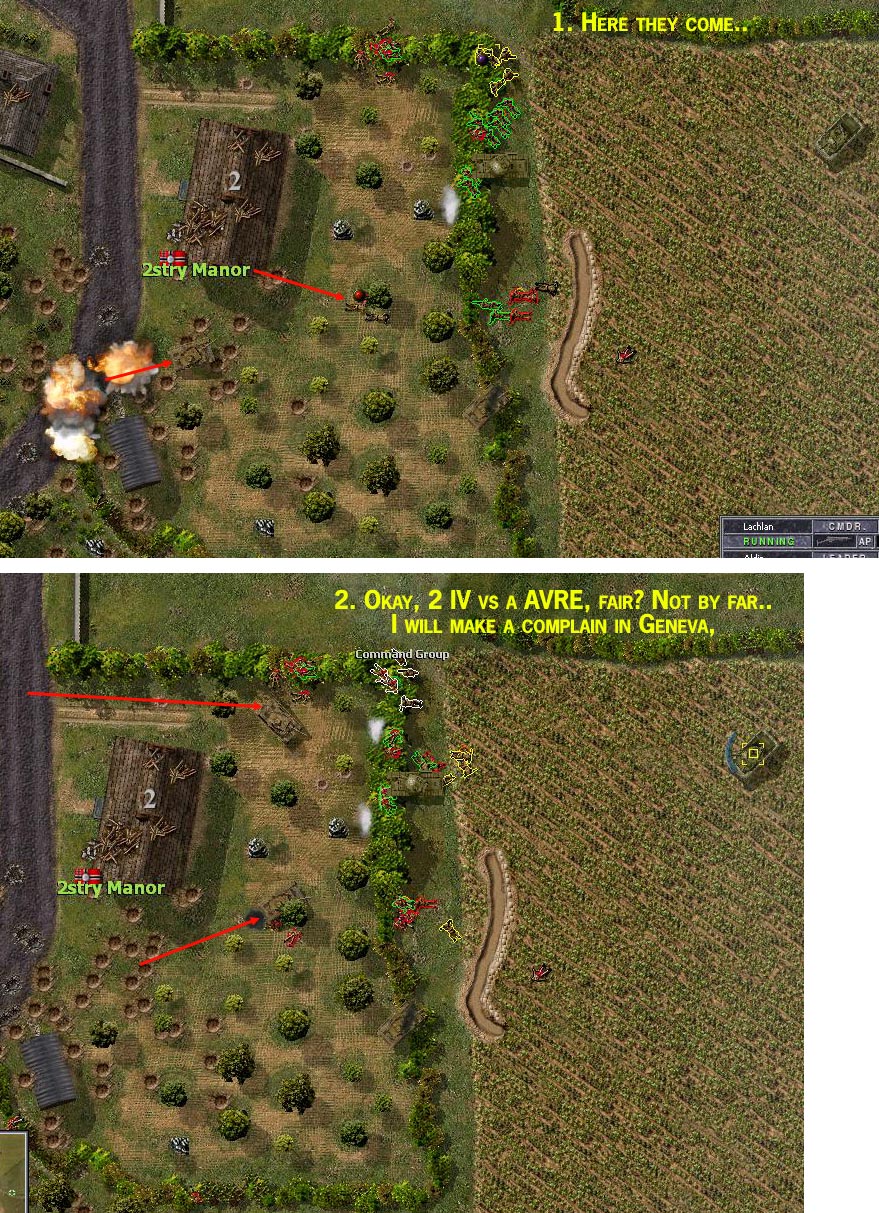
Gold beach,
The tanx started to show up from the gap in the hedges….so many of them...
The first trench is almost lost.
Manor is taken. Crocodile melts my men and war machines.
Sherman DD was hit at side by 7,62cm AP shell and exploded in no time.
Juno beach,
3.7cm Pak35/36 immobilized Centaur with side hits only to be destroyed by NAVAL bombardment called to it’s position.
Sword beach,
The allies are crawling toward the town under cover of smoke screen and tank guns.
They are trying to take Café… fire, fire, fire!!!
They took Café and advance….we need to stop them here!
The result of the battle:
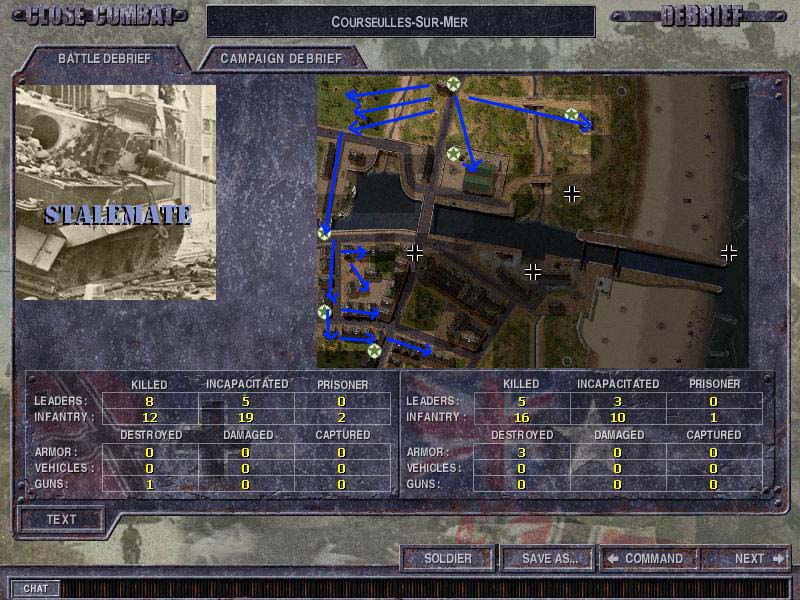
Ouisterham,
The result of the battle:
June 6th 1944, 2pm
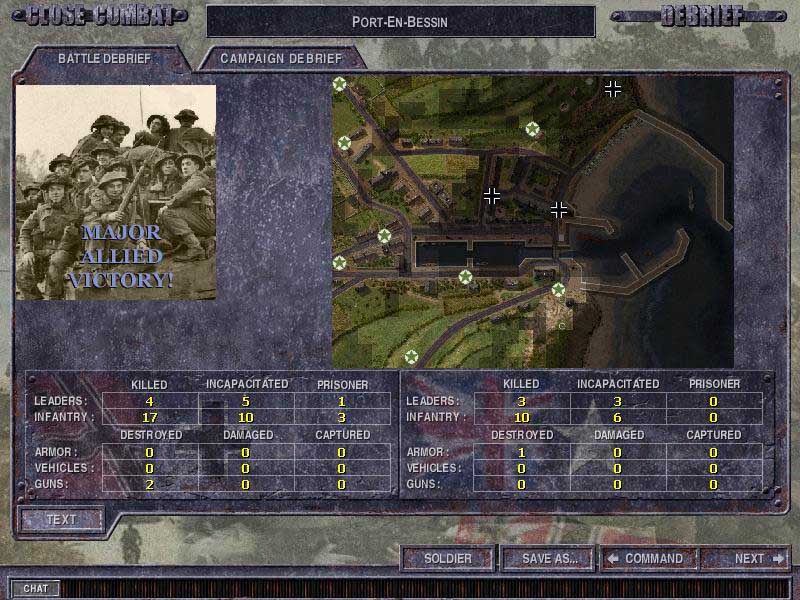
Port-En-Bessin,
Crocodile brings destruction and death to my troops.
The result of the battle:
Ouisterham,
The second battle of Ouisterham began.
Don’t let them take the bunker!
Two tanx are stopped by AT teams!
Ranville,
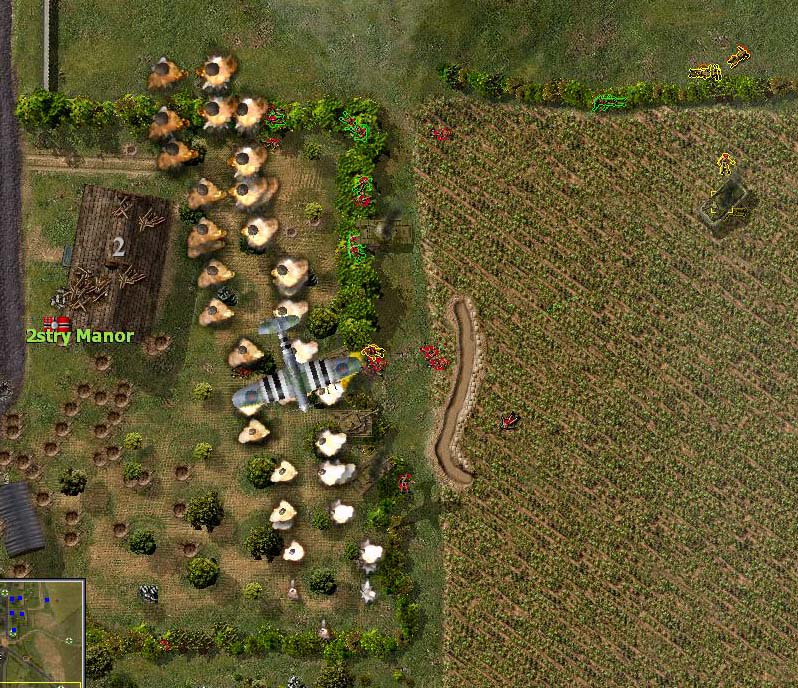
Airstrike inflicted massive casualties among my men in the houses.
Ost.441 Bat reinforced with Gun Group “Popow” takes it’s positions to defend Creully against the British combined BG that is about to enter the town.
As the British had very strong force it was decided to act via ambushes instead of direct engagement.
The first ambush worked – the British sustained casualties and moved in tanx for support their infantry which is no match for our glorious Grenadiere so our team has retreated to the houses.
The 4.5cm PaK hidden in the house managed to immob the British Crab tank but was KO by return fire. The British committed the attack on the houses with human waves, our MGunners just didn’t have enuf time to chnge the barrels as they overheat too fast spreading death in enemy waves.
In the end the Tommys managed to take the houses and capture road to Bayeux but they paid a great toll!
The British decided that they could expand their gains in territory but were met with the 2nd line of defense and were wiped out.
In same time the Brits attacked toward to Taileville which was repulsed by our brave Grenadiere!
The results of that battle according to the reports:
Hillman,
The British entered Hillman fortified area with a lot of armored support. But high command knew that beforehand and deployed number of AT sources to counter the threat.
First Crab got blasted by hit of 7.5cm HEAT shell.
The British zeroed our ATG and unleashed mortar barrage on it.
Another Sherman went to fire by the shot of Marder I! Unfortunately the heroic Marder was KO by treacherous British ATG. But our glorious and mean actions forced British to stop their attack and ask for Cease Fire to get their wounded from battle zone.
The results of that battle according to lates report.
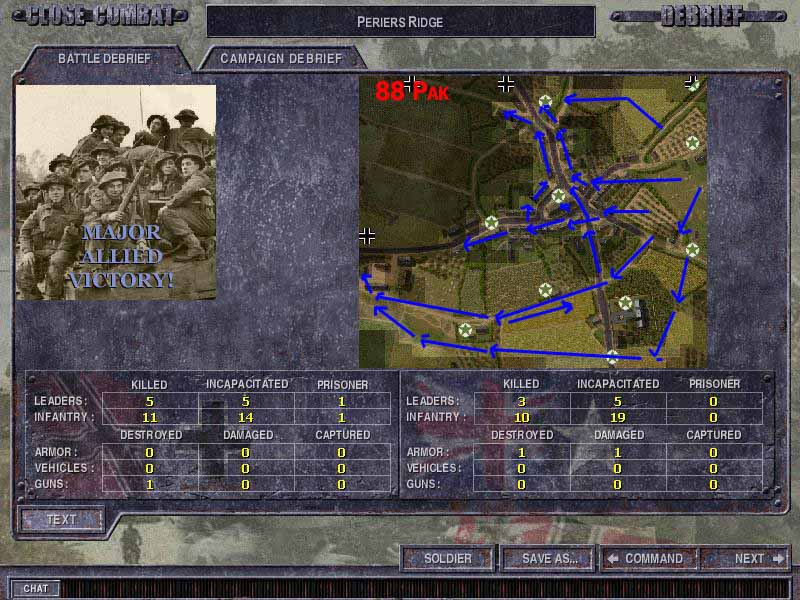
Perriers Ridge,
Perriers Ridge is prepared for defense.
The British main spearhead of attack was identified and Arty Barrage was called upon their heads.
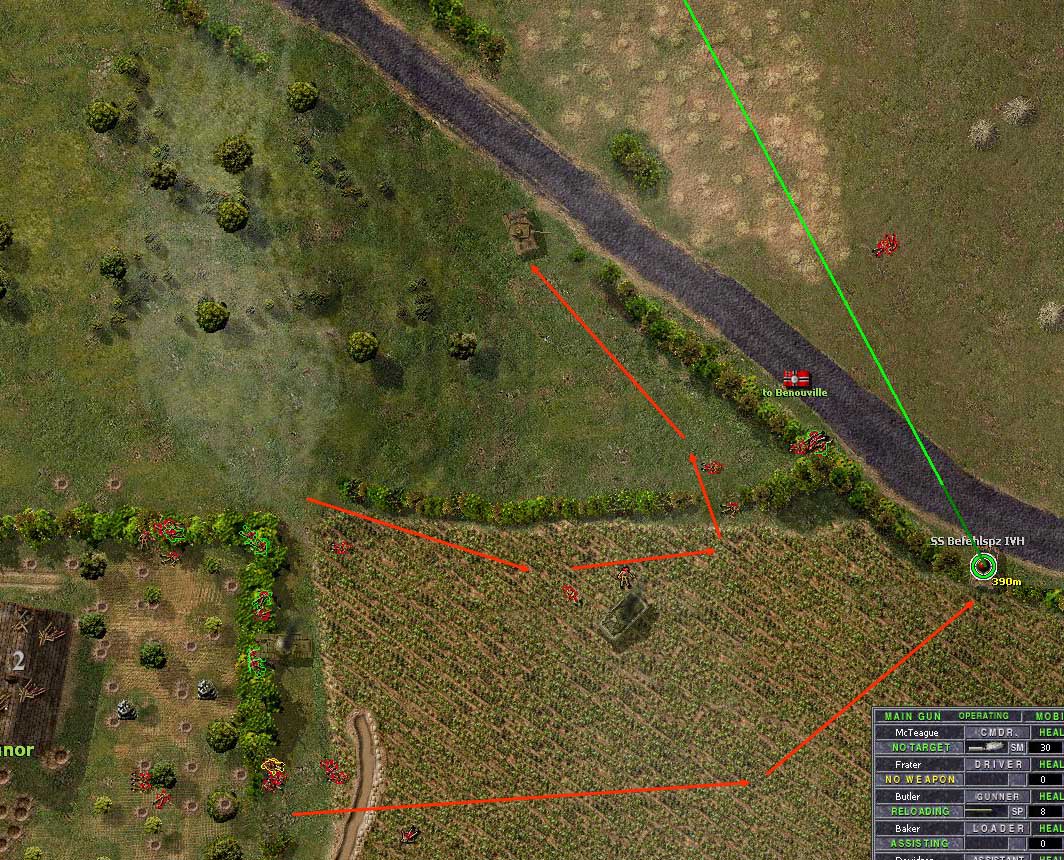
Pak 97/40 KO ShermanV DD that was moving to take to Benouville road ! After that the treacherous brits unleashed NAVAL barrage on our glorious ATG and destroyed it.
The fierce battle for the Chateau Monte.
2nd Pak97/40 got Churchill AVRE in sights and started to fire but suppression provided by Arty Barrage and Mortars fire was too strong to make accurate shot that’s why crew was ordered to abandon the gun and take cover as qualified gunners are in value these days.
After the NAVAL bombardment the area around the Farm looked like moon landscape with the only greandiere Bacher to defend it. He made his best killing and wounding numerous of enemies before his heroic death.
That was like a piece of cake for 8.8cm PaK43 to KO Churchill AVRE!
The results of that battle:
Thaon,
The dreaded Churchill Crocodile is in sight. But our men are prepared.
Marder I lost duel to Sherman VDD at medium range.
Our Gr.W. slows the advance of enemy infantry…
while PzAbwehr Trupp KO Sherman VDD
[img]Another Marder I was lost to Sherman VDD 7.5cm gun.
The path of enemy is covered with his dead soldiers!
The results of the battle:
Merville Area,
BG of 858./346.ID grouped to counter-attack of fortified area captured by the British Paratroopers.
Our Gr.W. place smoke screen to hide our Grenadiere from deadly MMG fire.
With support of 8.1cm Gr.W. our men advance to take first hedge.
The British ambushed Grenadiere with Hvy Inf weapons inflicting hvy casualties. Our soldiers had to stop their glorious advance and regroup.
The results of the battle:
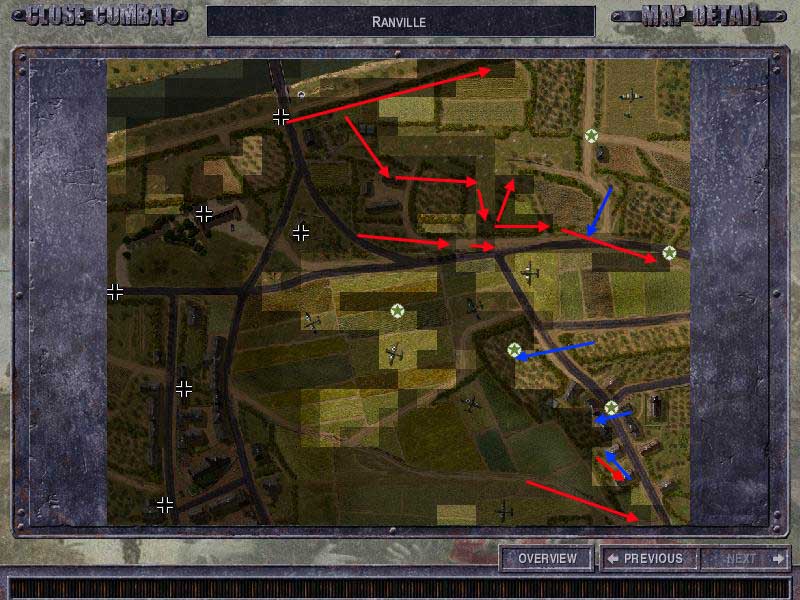
Ranville,
Mechanised BG of 22./21.PzD is grouped to attack Ranville that was captured by the British Paras last day.
Enemy ATG was spotted, zeroed and disabled by called Arty.
Attack goes pretty smooth with high casualties to the enemy, although we lost SdKfz 304(f) halftrack that was on reconnaissance mission.
The town is captured! All the enemy forces inside the town are annihilated.
Enemy Arty barrage managed to immob our PzIVG.
2 our PzIVH sustained suspension damages and couldn’t take part in those actions.
Another British ATG (76.2cm Pak) was destroyed by combine efforts.
Under results of initial success our PzGrenadiere were ordered to move fast to take more objectives, but unfortunately enemy was awaiting for them.
The results of the battle:
June 7th 1944, 2pm
Port-en-Bessin,
According to the order of high command Port-en-Bessin was abandoned.
Hillman Fortified Area,
BG of II./726./716.ID prepares it’s positions with over-turned front in order to repulse the attack of the British Armored unit of 7th AD.
The enemy infantry crawls toward bunkers under cover of 4 tanx. Our men slow their advance and inflicting casualties.
The British committed full scale attack on the road to Hermanville. But were repulsed with hvy casualties for the enemy.
The accurate shot of our 3.7cm PaK with Steil.Gr.41 KO Cromwell IV. After that PaK was KO by overwhelming guns of the British tanx.
The enemy plan to capture roads to Buron and to Perriers Ridge were stopped by accurate fire of our Gr.W.
The results of the battle:
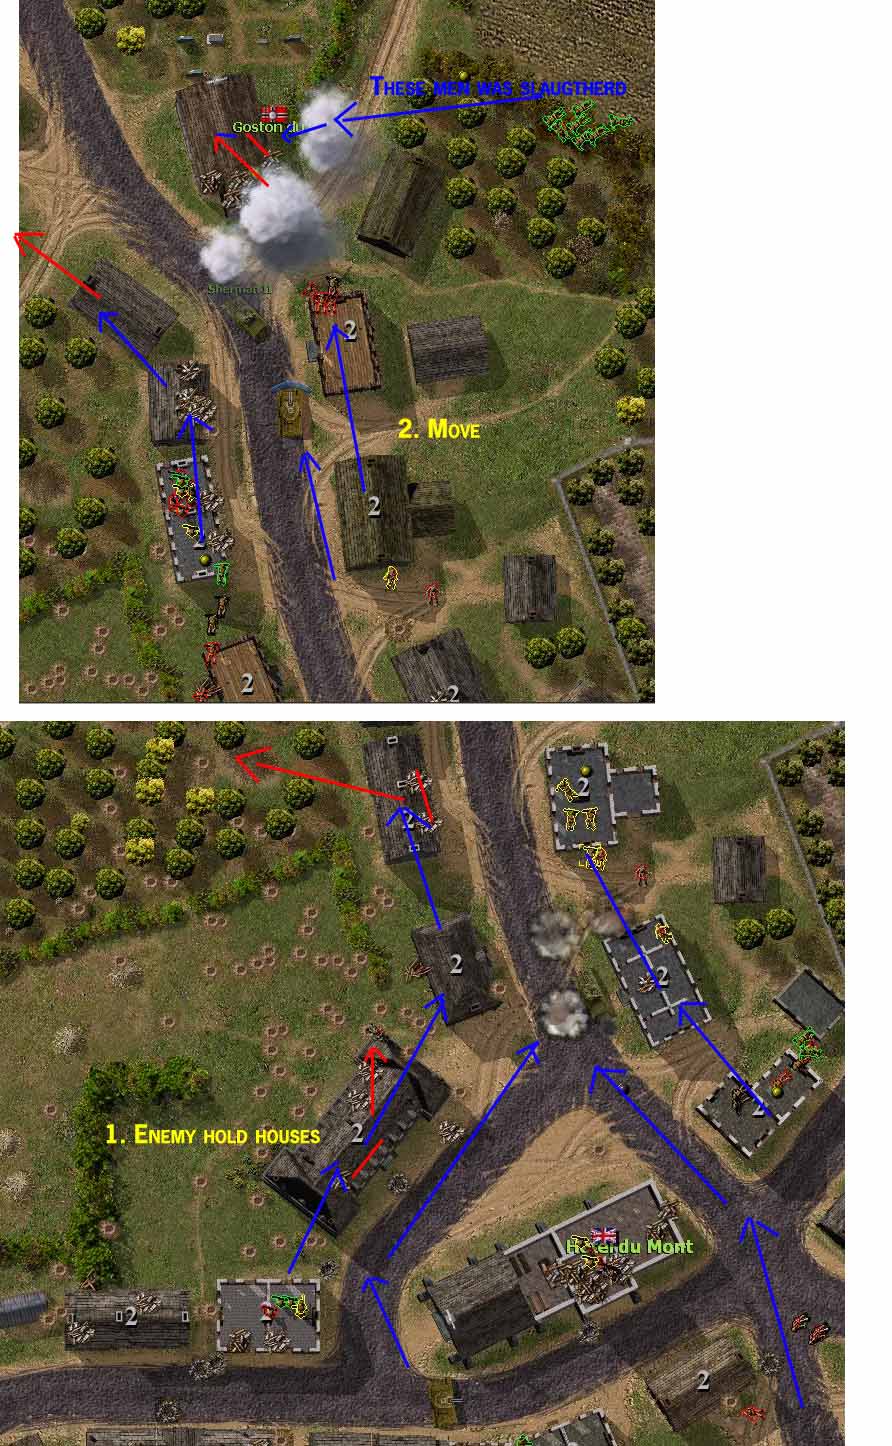
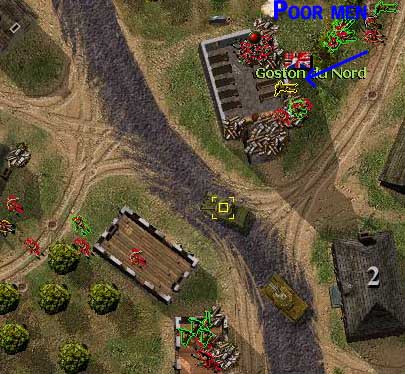
Perriers Ridge,
I./736./716.ID regrouped to withstand another attack of the combined BG of the British 8th/3rd ID.
Enemy infantry and tanx push hard on our brave Grenadiere.
Our men fought brave but the odds were too overwhelming – the houses are lost.
The enemy moves Crabs in to help his infantry.
Under cover of smoke screen the British infantry and tanx advance through the town.
The results of the battle:
Benouville,
II./192./21.PzD takes it’s positions to meet the combined BG of the British 9th / 3rd ID.
Churchill AVRE is KO by 8.8cm FlaK covering the road.
They mis-zeroed our Flak and called NAVAL barrage in different area! Flak wasn’t destroyed.
[/img]
Our brave PzGreandiere fight fiercely against overwhelming odds.
8.8cm FlaK KO another tank – this time Sherman VDD.
The last defender tries to hold the enemy but odds are not in his advantage.
The results of the battle:
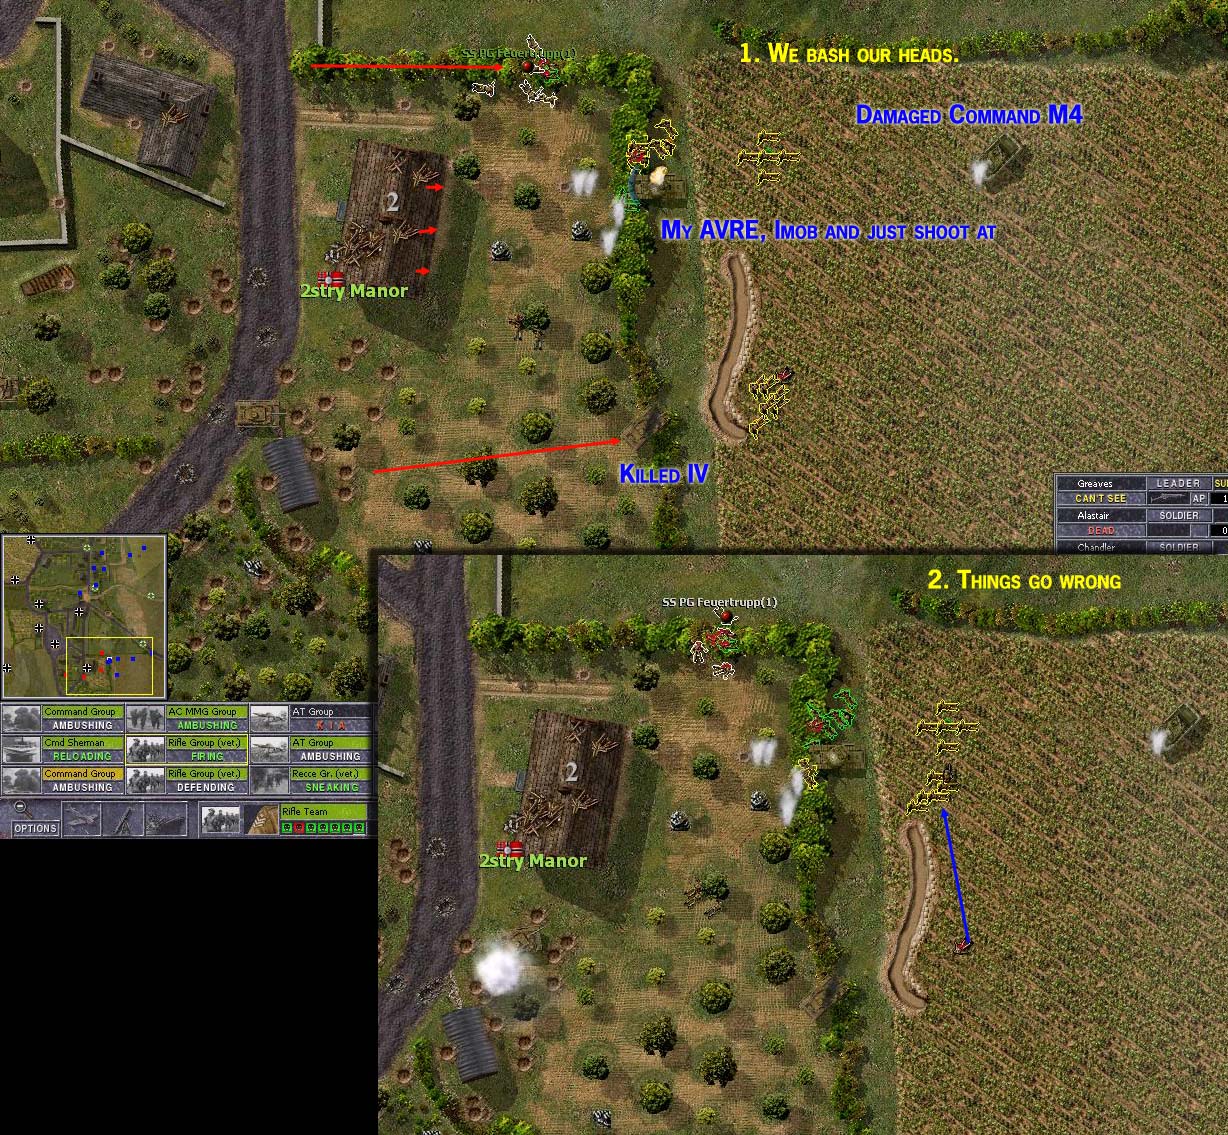
Merville Area,
BG of 858./346.ID prepares to expand it’s gains during last battle.
Spaher Trupp that was send to scout possible attack routes was annihilated.
h[img]ttp://www.closecombatseries.net/dima/vs_Stalk(TRSM%20097)/07.06/vs_Stalk_07.06.440069.jpg[/img]
Greandiere advance under covering fire of Marder IIIM.
The smoke screen is provided to screen our men from lethal fire.
Despite the hvy casualties the first bunker is captured !
The results of the battle:
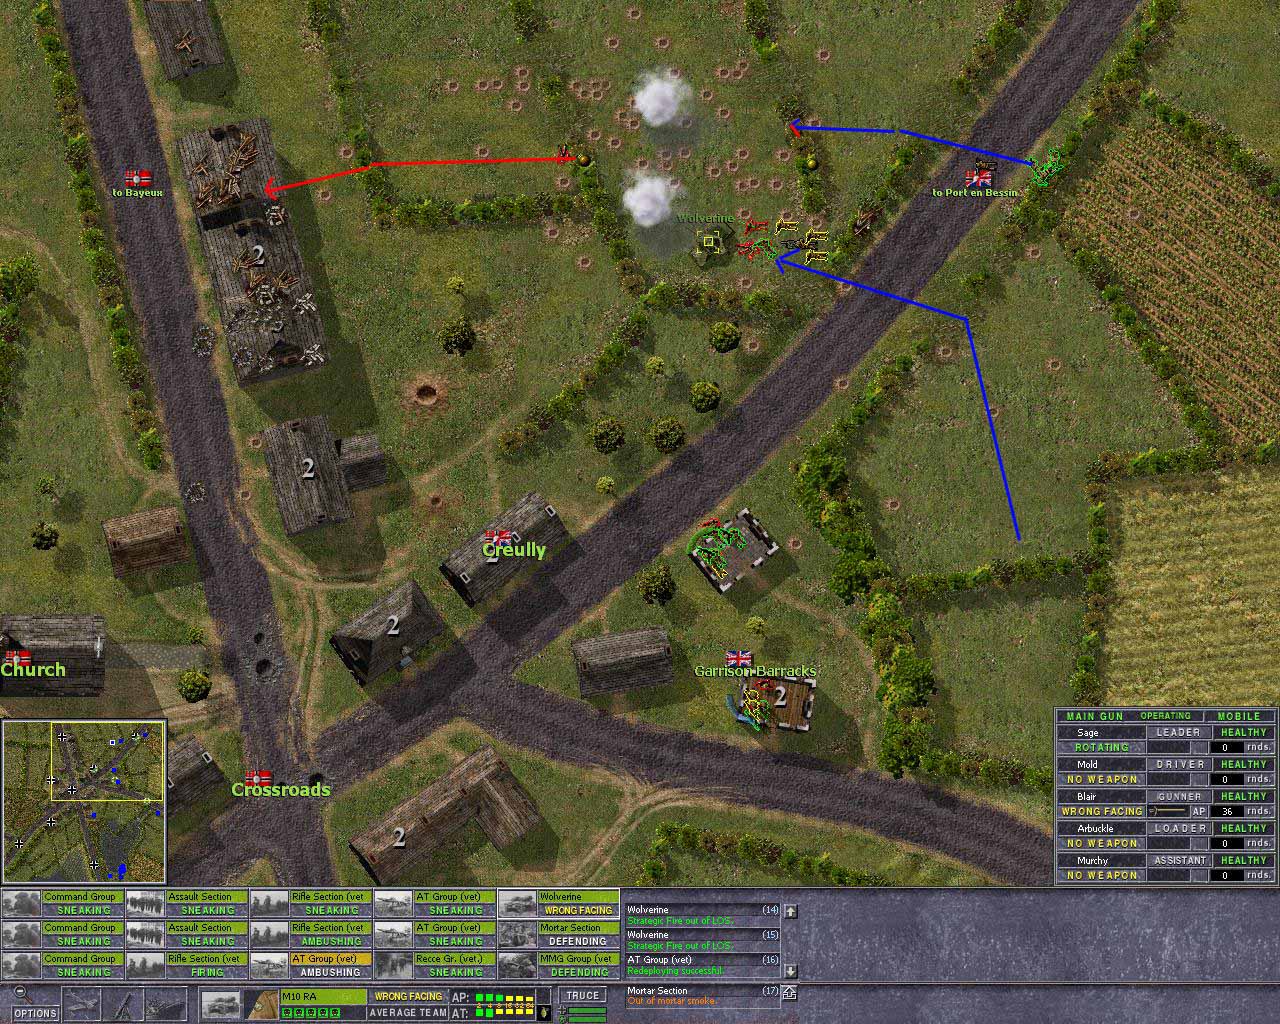
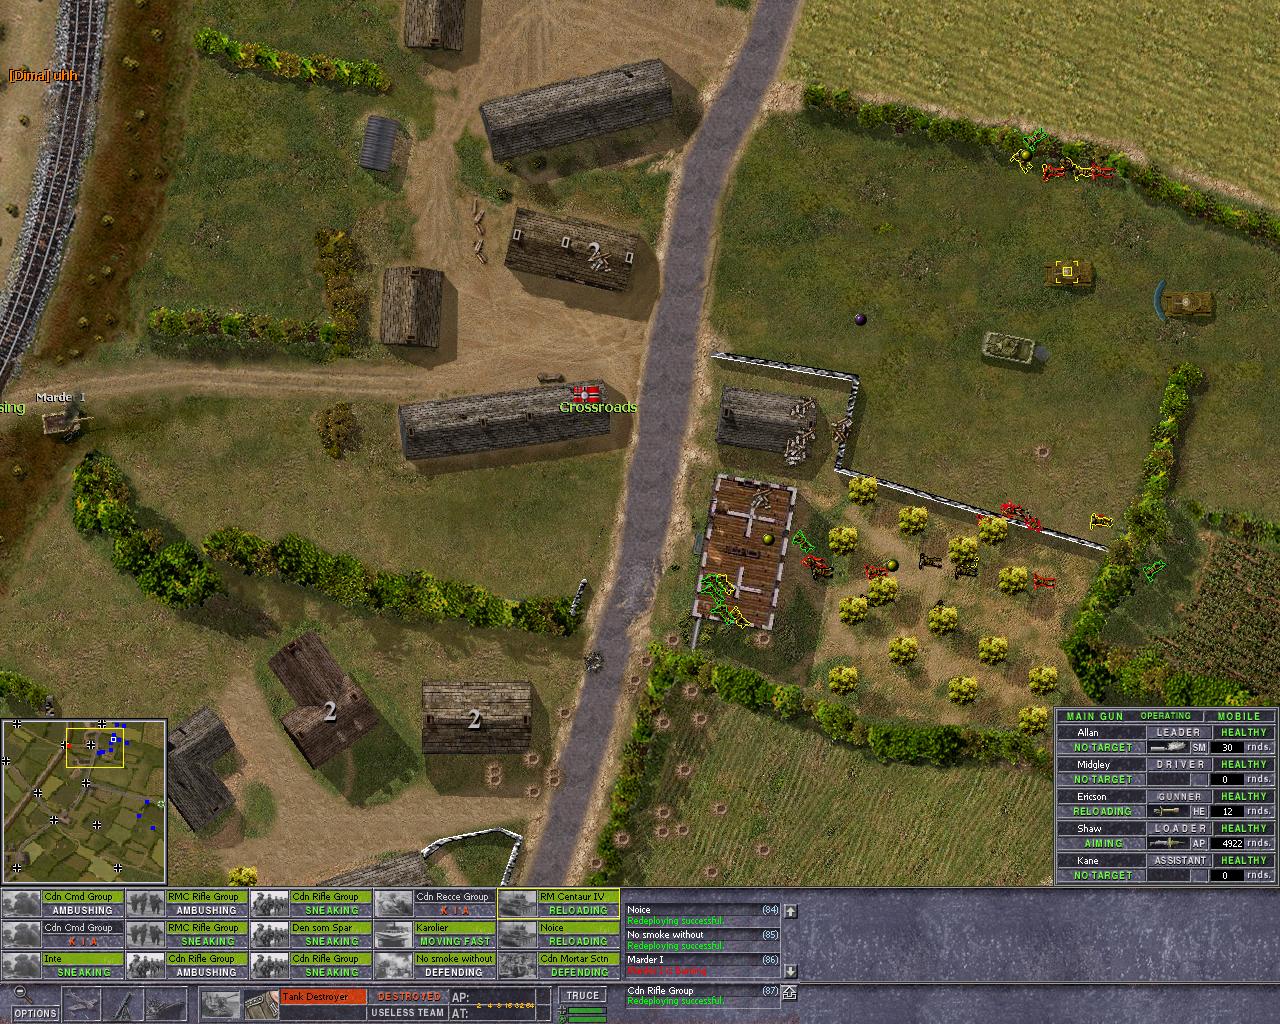
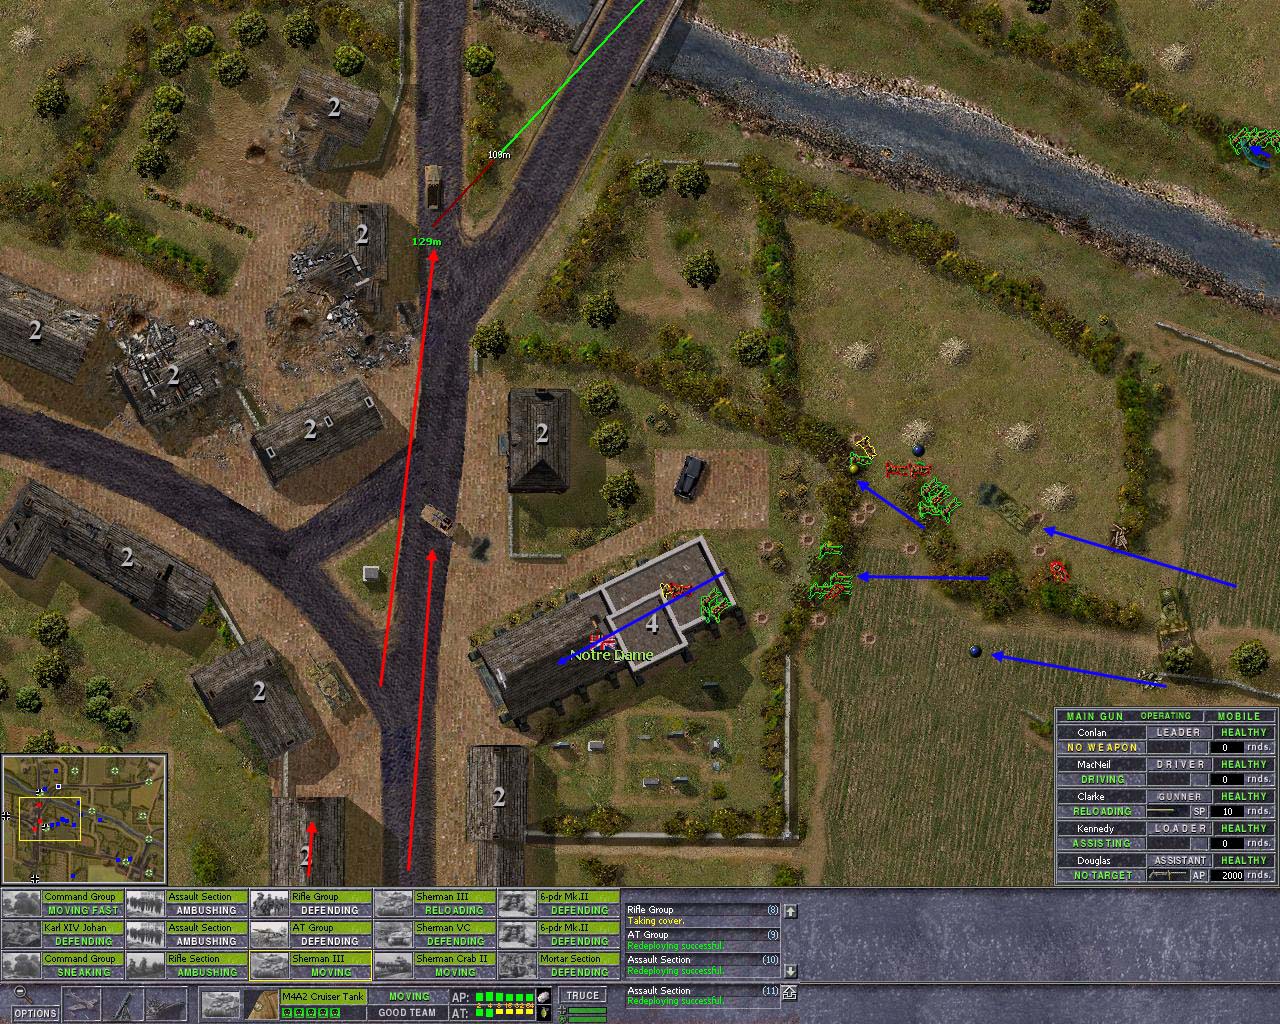
Im on my way to Bayux, and this is a map one need through fast,
I already move a Bg through, and this Germans BG is just in the way.
What to do? I have a infantry BG, no fancy tanks, just a few tank killers,
and Germans hold it with some lousy troops, and they still have guns.
I decide to take a TD up North and some infantry and make a terrible sound with em,
hoping to get Dima to move his units North to meet em.
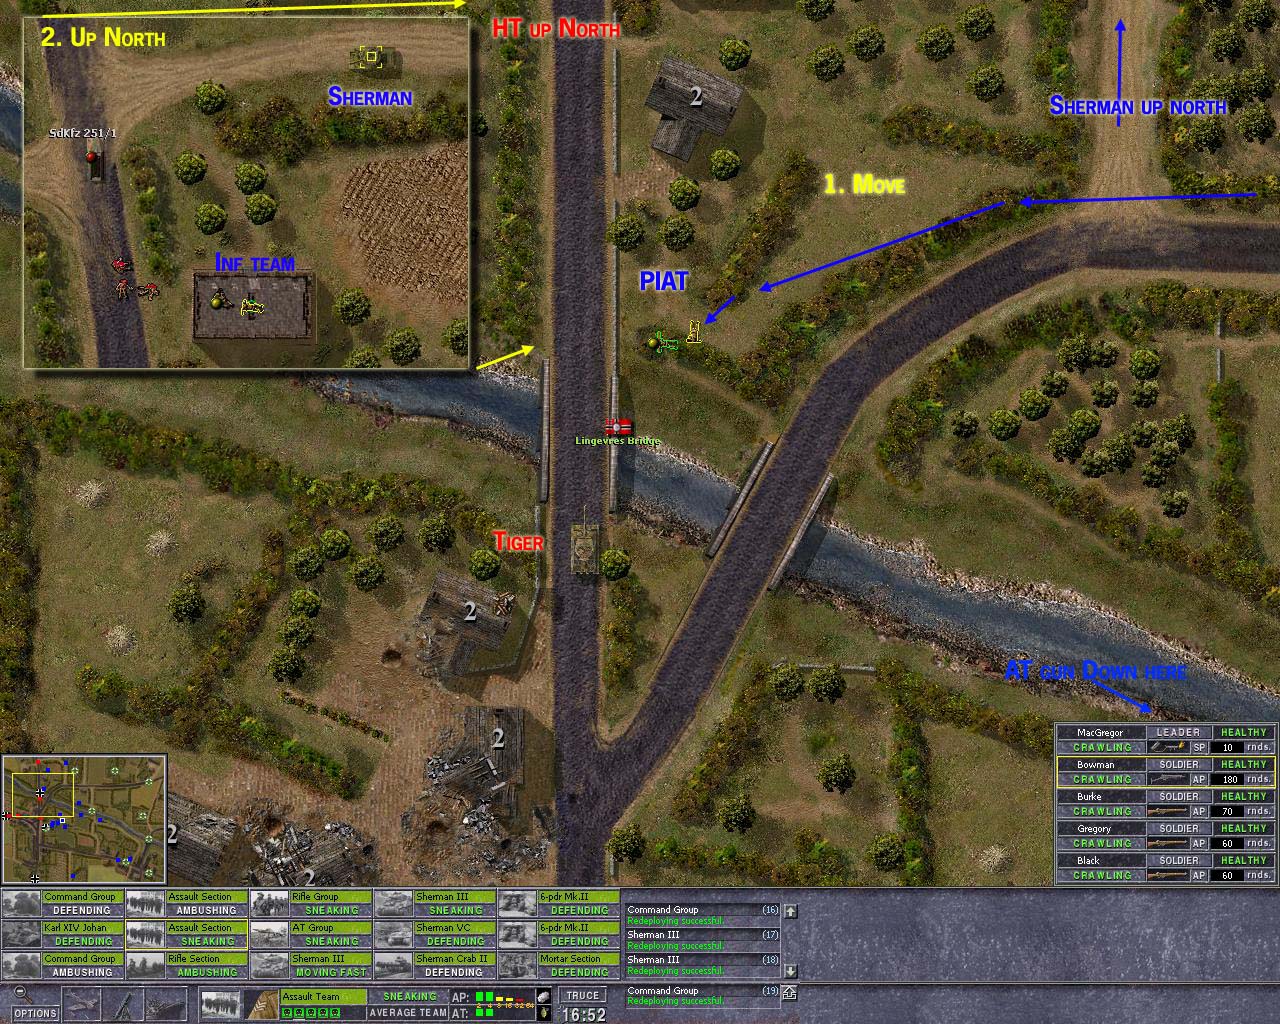
And I sneak down south with main force of infantry, just try flank him.
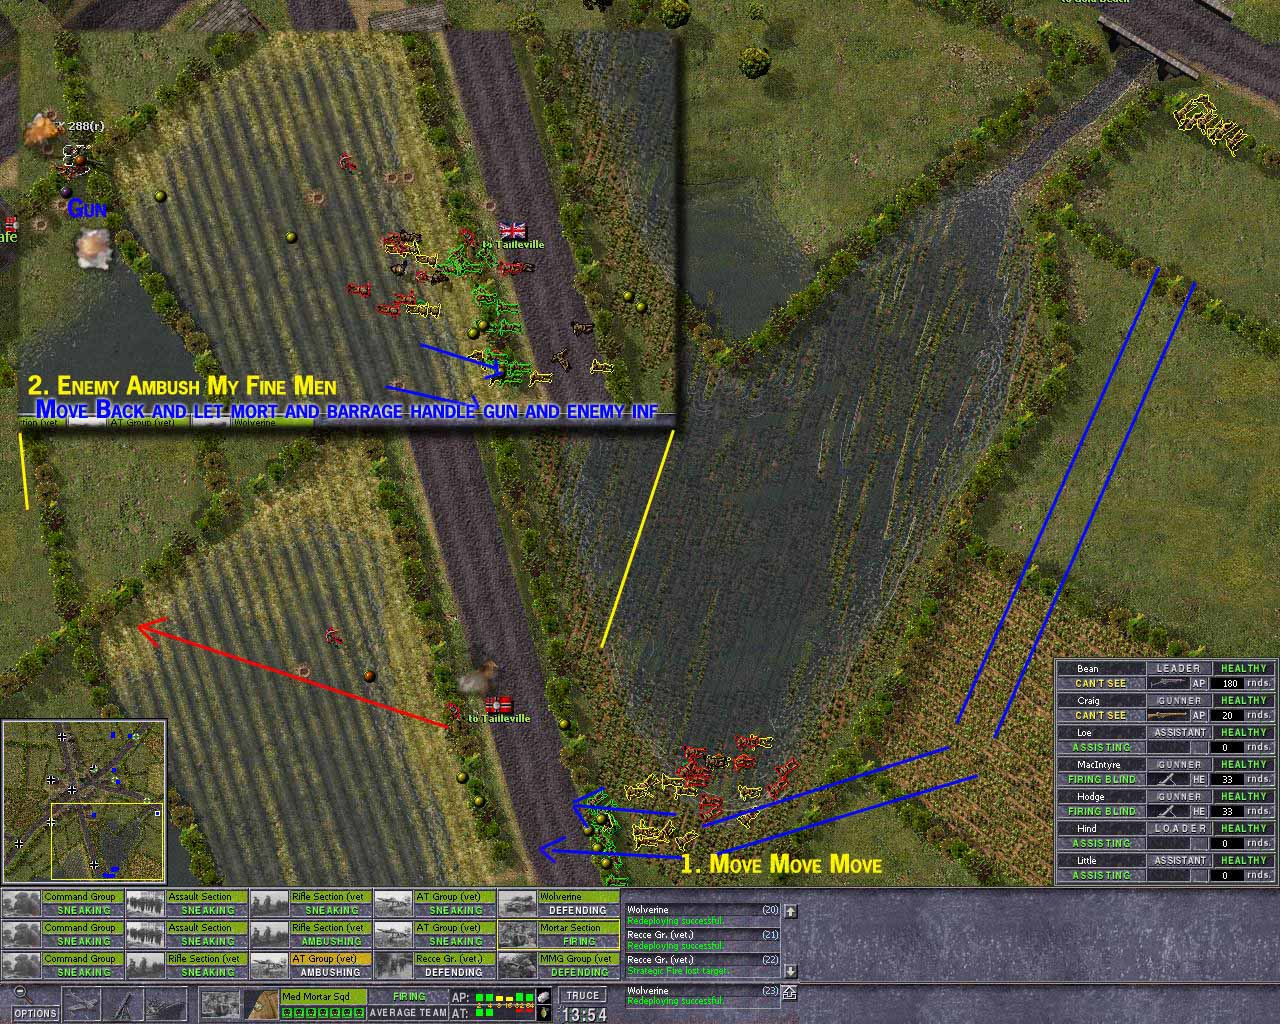
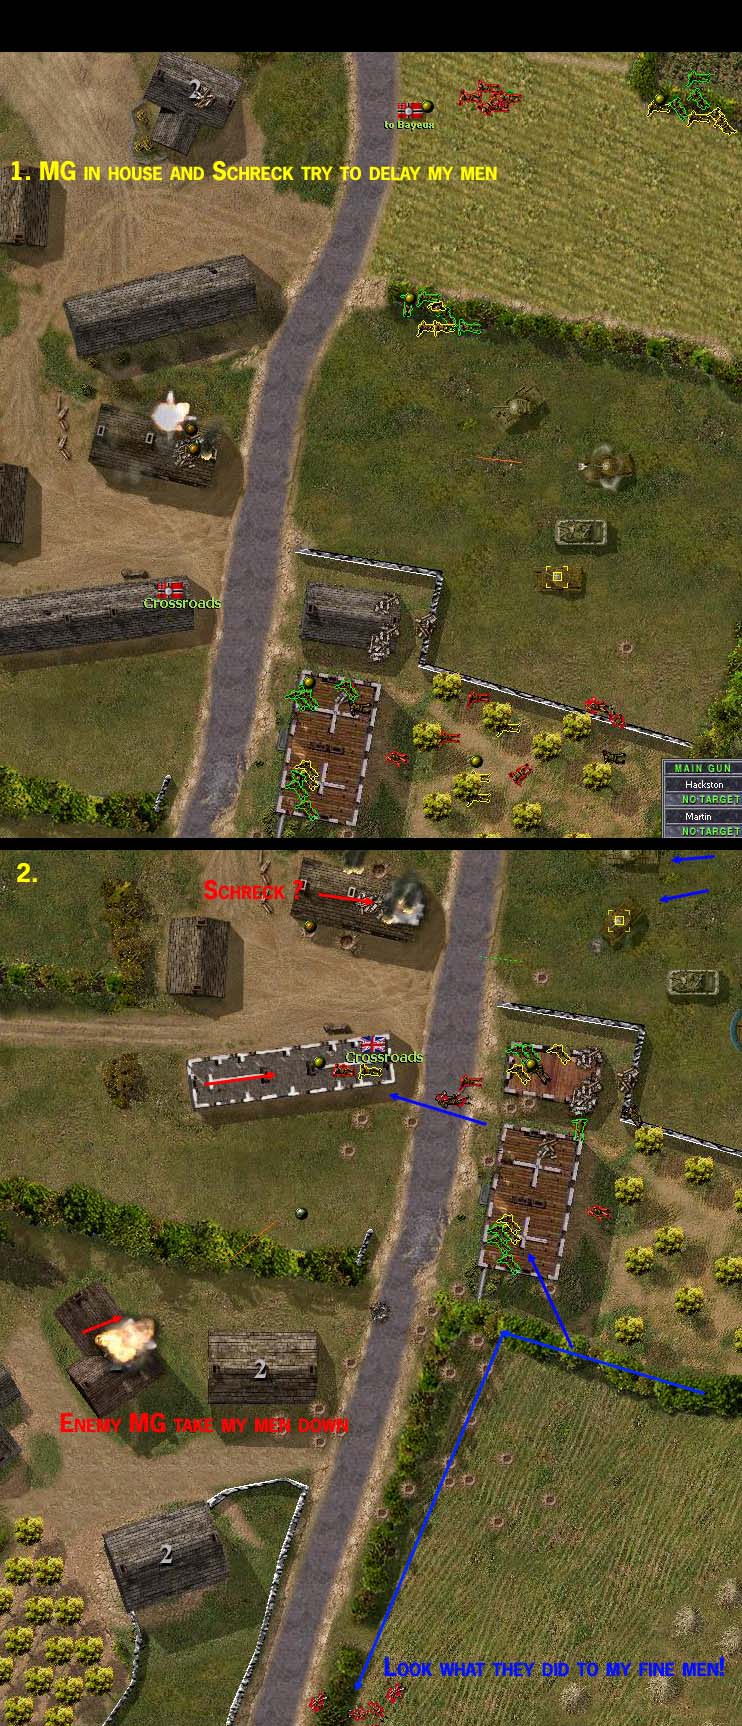
Well, seem he w8ted for me, to come with TD here, a bun and infantry was ambushing in a nasty place.
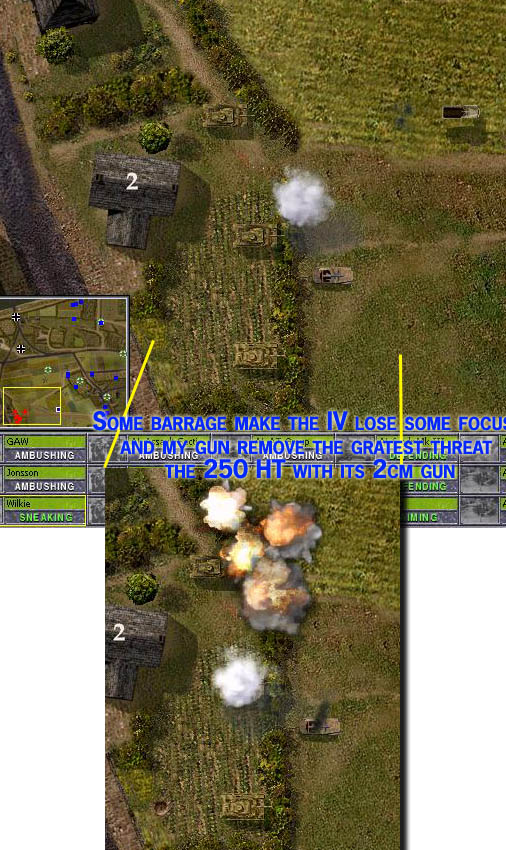
I have to move my men back and have the morts and barrage do its job.
As gun is destroyed my inf focus on kill that enemy infantry team, massive supperiorety in fire power do it.
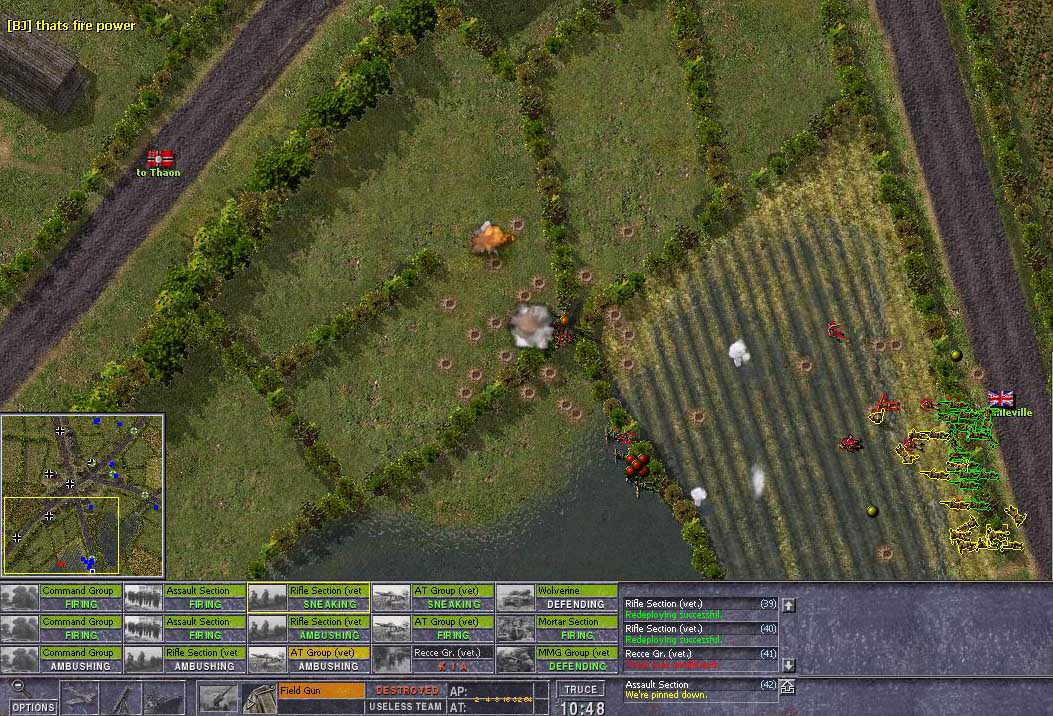
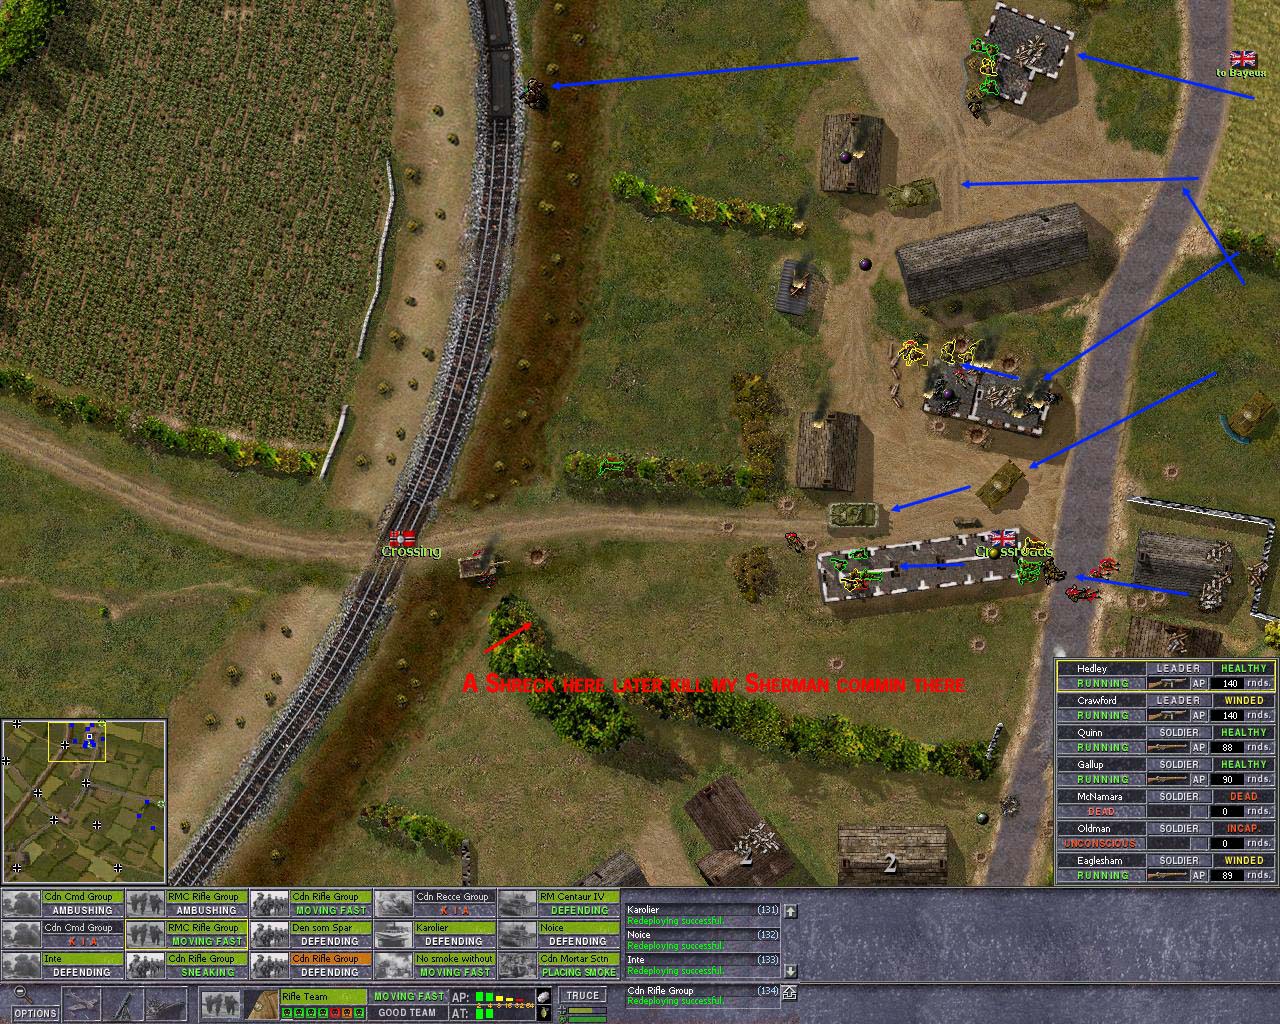
Well, seem Dima have got a idea what to come in south and flank, and he move his infantry fast and with care,
and hes set up a nasty ambush again, a bit further up.
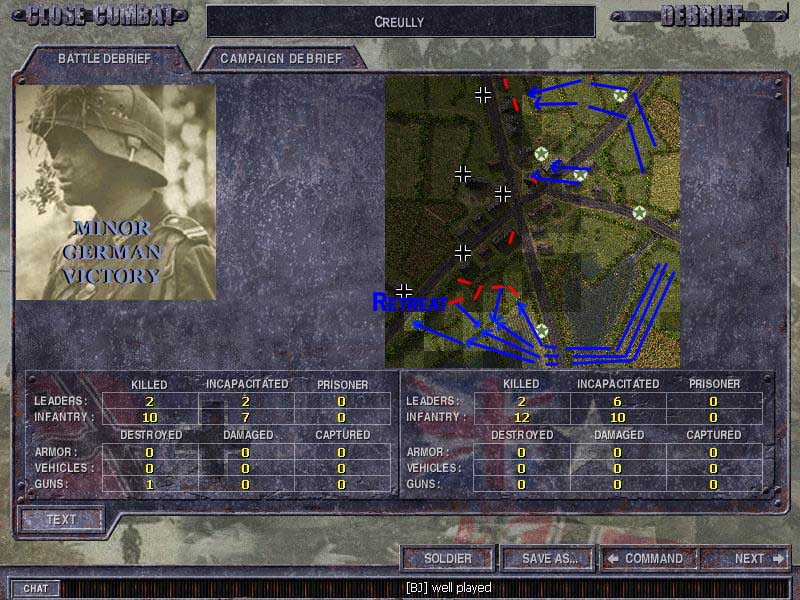
Yah end result, he blocked the south flank movement really good.
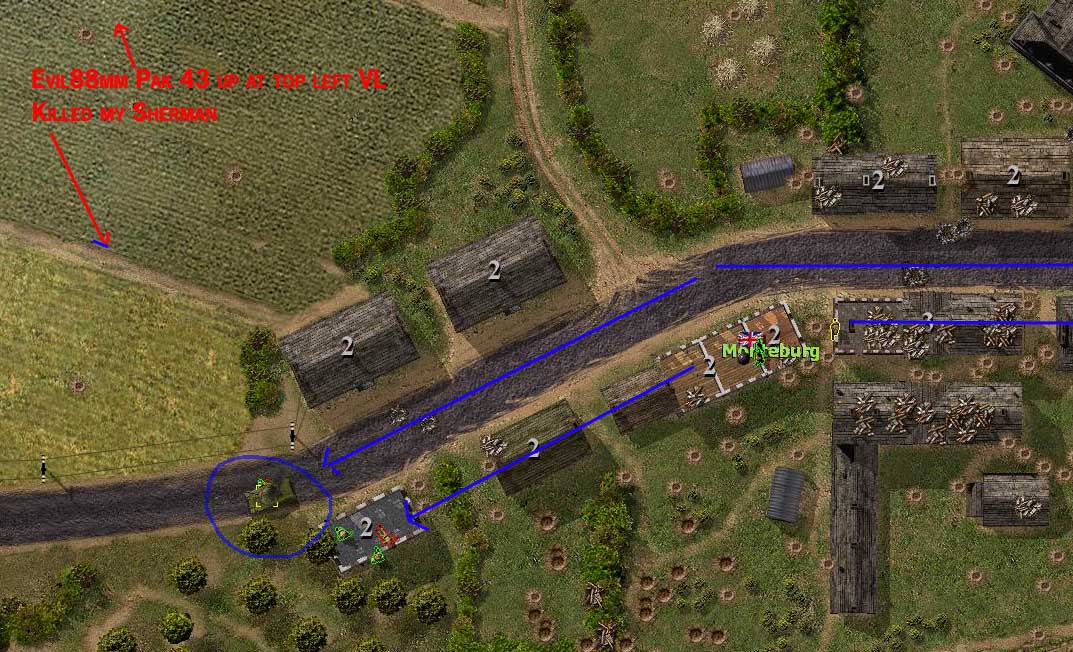
Map: Monteburg
Date 8 th
Yah, I know he had a 88, but a bit of gamble with the Sherman, and I hoped to destroy the 88 with barrage,
not so, placed it at wrong place. So my poor Sherman was blown up.
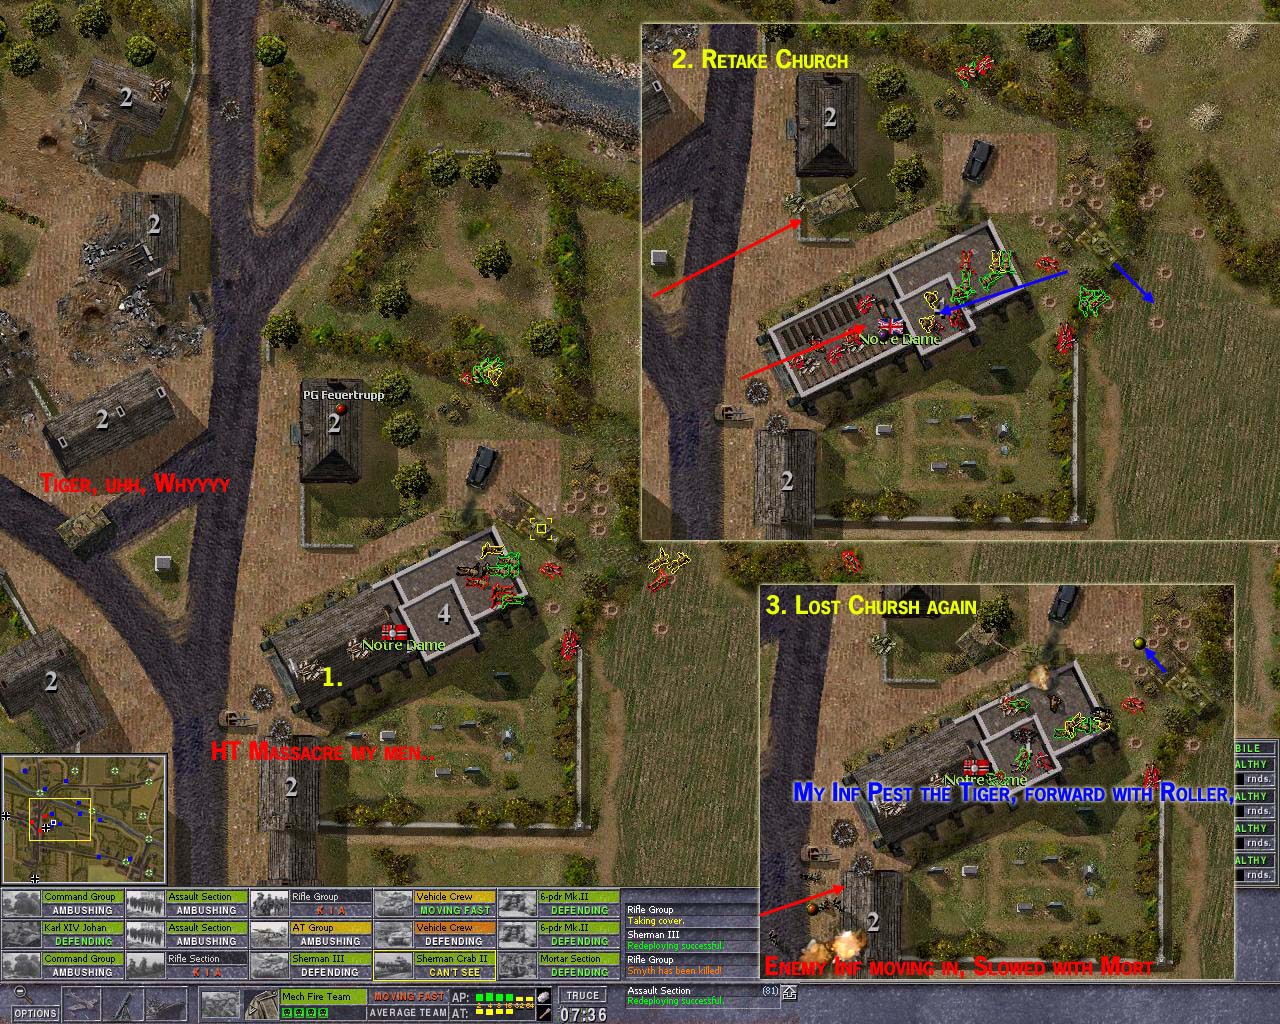
Yah, in center we fight for control, Dima try to get as much as he can for free, and try to get as many free shoots of as possible.
We must keep this thing moving, and with support of a 95mm howitzer and later a 20mm tank the UK infantry clear one house after the other.
At the church I expected the enemy to be so week after I shelled that house really well,
so he would not be able to do much at all, well, not all go to plans, as mo Right side team move in they are massacred, why?
Nasty, but his team is basically dead in the process.
In the end, the whole city is in Uk control, and the nasty dimish Germans are cornered in a impossible position.
It was expensive, 37 men, and 1 tank. But who cares, he have to redraw next time,
and battle will be over here. It’s the end result that matters.
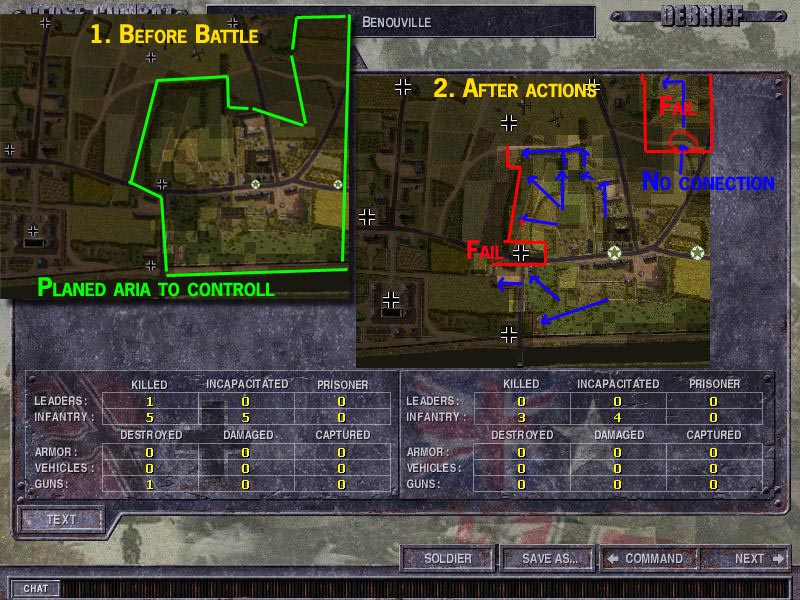
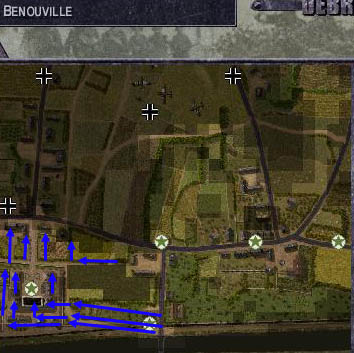
Map: Benouville
Date 8 th
General plan, see green aria, I want to control that aria so I have a better position to next round.
Im up vs the German 192/21, so its no second rated BG, and I fear what Dima may do with em.
As it happens, this Bg will be out of fuel next round, so there marders will stand still, and that will make things more easy.
Conclusion, I don’t have to fight that hard this battle as enemy will lose its moving ability next rnd.
The green outline, would be grate to have as I then can place a AT guns in all hedge next battle,
and as dima will then rely only on AT guns, I may conter them guns with my own guns..
End result is ok, but I failed in connect the right side cleard aria to a VL, so I cant use it,
all work there for nothing, I here dima laughing over the radio..
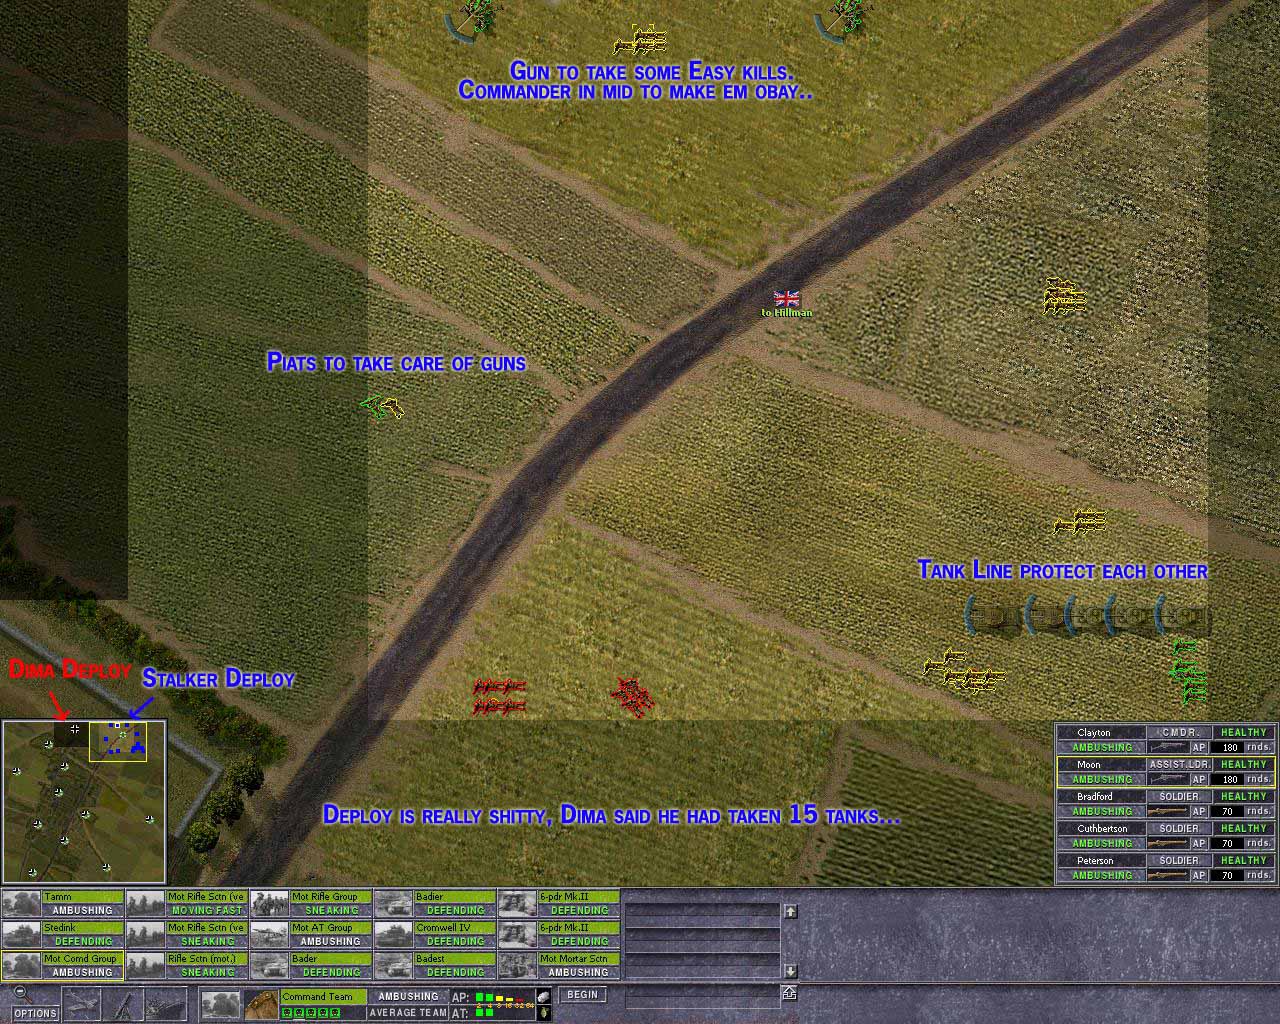
Map: Buron
Date 8 th
Okay men, there been what we call a meeting butchering. Or was it meeting butchering?
Well, stupid, we ended up enter this map next to each others, and I have no hedge, nothing to hide in.
Over the radio I here Dima giggle, haha, I have 15 tanks, care to truce? ‘
I have no idea what truce mean, but if he have 15 tanks and meet me with em my men may have a bad day.
Actually I was not aware of this as we enterd the map, so my men and me was a bit shaky.
Plan, set 2 AT guns to be able to pick of tanks and maybe AT guns, the Tanks I have I set on a line,
as to minimize the number of possible German tanks fire at one of my tanks.
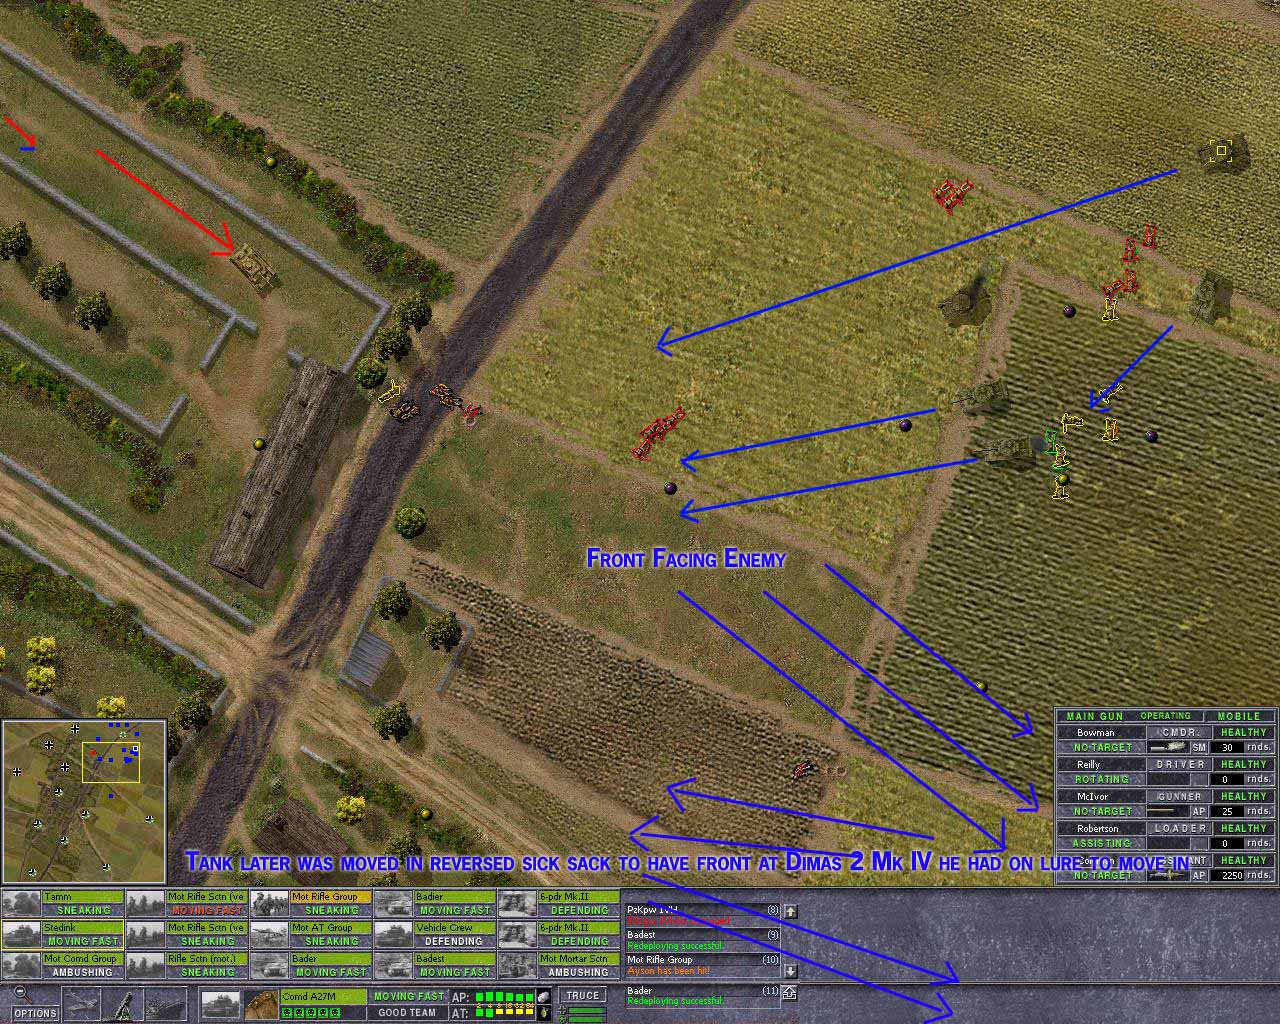
Seem dima BS me, he dint have 15 tanks, he moved south and tried to grab as much as possible,
and moved in 2 IV at north wich my nice consield guns made smoke of.
He then moved in a third and forth Iv:
The north threat was gone the IV was smoking, now I move fast with front facing the new threat.
Dima see my 3 FF with its 17 pdr, and decided it was better to redraw, and face em in the front.
My tanks sack its way down the map, as Dima lurks in every clearance and fire with his 75mm L48.
Ya, in end my brave men go sown south right side, and move up the Left side:
(minimap in image show how movement was done)
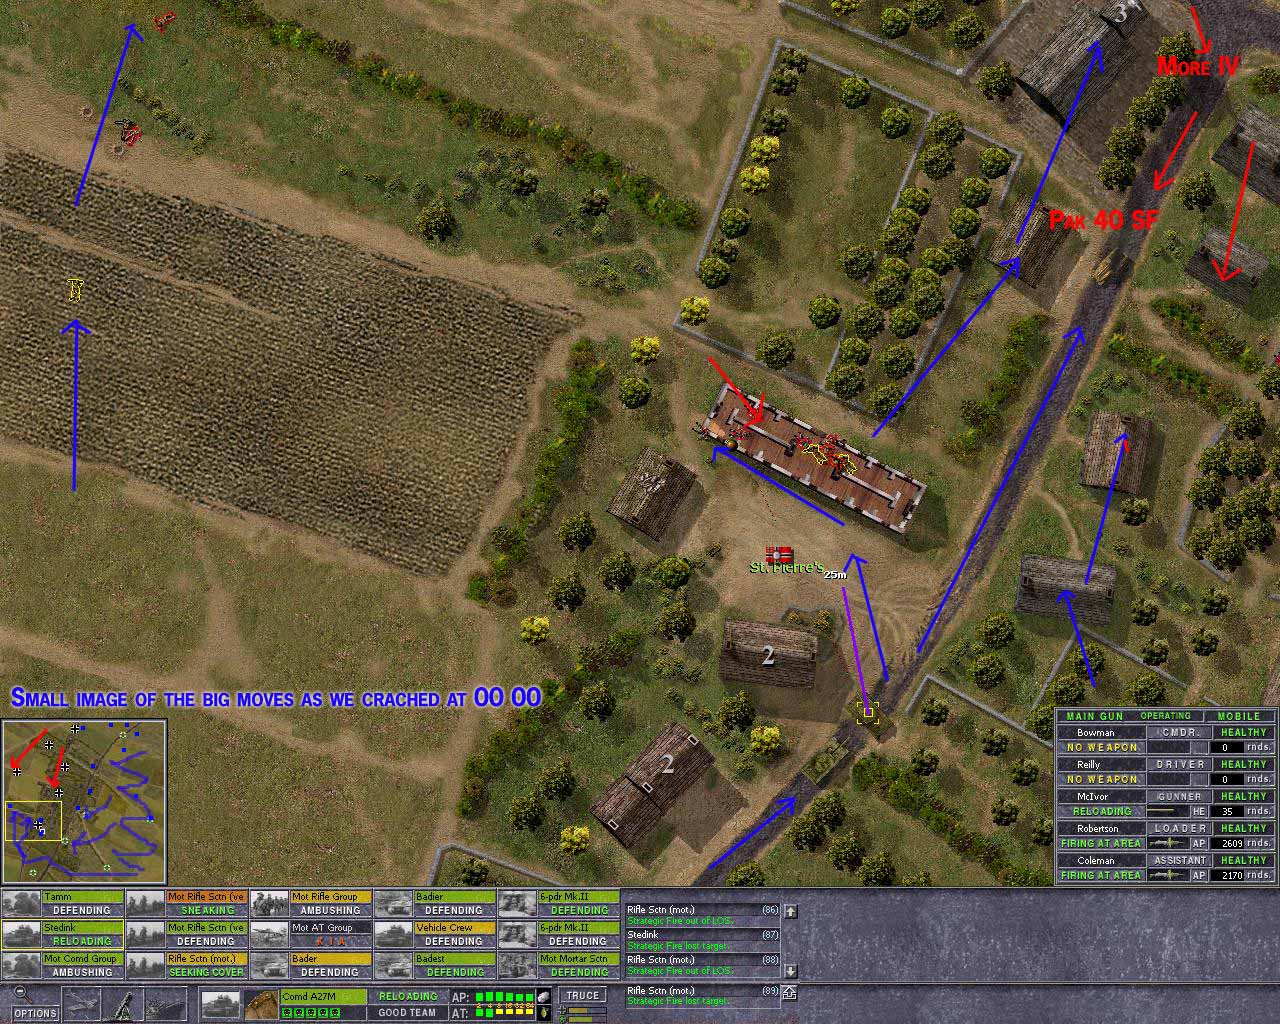
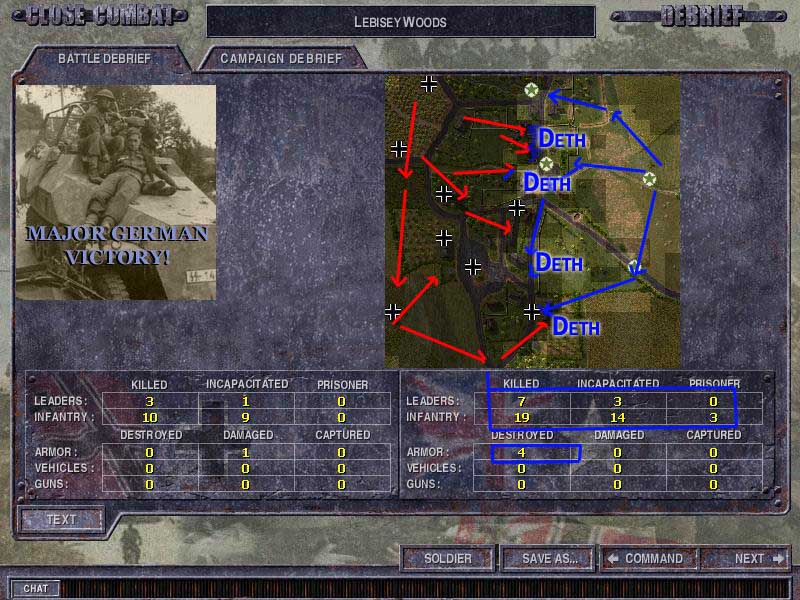
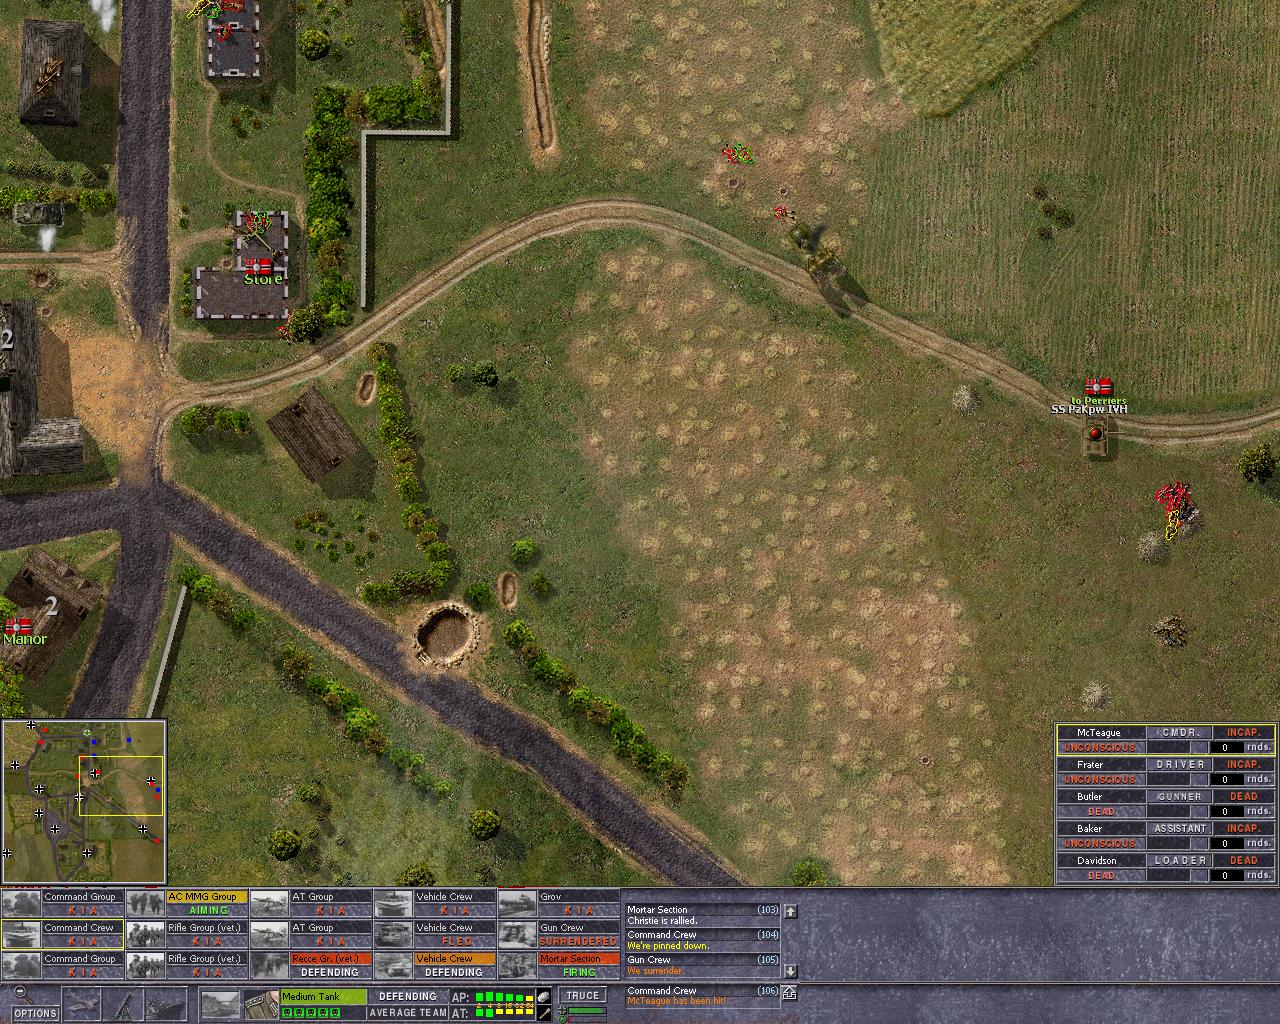
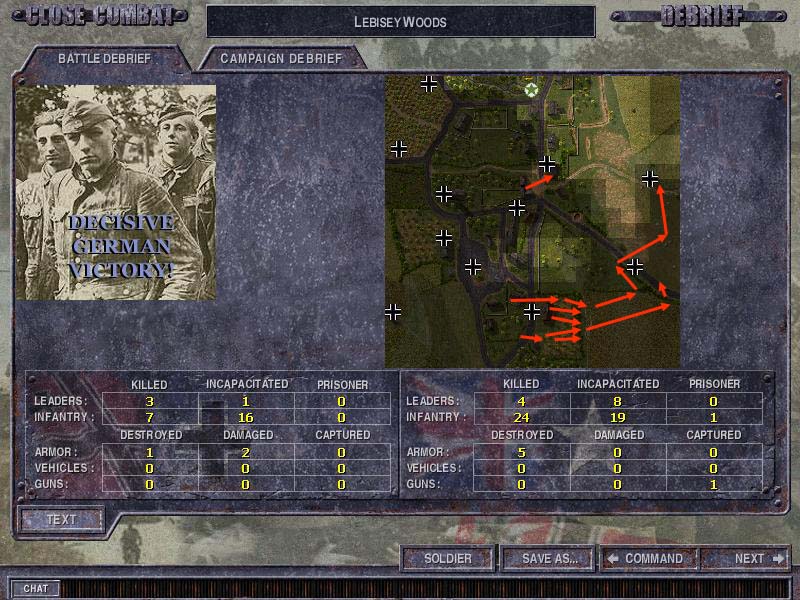
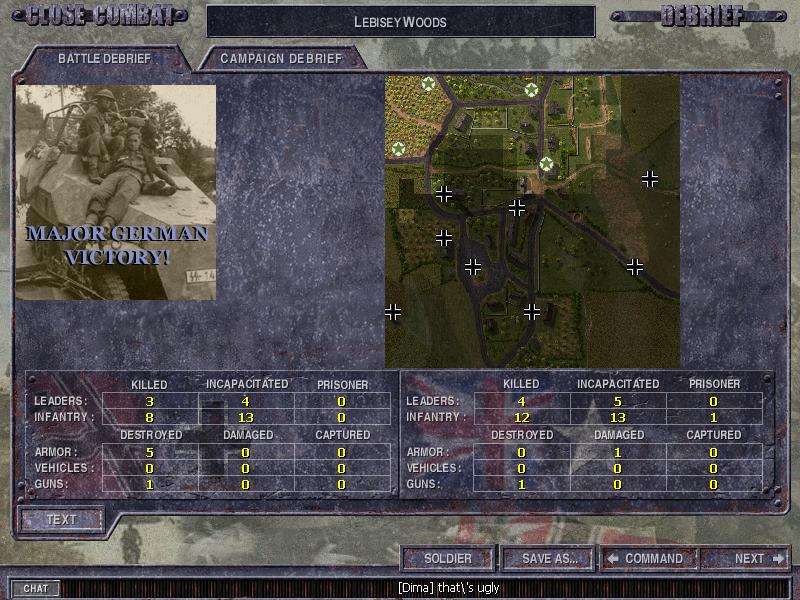
Map: Lebsisey Woods
Date 8 th
Okay men, we are up against Dimas Pz units again. We it will be vital to get a foothold in the village before Dima take it all.
He has the Mk IV, and we have a few FF, but we also take some mine rollers they have extra
armoured in front and fast moving turret, that shall be his doom.
So I thought.
This was a nightmare battle I refuse to talk more about. I deny even commanding my troops here,
it was probly the AI who Dimas Germans defeated so badly. (who took images)
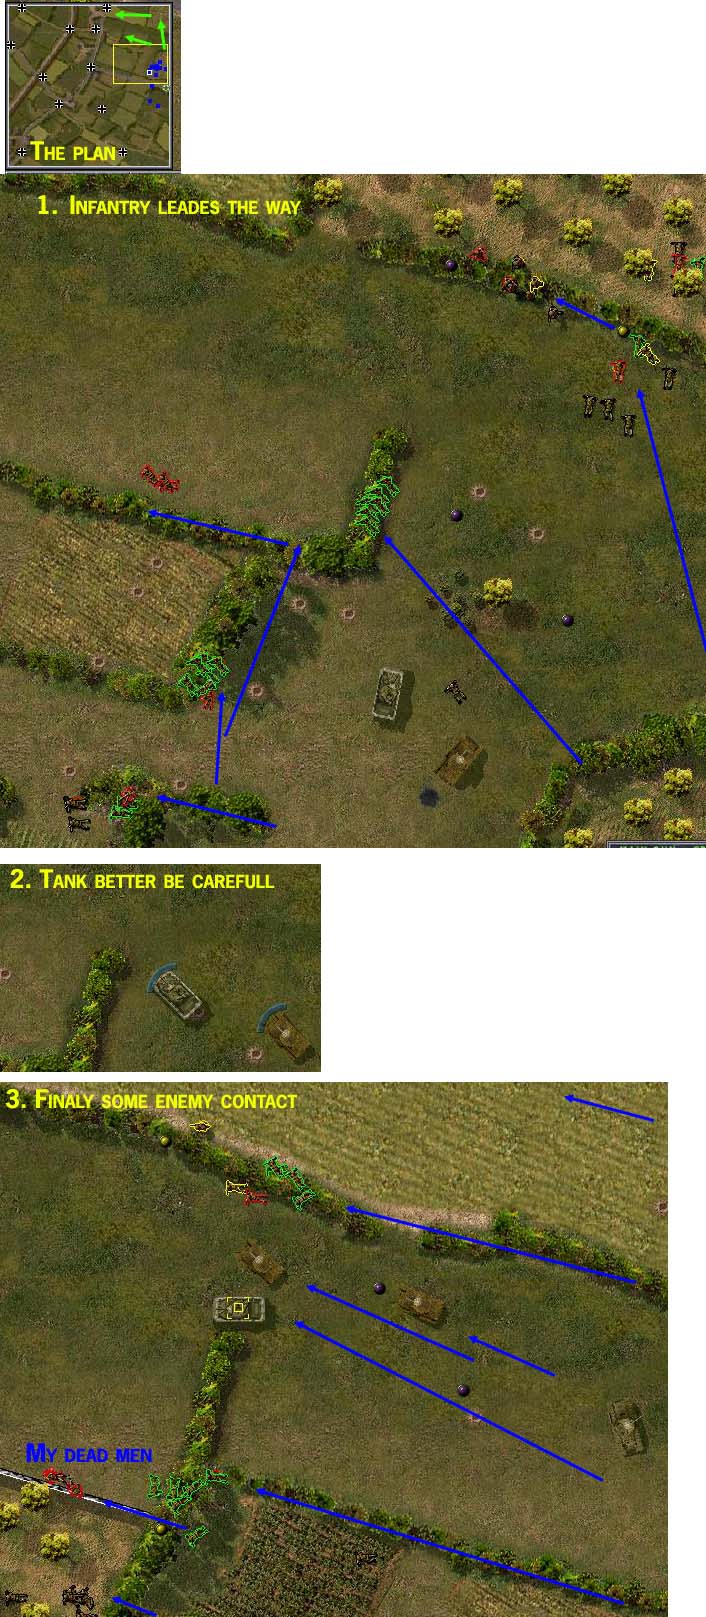
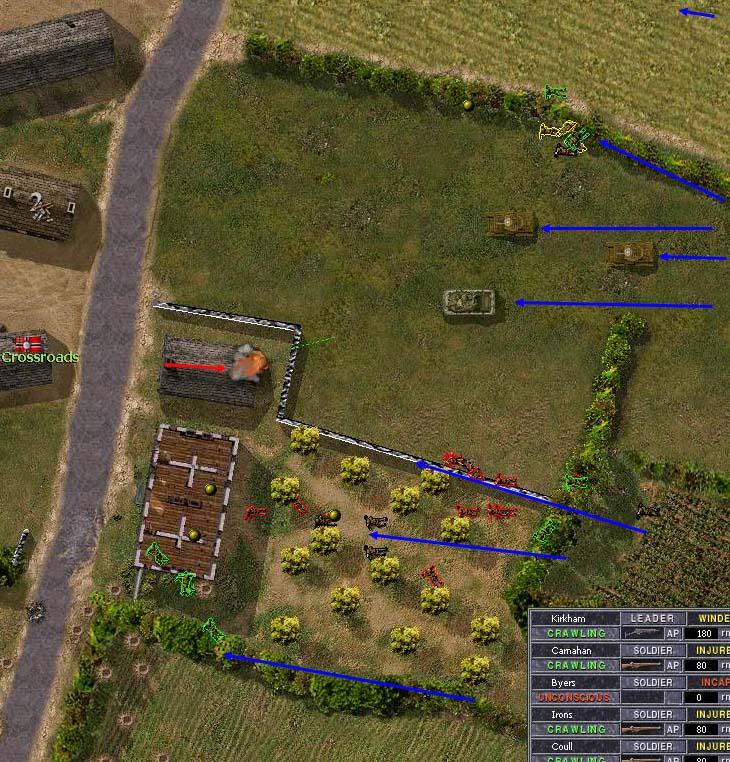
Date 8 th
Revenge!
Yeh, the enemy has just some AT guns, but they have the stick HEAT grenade model monster.
So be hit by it, will likely take out my fine tanks.
In the end the enemy gun fought bravely, but I had 3 tanks fire at it simultaneously, and the guns crew was destroyed.
The enemy MG tried to slow down the movement, but, what can one do was combined tank and infantry.
The enemy infantry team ambushed in houses, but again, tanks support, and infantry just flush the Germans out,
and tanks destroy em, move move move and men remember our lost brothers in Lingevre, revenge em.
Last edited by AT_Stalky on Sun Aug 03, 2008 9:21 am; edited 1 time in total
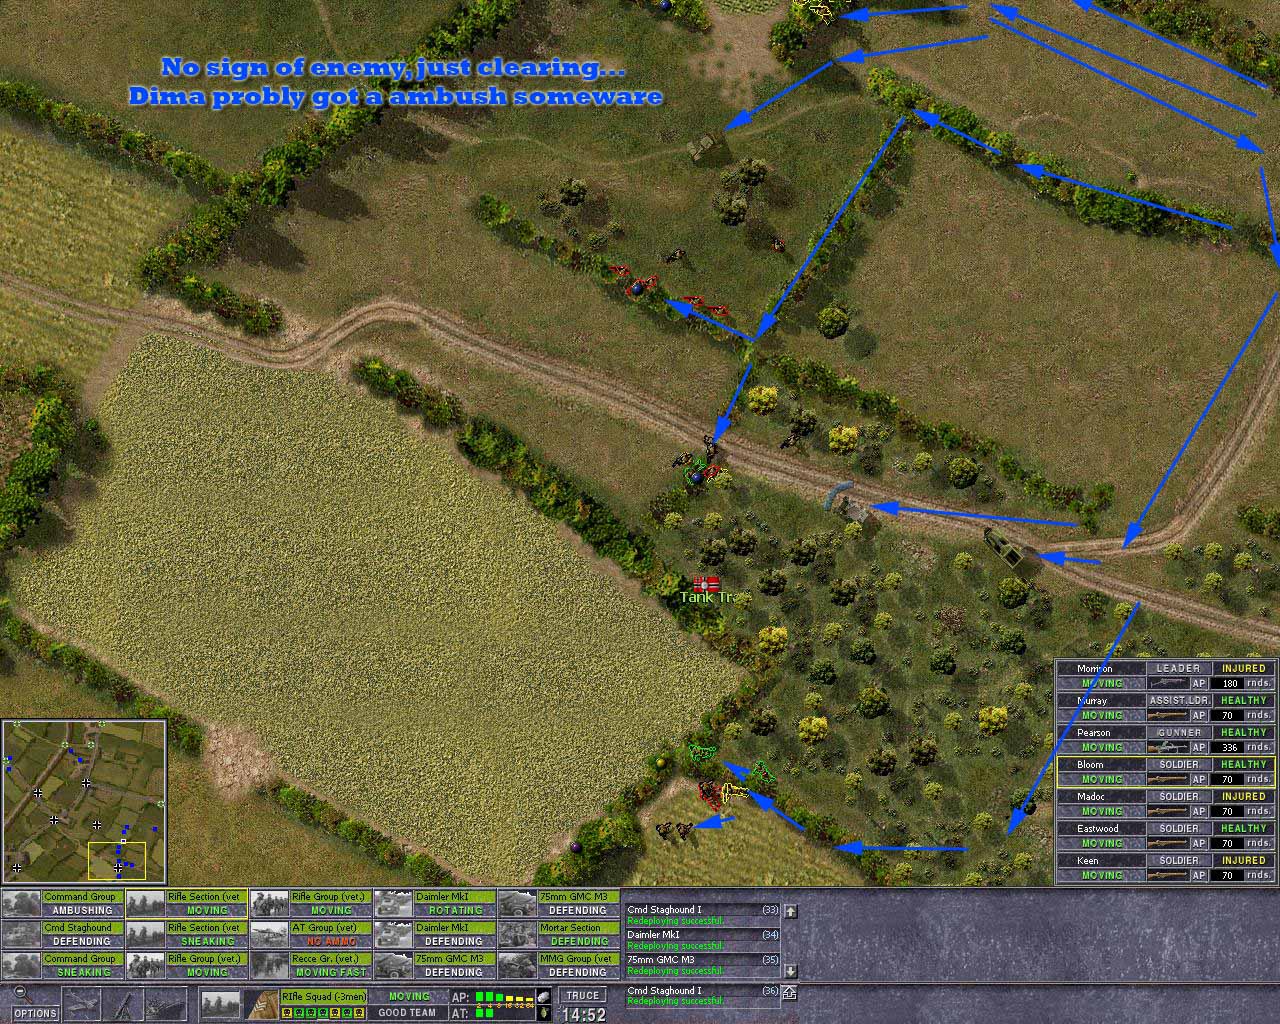
Dima has a Pz BG and control the maps West side, I have my AL BG, and have just a few guns left.
What’s his objective? Hard to say, He may go north, and try to roll up my aria there
and have a more easy way to pass into my South East controlled village. That’s logical he try just that, so I figure Dima figured that I have thought so,
he will go south just for that, and then he may use his long guns of his IV to remove any gun I have.
I will be strong in South.
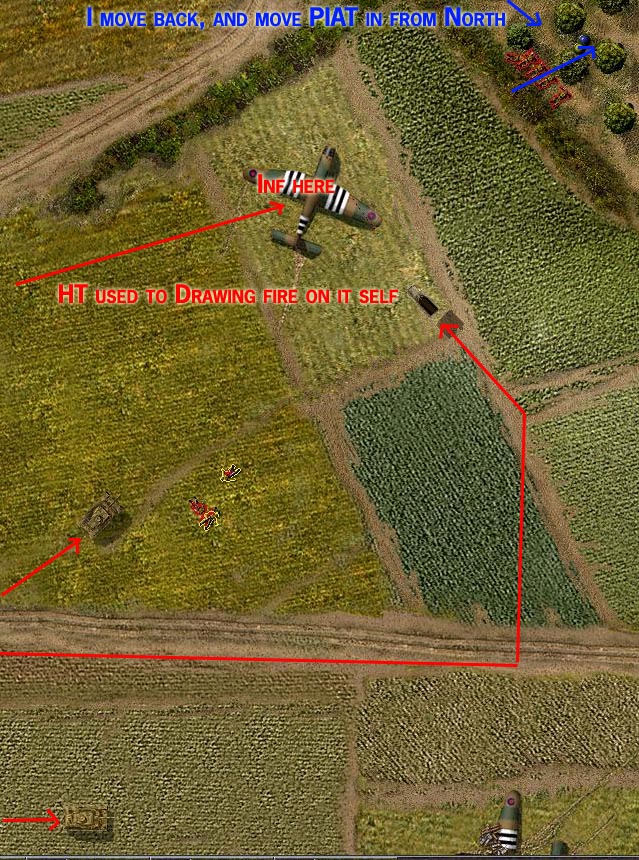
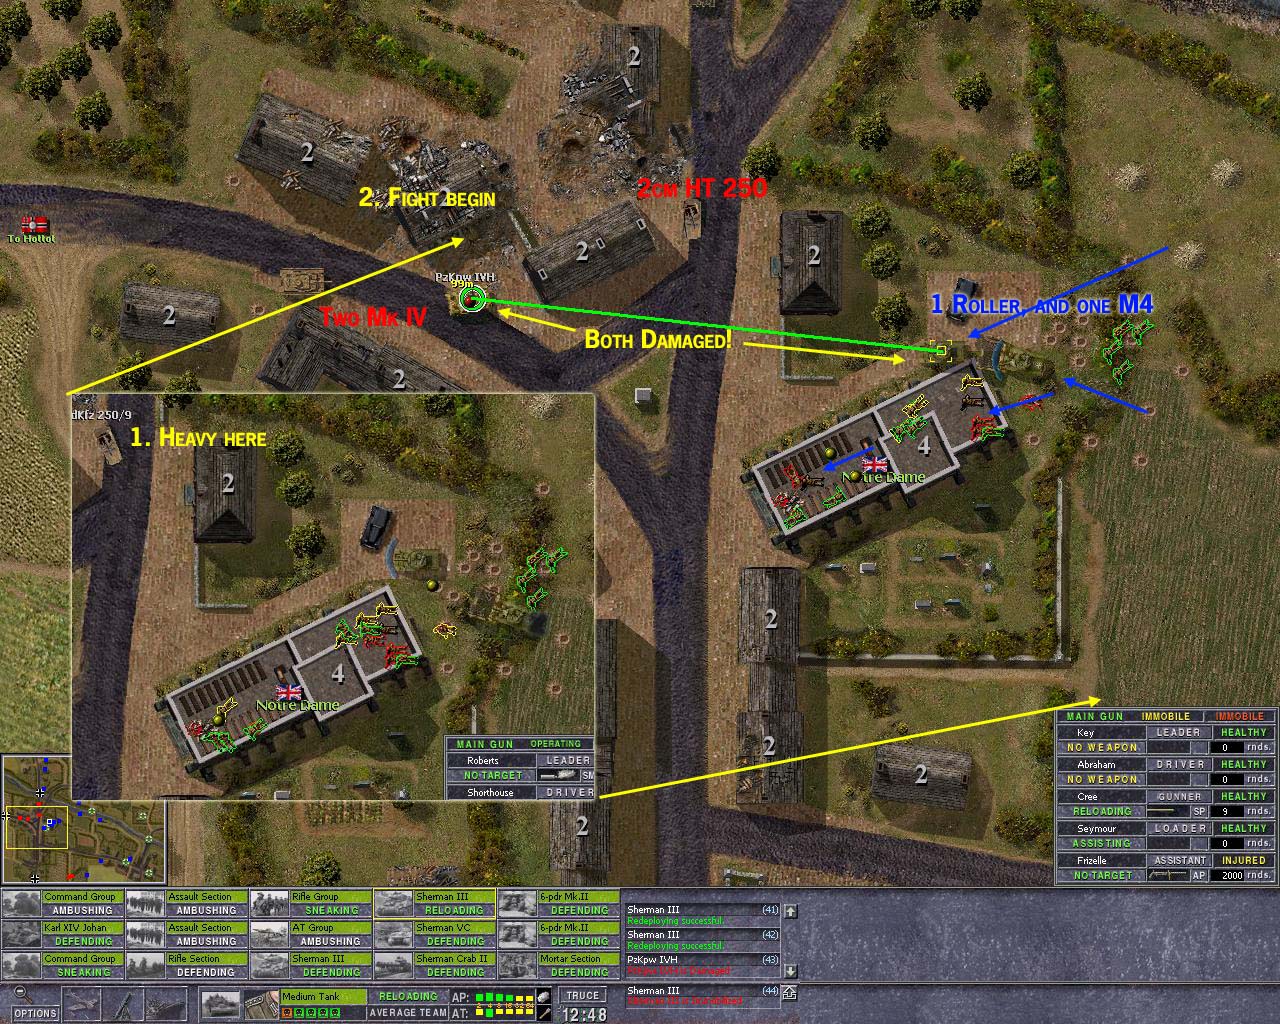
Yes, he will try take south… 3 Mk IV and a 2cm HT, and a HT in front just to draw gun fire on it.
Hm, this is gone be hard. My “scouting” was killed in mid there.
Hm, this aint working that good.
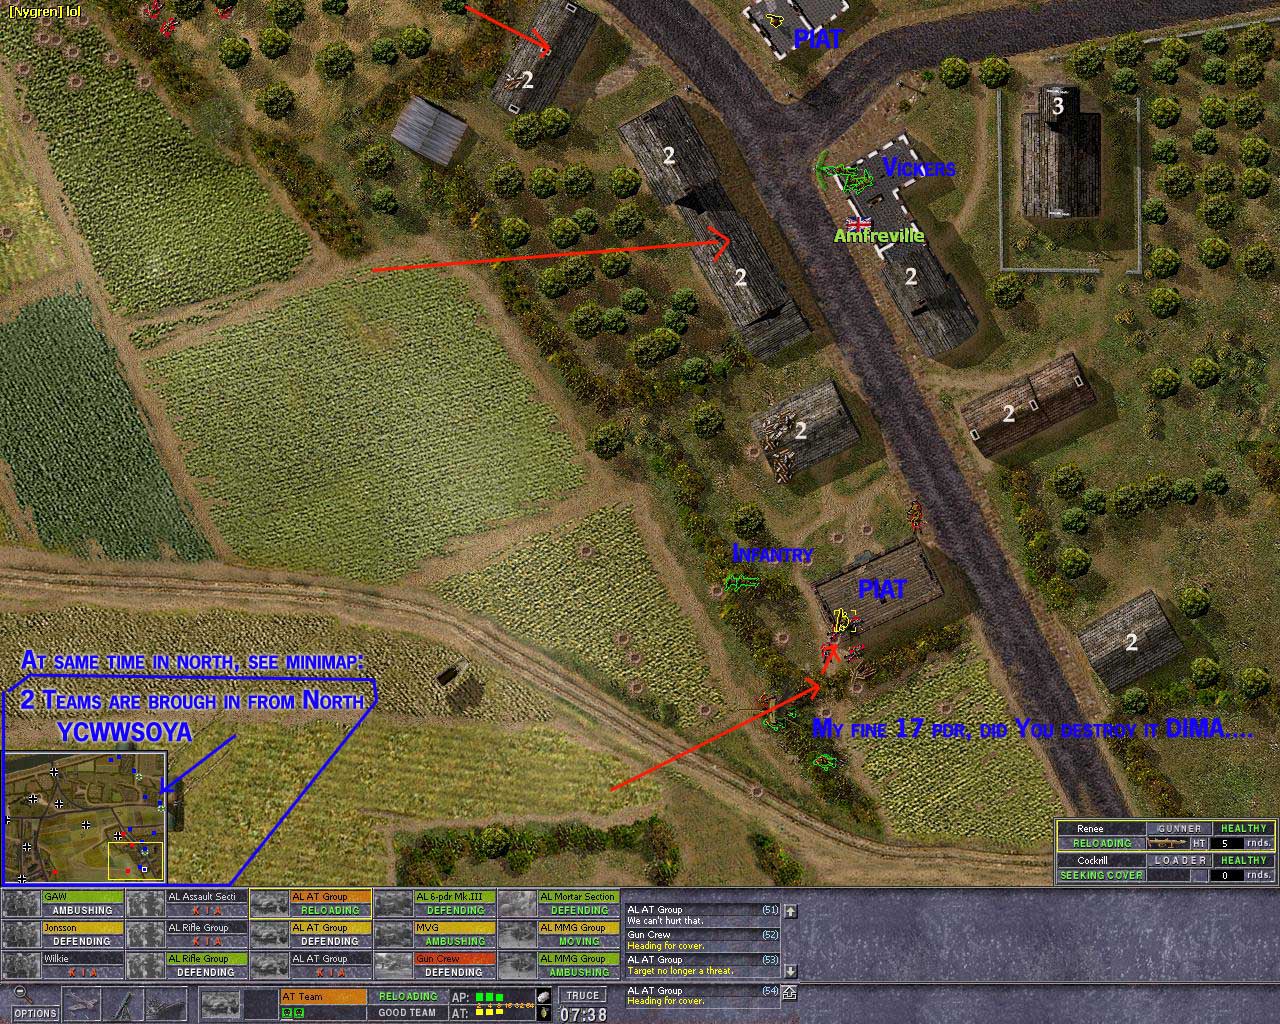
MOVE MOVE MOVE MEN; YCWWSOYA…. (You Cant Win War Sitting On Your Ass)
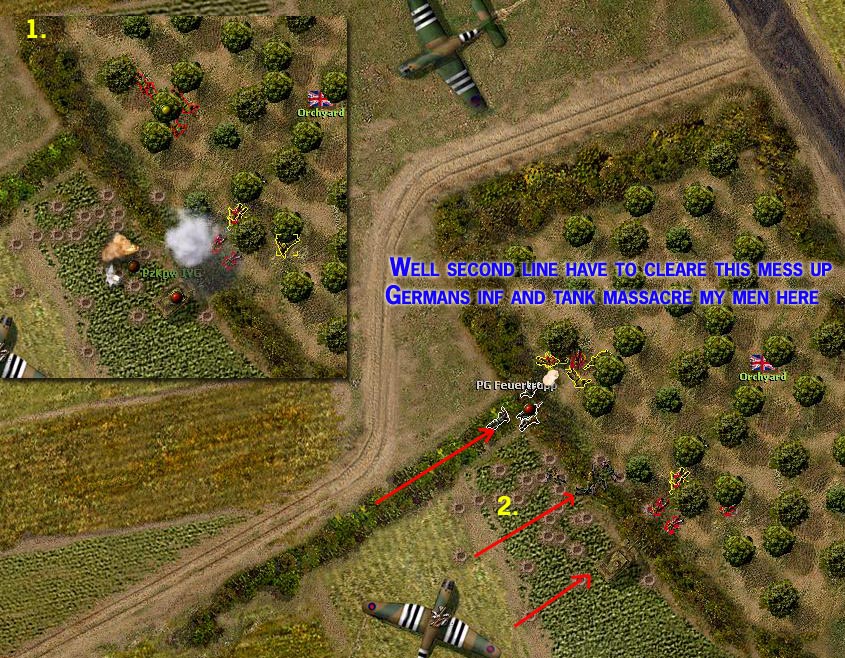
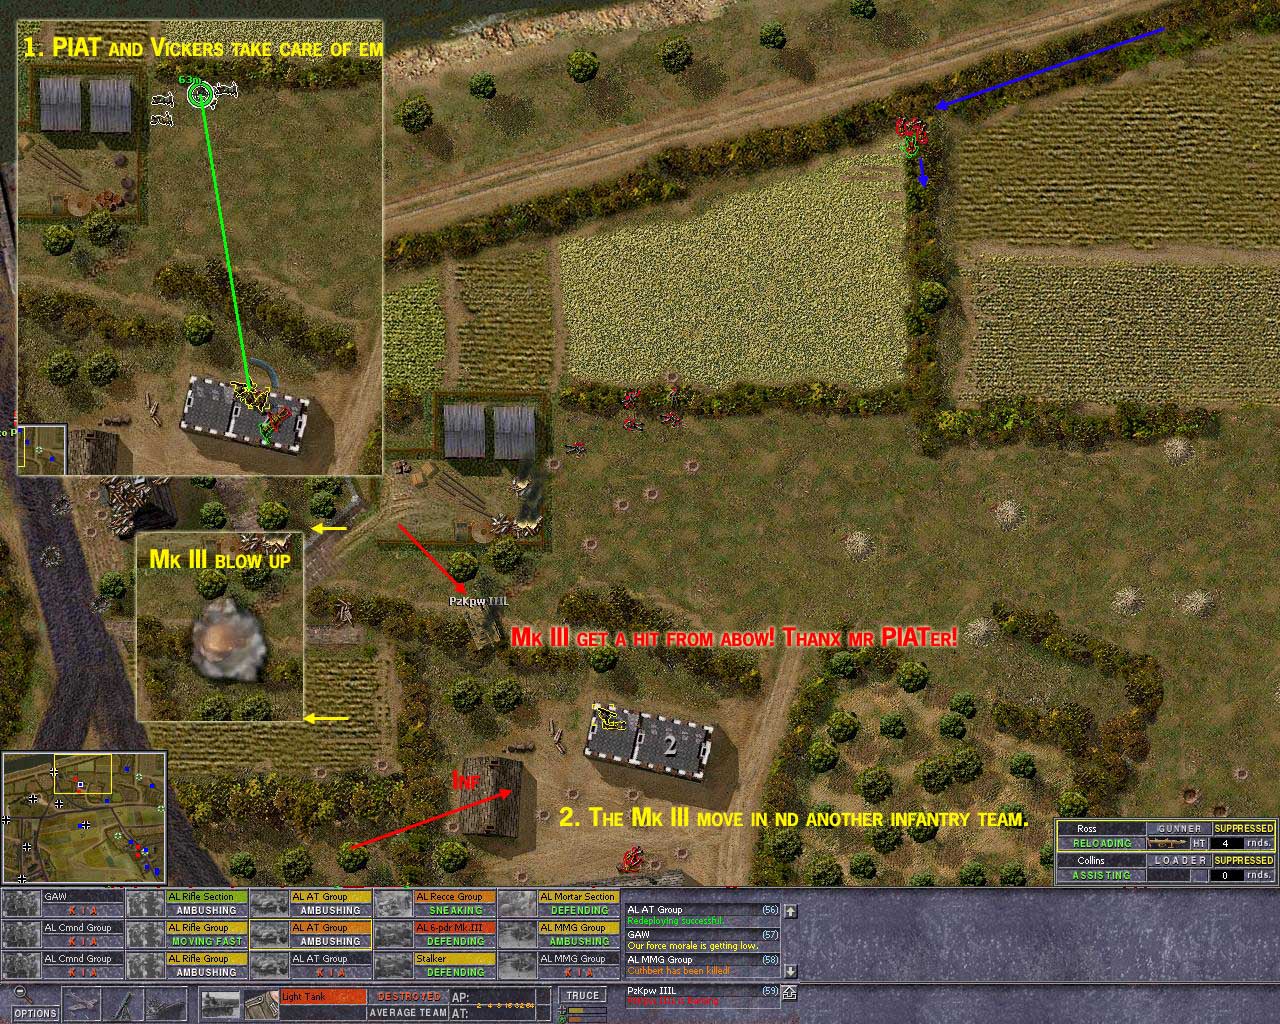
We must form a second line,
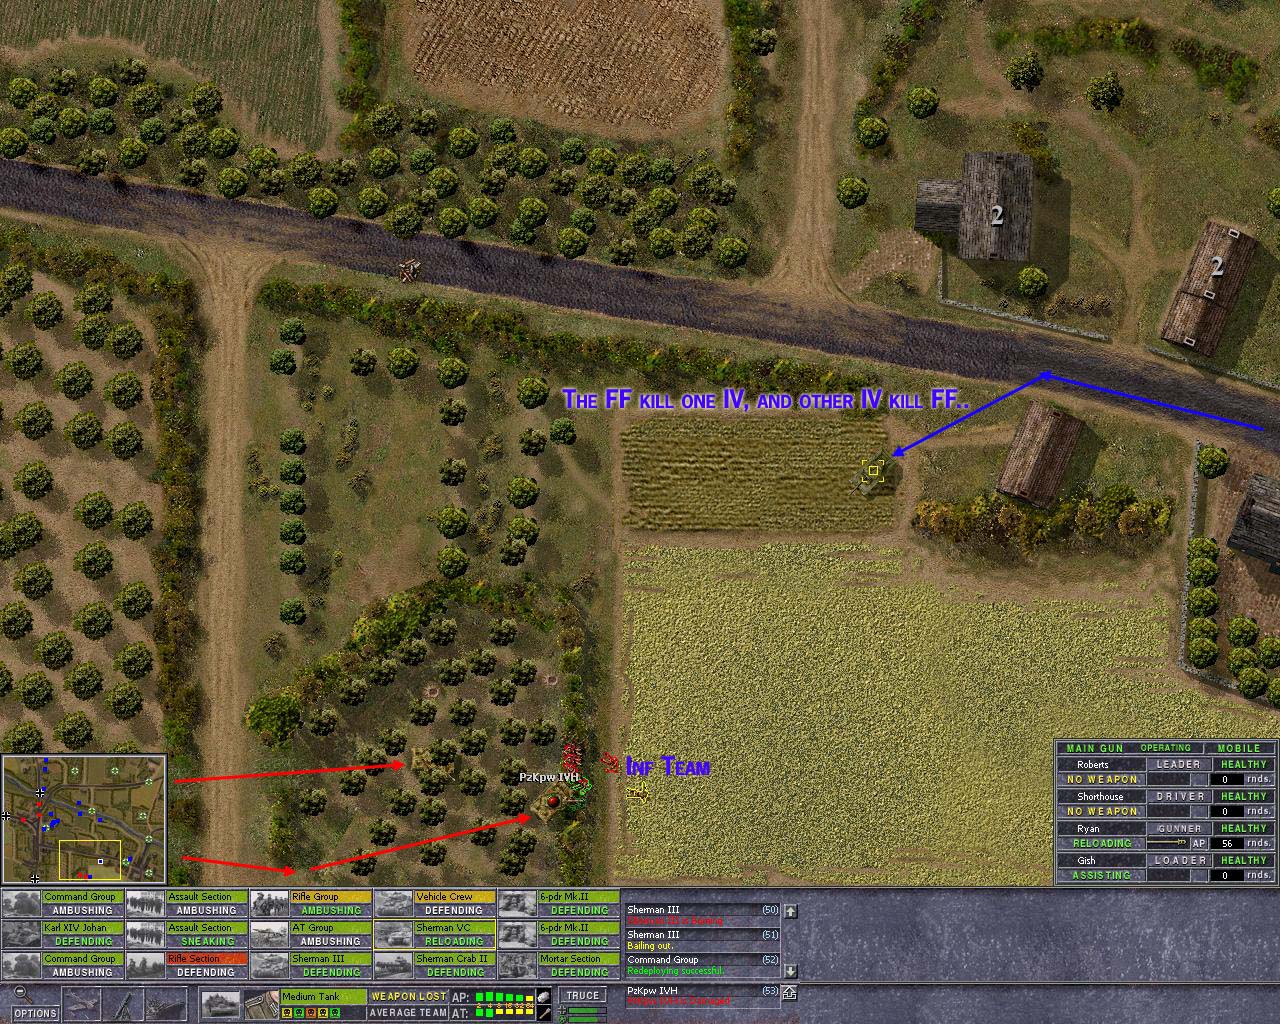
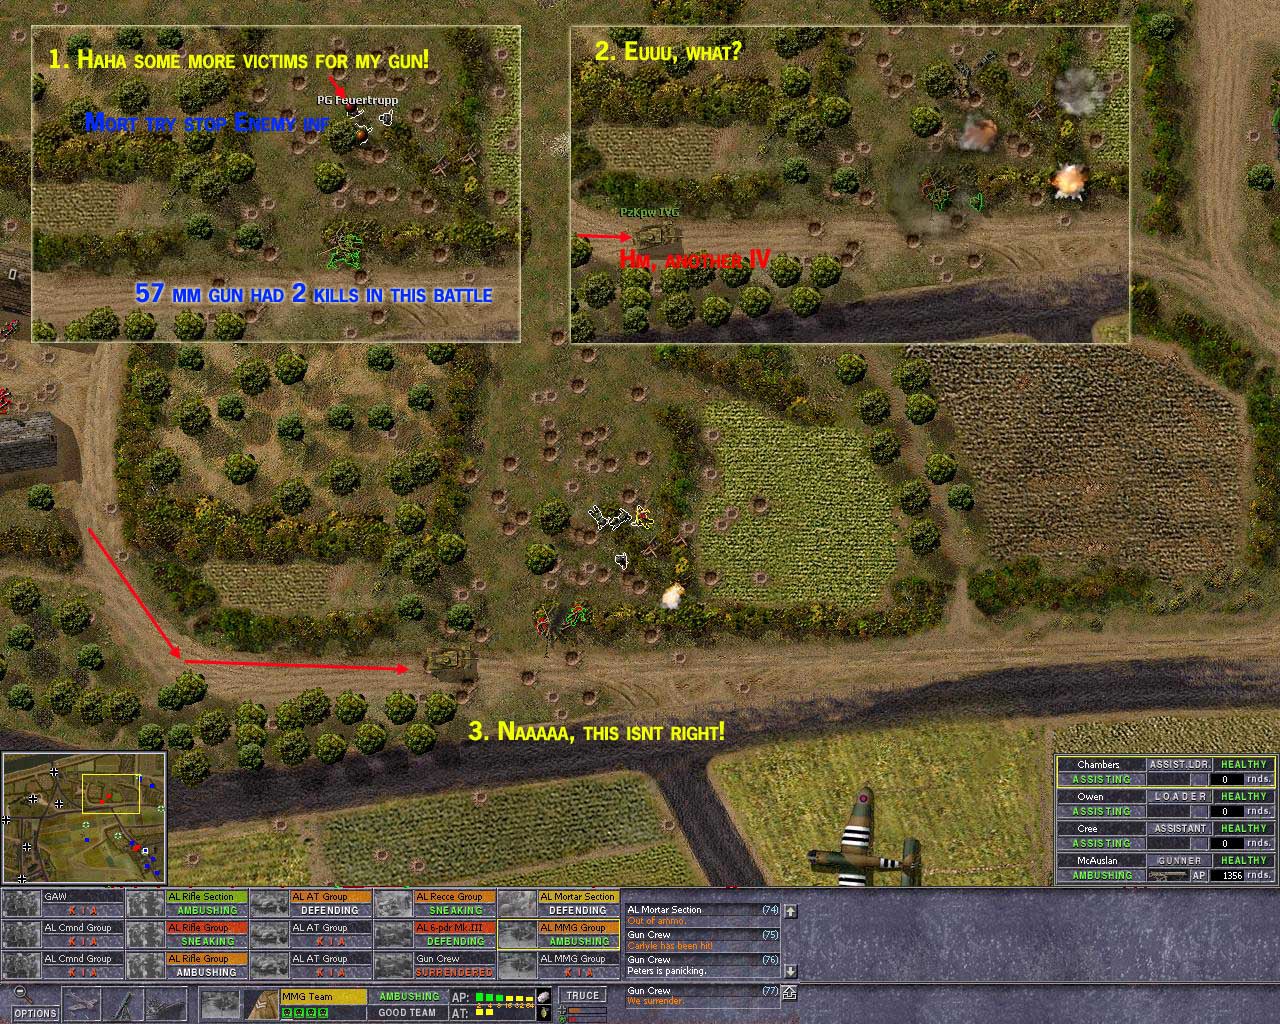
IV is brought down by the 57mm gun, and PIAT and MMG take care of the infantry later.
Here the “Dimons” come in the South, see the smoke, its what was a well maintained 17 pdr.. Vandals.
The Germans push on, but they are held back and fought down by my fine AL troops! Well done soldiers!
Day: 8th
Map: Ranville
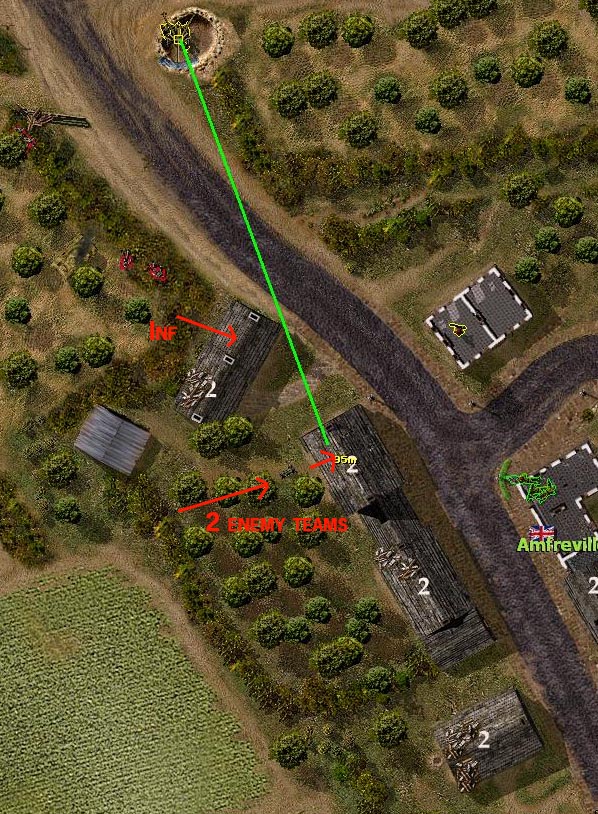
Ya, Dima is out of ammo, he cant use his Pak 40 SF that definitely hampers his defence hes a master of use them “crap” vheicles,
to me they seem useless, but not in his hands. But he have the towed 88mm Pak 43,
and they have taken a toll of my men before.
Wonder where it lurkes… He cant really have 88 th in South here as its to confined and hedges limits LOS.
Defend the South will be hard for Germans, and when Chatoue is taken,
the West village will be taken to in next round, that’s the plan.
Go north, was not really an option, (88 th).
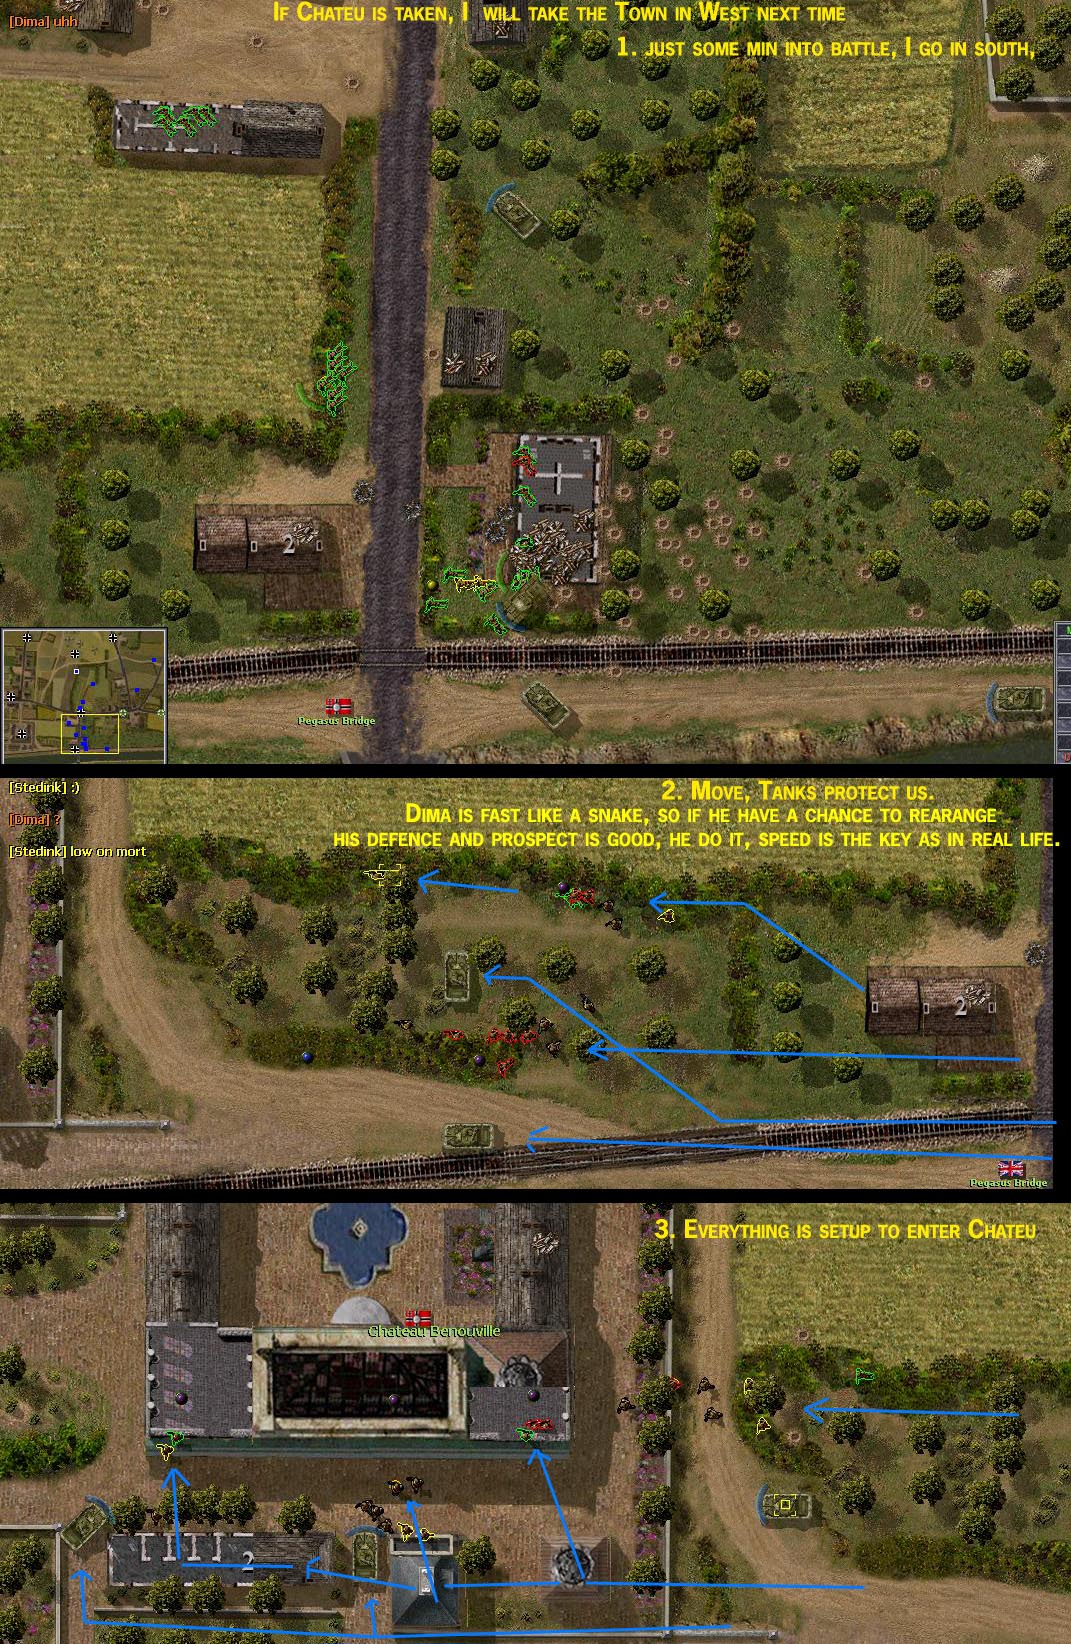
Okay men, move move move, better take map in a few rounds then
sittarond and be shoot at forever.
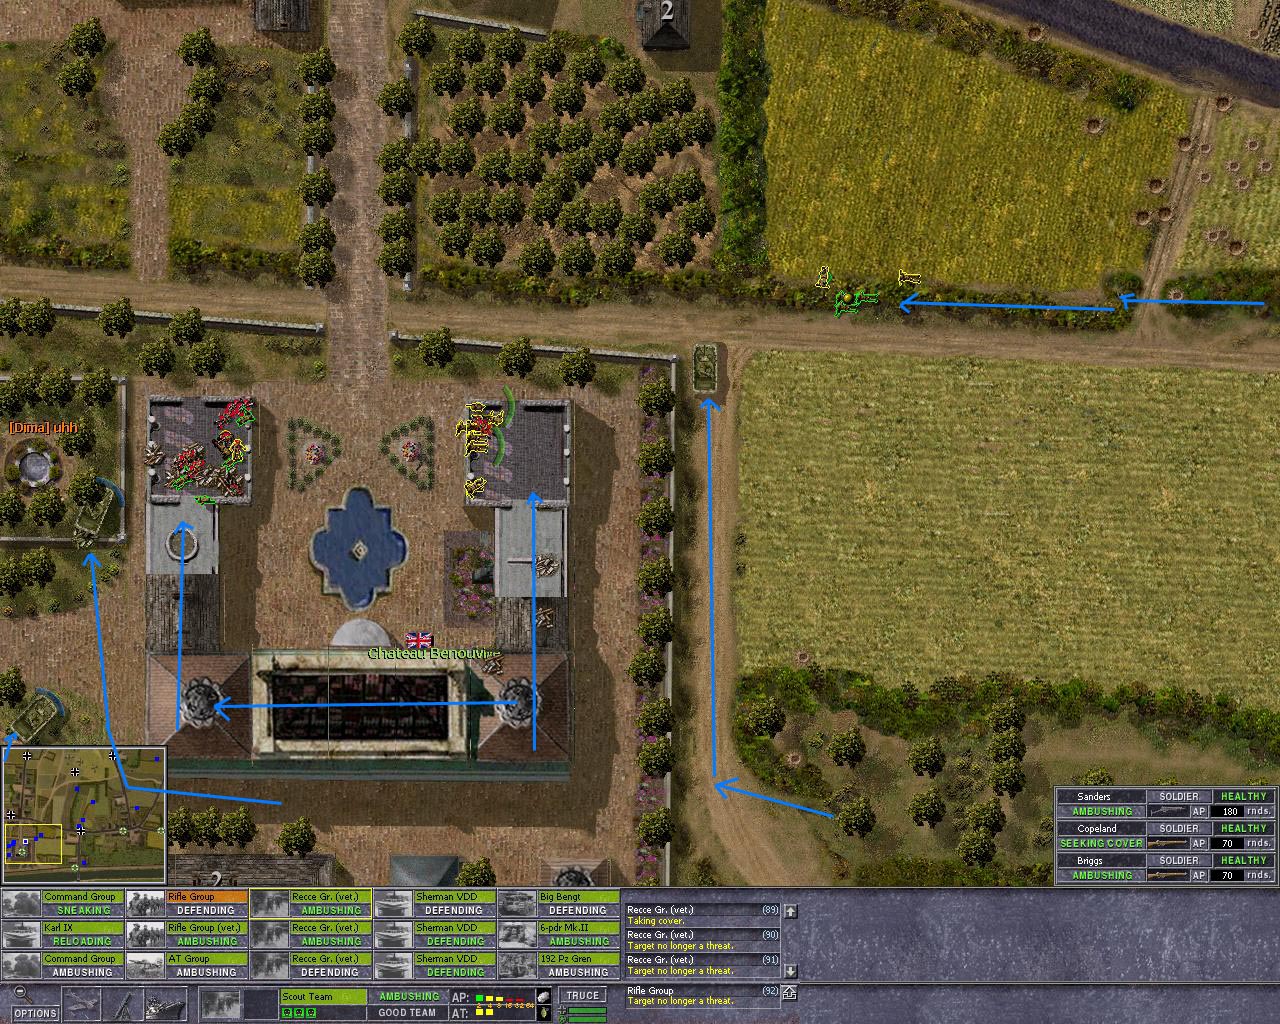
Taken, enemy shot at from all angles, some men lost but, mission accomplished.
Battle continue, get a foot hold in the village, okay men, improvise, and we may expect Dima
have reinforced the south of the village, his defence movement can be really problematic for my force.
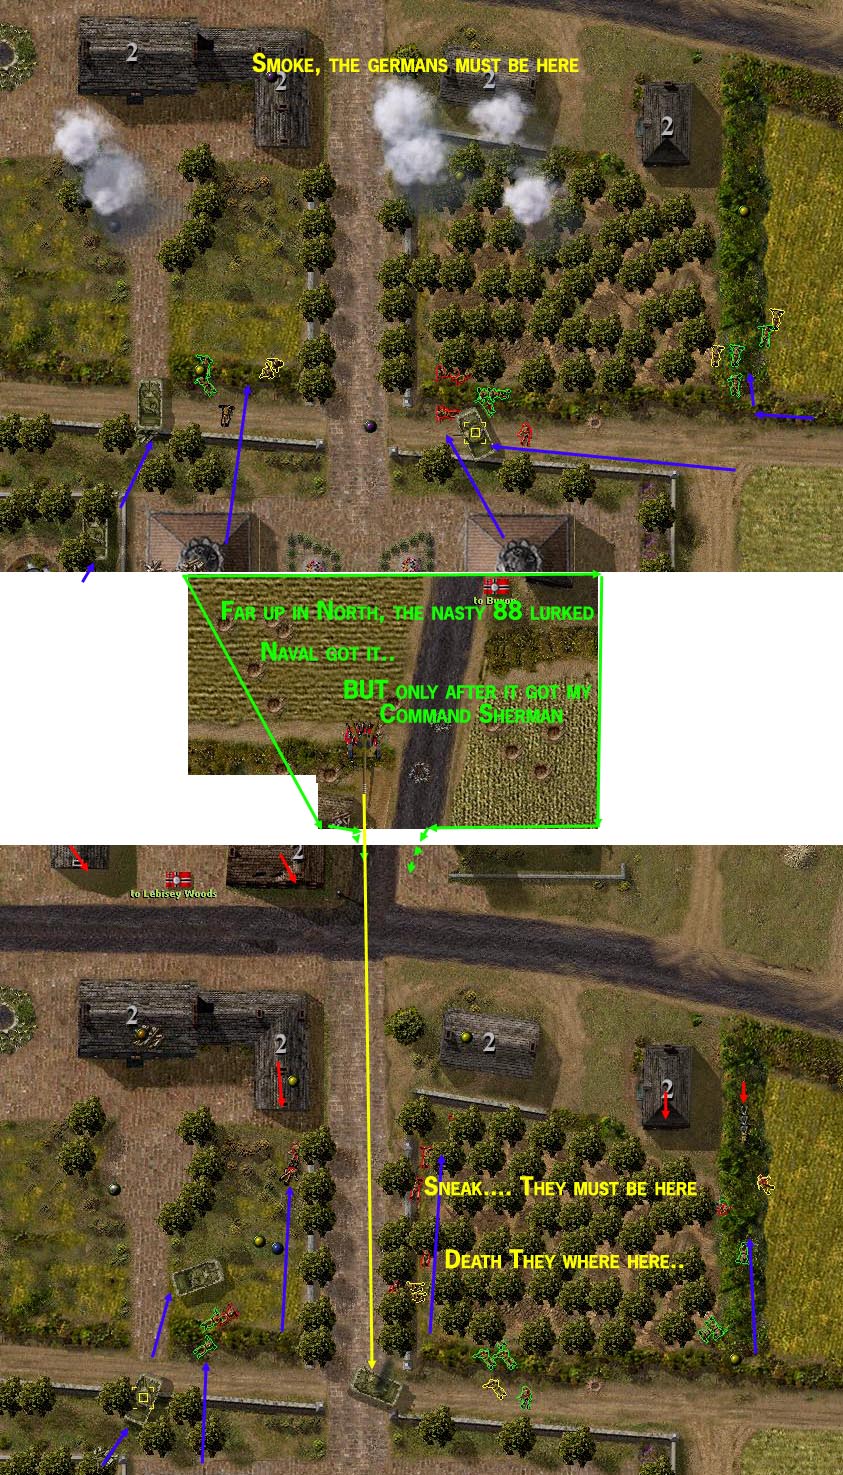
Yah, darned and one Sherman was tracked, and the otter was 88-ed. I dint dare to bring my AVRE,
it’s to valuable to be lost here, but some infantry one may take a risk with.
Common my men, dont be selfish, do it, think of the grater good!
Yah, that was that. No reall good destruction of Ge forces just a 88.
Dima can be slippery as soap when he is out of supply, or he meet a supperior force, he minimize losses. Man, does he know the art of hit n run. Its v imp to try to kill them "hit n run" units, or they will be at another place and cose some more delays and cassualtys.
Day: 8 th
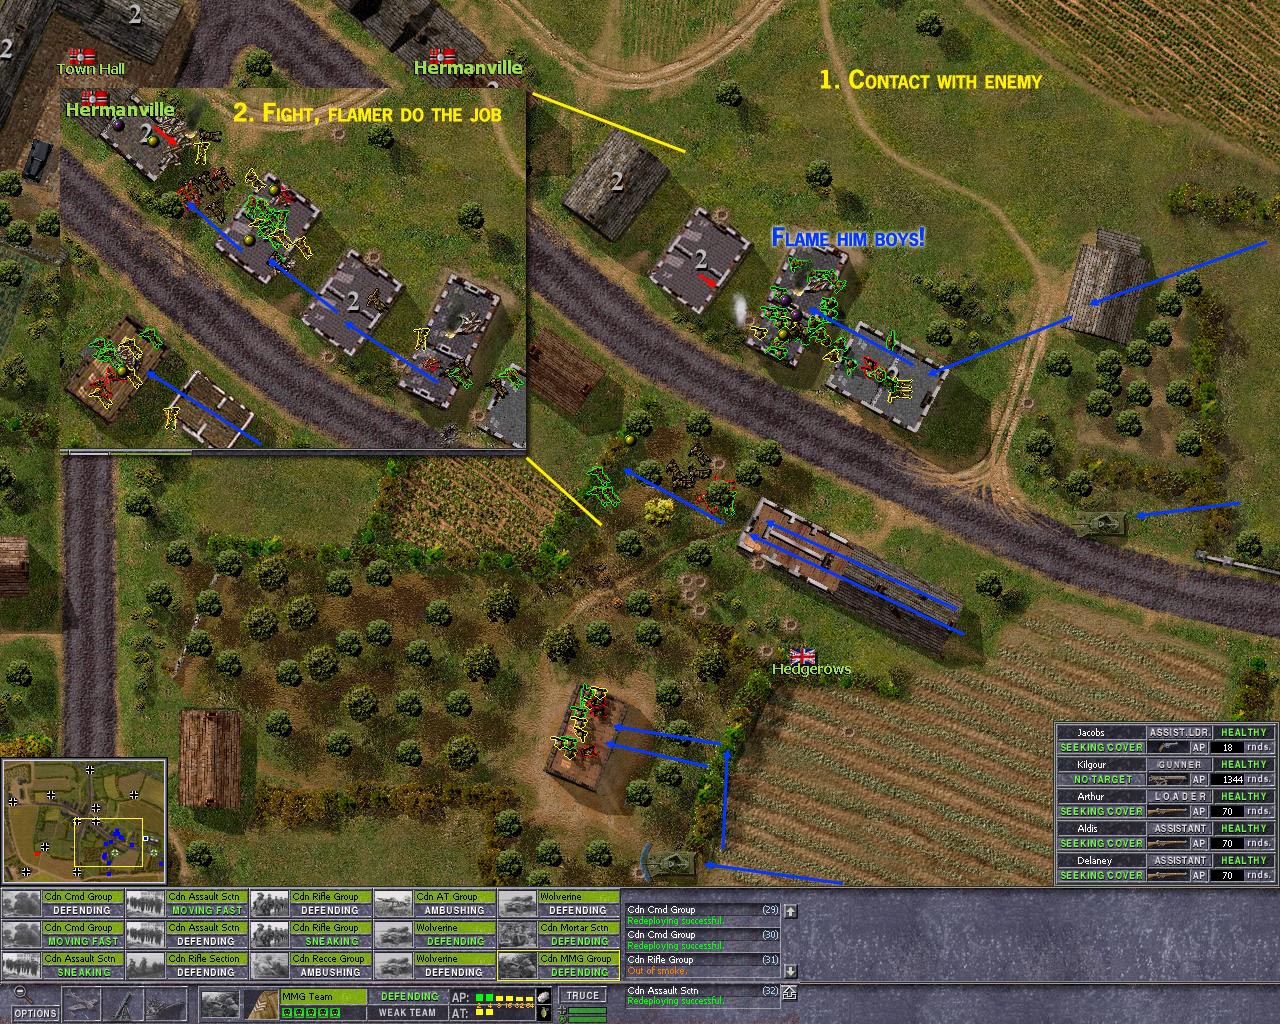
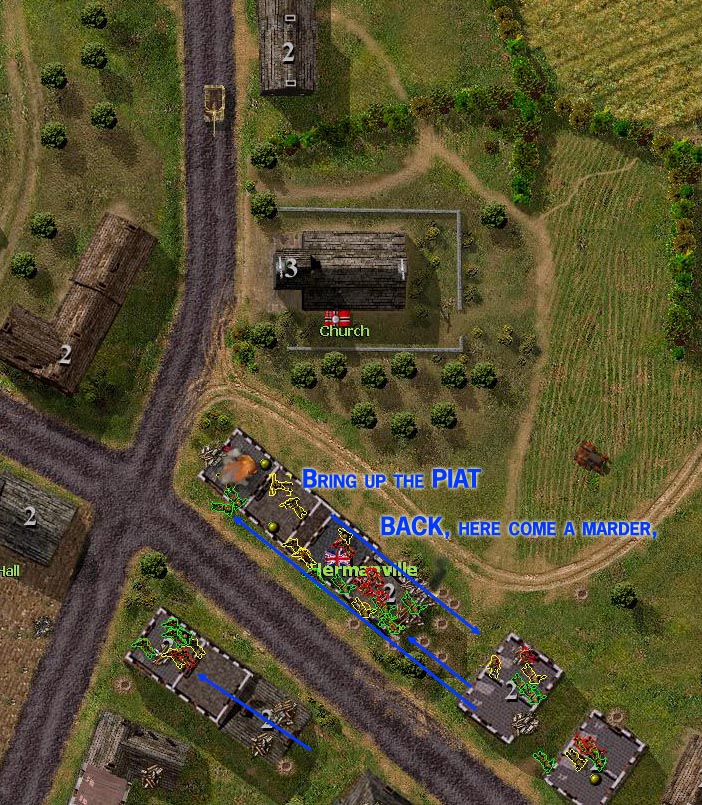
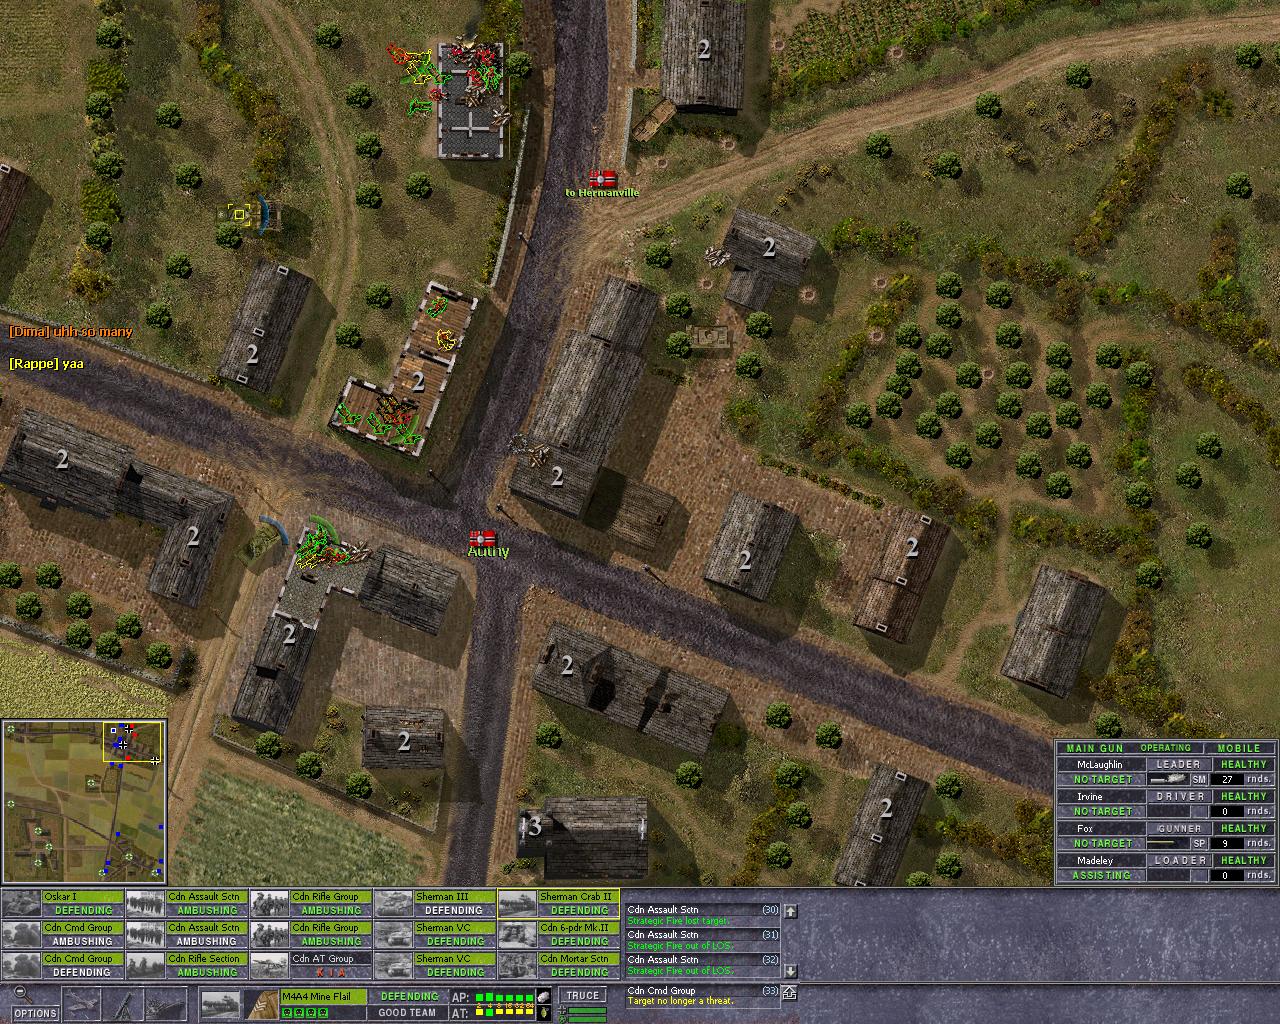
Map: Hermanville
This map is a way to confined. The only thing one can do is use brute force.
Some cool funnies would be useful. This UK BG have non, not even some good tanks with HE.
But, my tank BG are in other fights, so I have to manage with this unit, and btw,
Dima control a rather sad Germans unit here so, it shall work, well it have to work… Get to work..
What to do, the centre of the map hold the city, there is no way his week Ge unit can hold this map if he lose the centre of it.
Move forward, meet sporadic fire, flamer remove threat, move and some more resistment, flamer do the job.
Dima shell my men with the marder from down south West corner at grate distance,
and then move it round map and kill my men from north side. My mean are dying, move em back. Bring up PIAT.
End result, not mush happened, few casualty’s.
Day: 8 th
Map: Lebisey Woods
This map is tricky, control the East part of city is critical for UK,
and the East house in South is a must have to hold the map and the Exits.
The problem here, is that I meet Dima with his Pz unit, this may be v painfull
as he keep up the speed and take advantage of any breakthroughs and it
will many time be a matter of move to make damage control.
Sad for me, was that Dima had made same analyzis as me, this house one need. He aim to go further to East, and then take the VL in East side.
Yahaaa… Well… Not really
Yihhhhhhhaaaaa, them RAF pilot’s they save the day, but not me.
Hm,
Hm, Here the come, exploiting there success, and they take no notice of
my wounded men or there hurt feelings.
The things that was not allowed to happen, just happened.
Now that’s how to use a armoured BG, fire and speedy movement, combined force,
taking max advantage of enemy local defeat, and eliminate the units as they regrouped.
Yes, the end result, I here the Germans giggle over radio, hm,
This was v close to a totale Germans Victory,
I say 1 more min and my force would have been wiped of. It will take a miracle to handle this map next time.
Here I have to rethink strategy, and direcly the tactics. Herer I have been badly beaten 2 times. Dimas use of Pz BG will not allow any fast
manuver on my part, the speed is clearly on his side here, as the west side is more protected from los..
And the Dima hill in South West with a AT gun on it cover all my movememnt in the East field.. I just cant move my tanks to
rearange my attack, that mostly have been defence here ofcose, or was it defeat?...
The plan is go up north and grab the exit there. Waste no time, we have men but not that many minutes to get the job done.
Yes there he is, and in the other 2 story house to. Suppressive fire take care of it.
There we have a marder, damned Dima can use em scillfully, but this time I was lucky, and my 95mm How got him first.
The partisan style used by Germans is annoying and delay movement, probly exact what they whant.
North is secured, a good base for next round is secured.
I though a Shreck killed the Sherman, but it dint, maybe it just took some shots, its blurry…
Germans played partisan, and managed to keep there losses low, but UK managed to take there objectives.
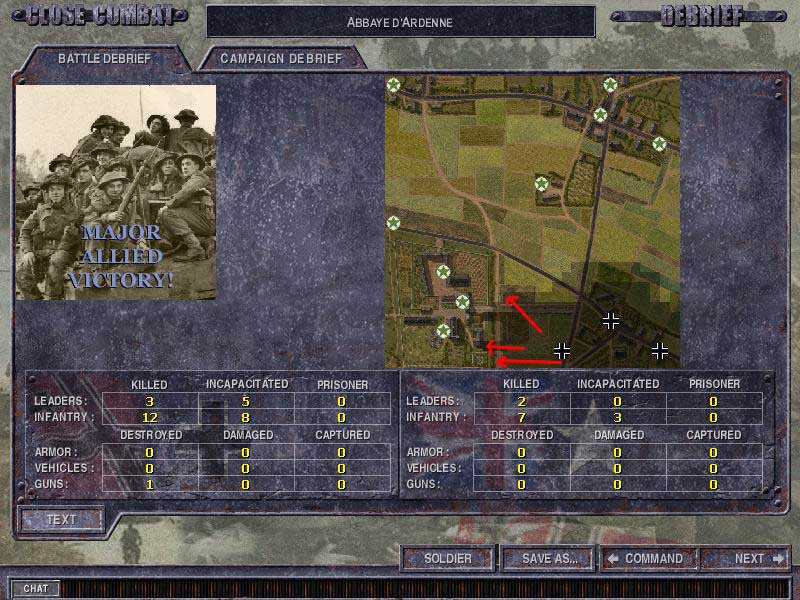
Day: 8 th
Map: Abbaye
Here Dima come in from the East of the map, as hes BG is cut of and try to regain supplies.
He has fuel and ammo for this round, but not for next. One have to assume he is desperate to get the West side Exit.
Some FF may cover the large fields, so one have to assume he wont try to move in the open aria. I believe he try brute force and move along the North covered aria.
After some movements Dima managed to get the Tanks and AC over at the North side, smoke made it safer.
Not much fight, Germans asked for Truce.
Day: 8 th
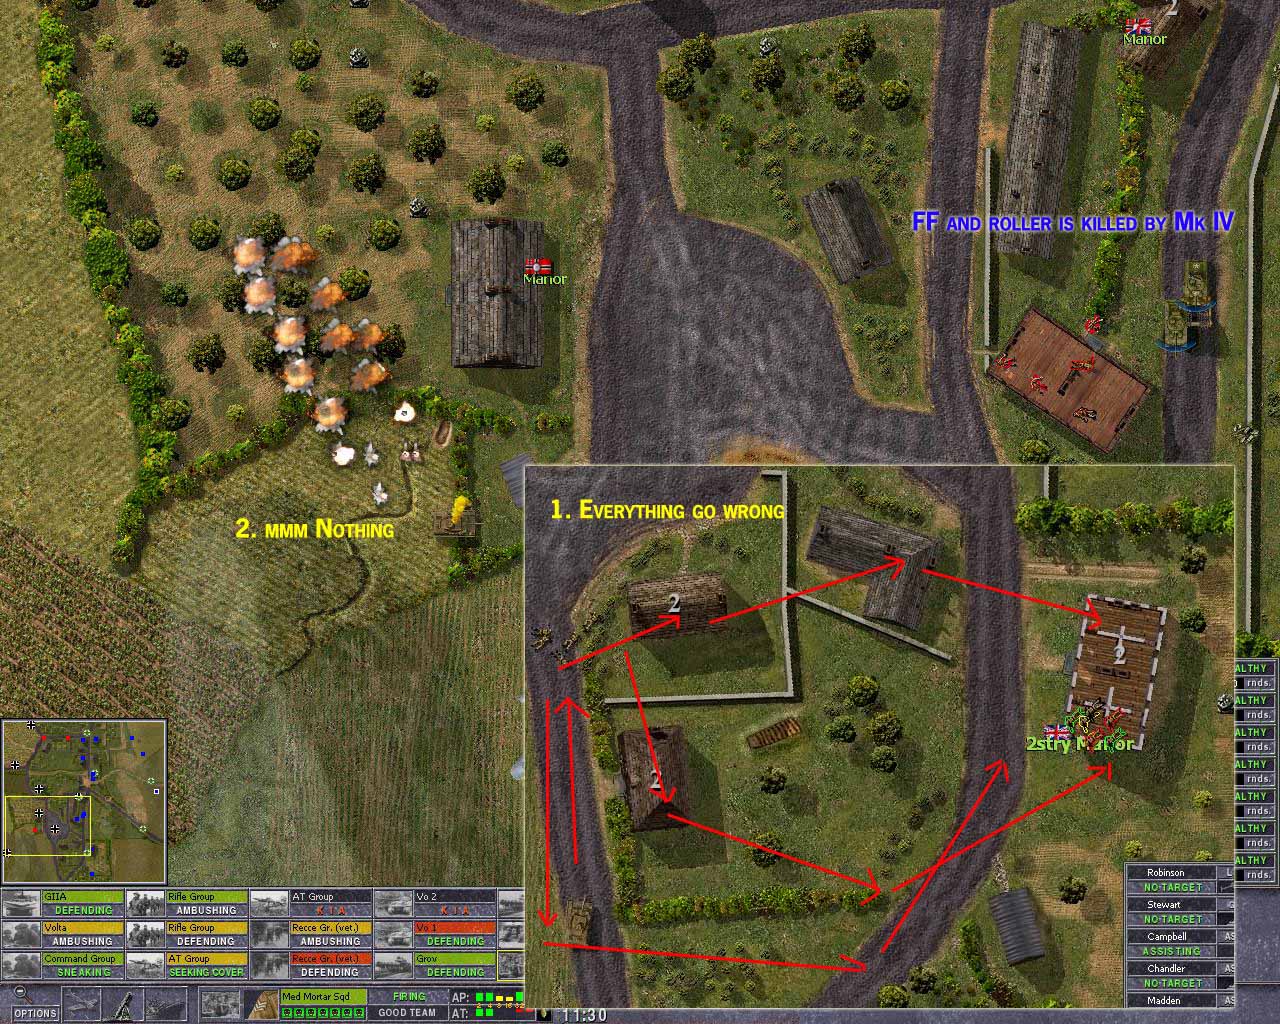
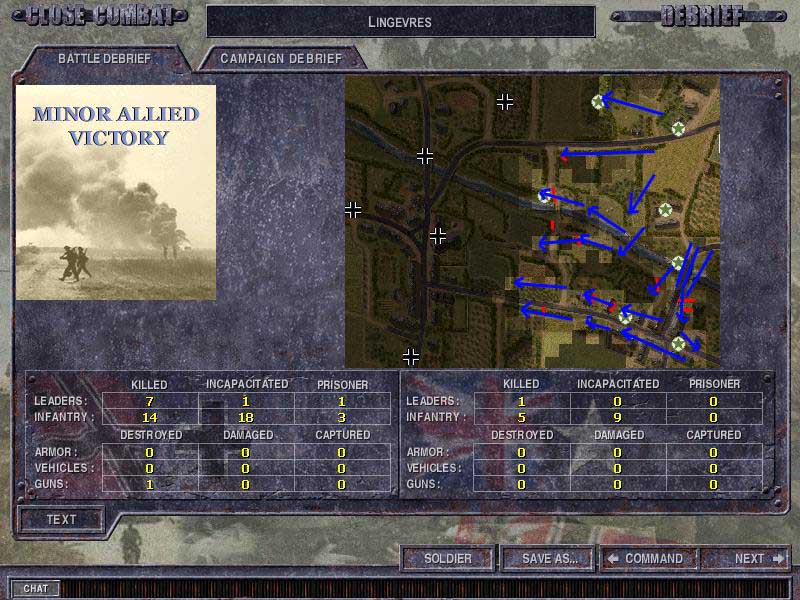
Map: Lingevres
SO, Germans have moved out there second rated depleted BG, and have moved in a quality BG, with Tigers.
I held the East part of the map, and decided to try to control the whole North part of the map over the river.
Get the church, hold it, that’s another goal. May be costly, but, I must have a good big aria in this map, for I fear it will be many painful battles here, and that better then just a few totally painful.
Tiger movement! Yes, it would be sad to lose it to a PIAT…
If the Tiger wold have got over River I would have lost North, I have a AT gun that cover bridge and a another Sherman that help that AT gun.
Arrrr, yes, Sherman’s shall have an advantage at close fights, mm..
Yah that Shermans is destroyed!
The 2 IV is a threatening sight, and FF is best at long range, in the end… lost FF..
Heavy CC fighting. I believe I damaged the tiger, it got imob.
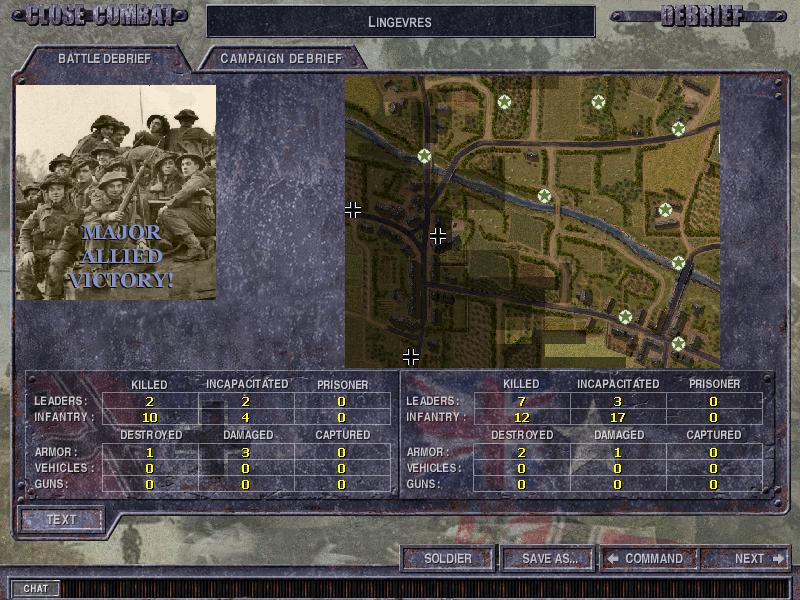
End result.
Germans lost a tank and got 3 damaged, UK lost 2 had 2 damaged.
Do I hold Church, No. I have a foot in it and who will win it next time?
In North a bow river dima has no foothold.
In South, I see some trouble.
Be up vs the Quality Pz Battalions is challenging. I believe we are gone take a new approach to this map in next round.
Day: 8 th
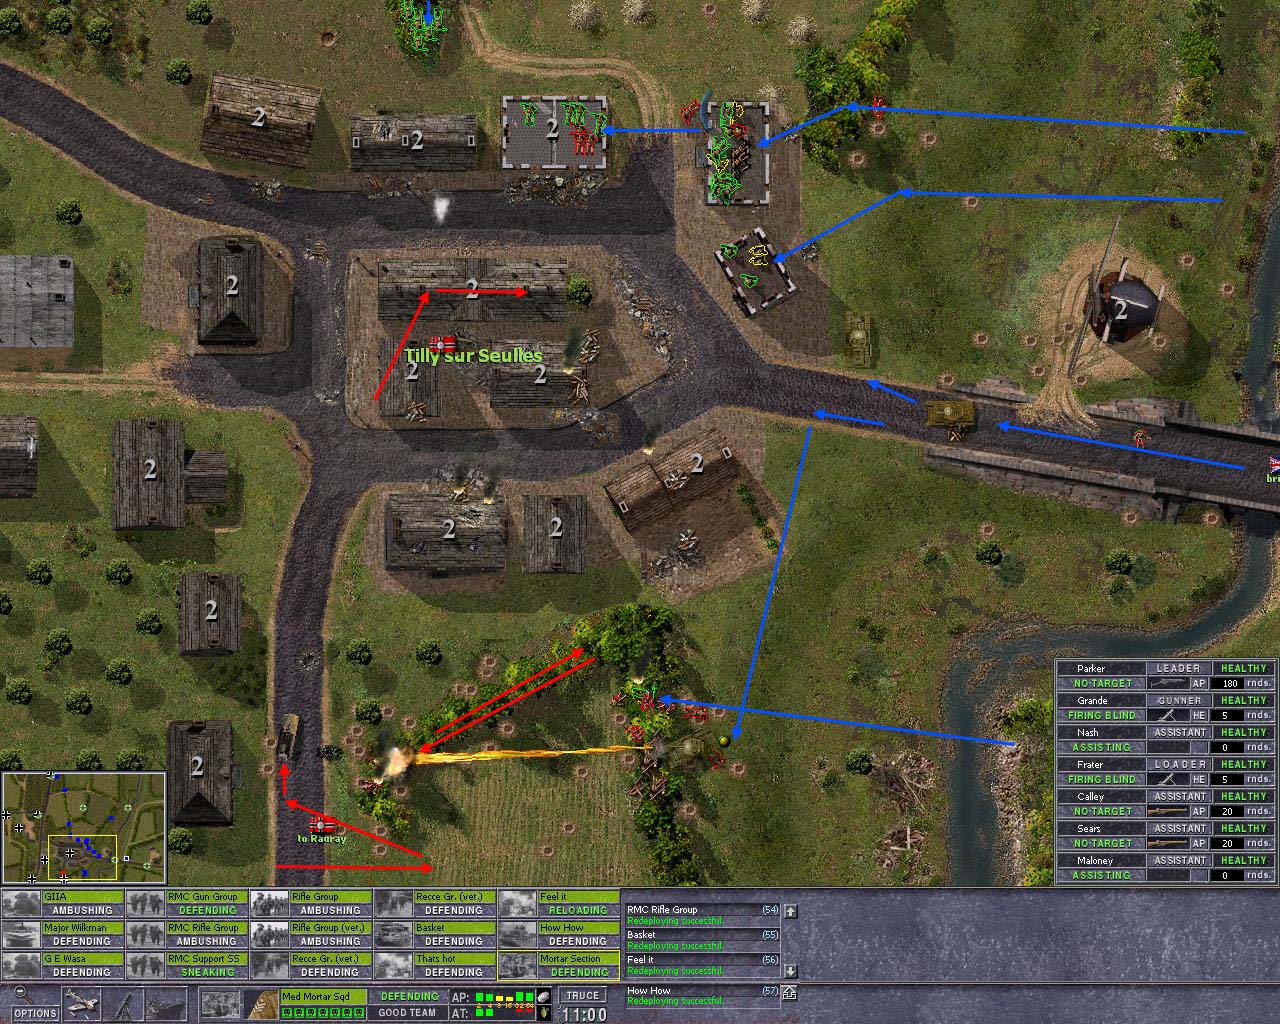
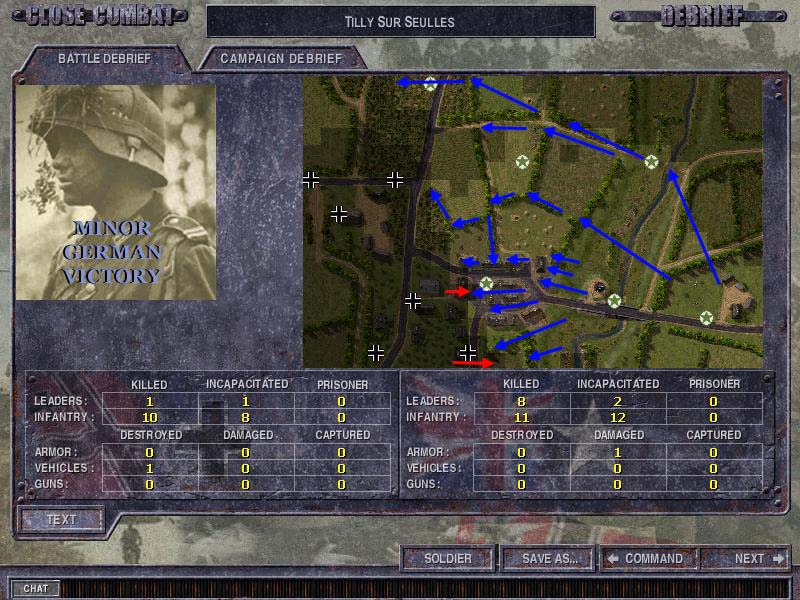
Map: Tilly
We better move fast here, it’s a meeting engagement.
The enemy hold HTs, and quality AT guns and Scheck’s.
My BG has good tanks, including some funnies.
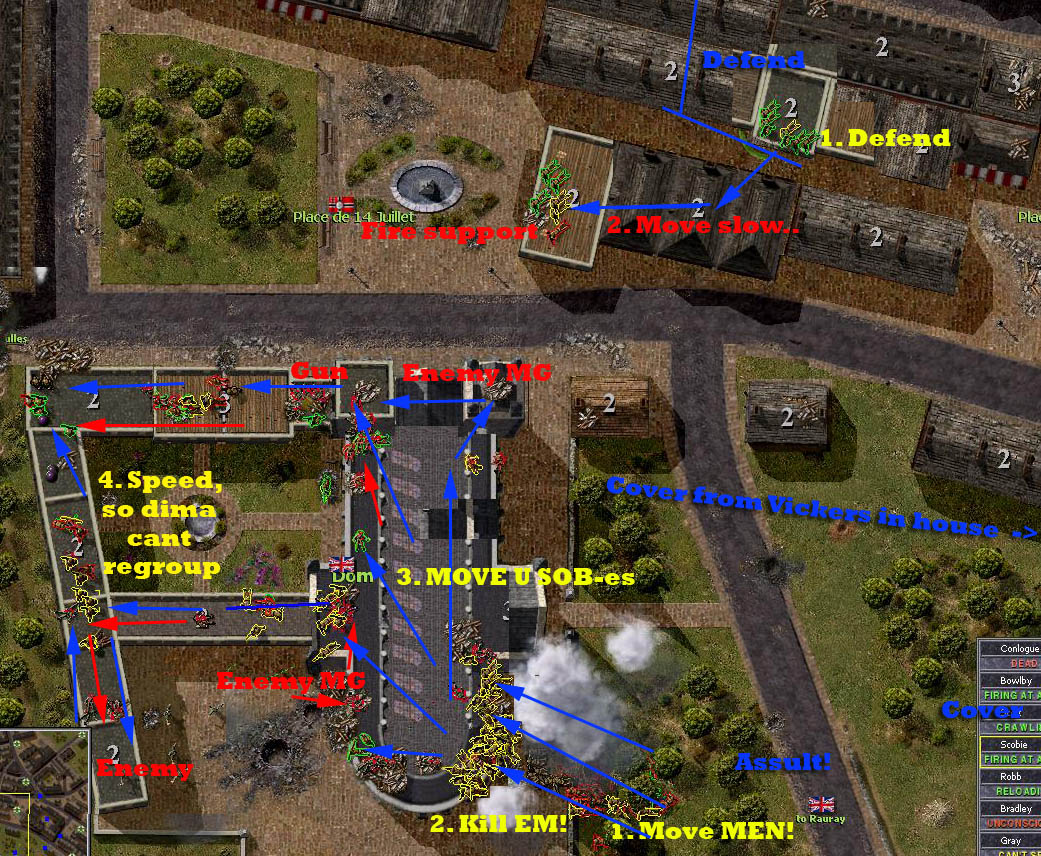
The goal:
Try take main City, if its under my control the Germans will have hard time here. The North can be grabbed by simple tank/infantry movement. As enemy hold relatively weak SP AT he will not be able to grab North part.
Okay men, move it!
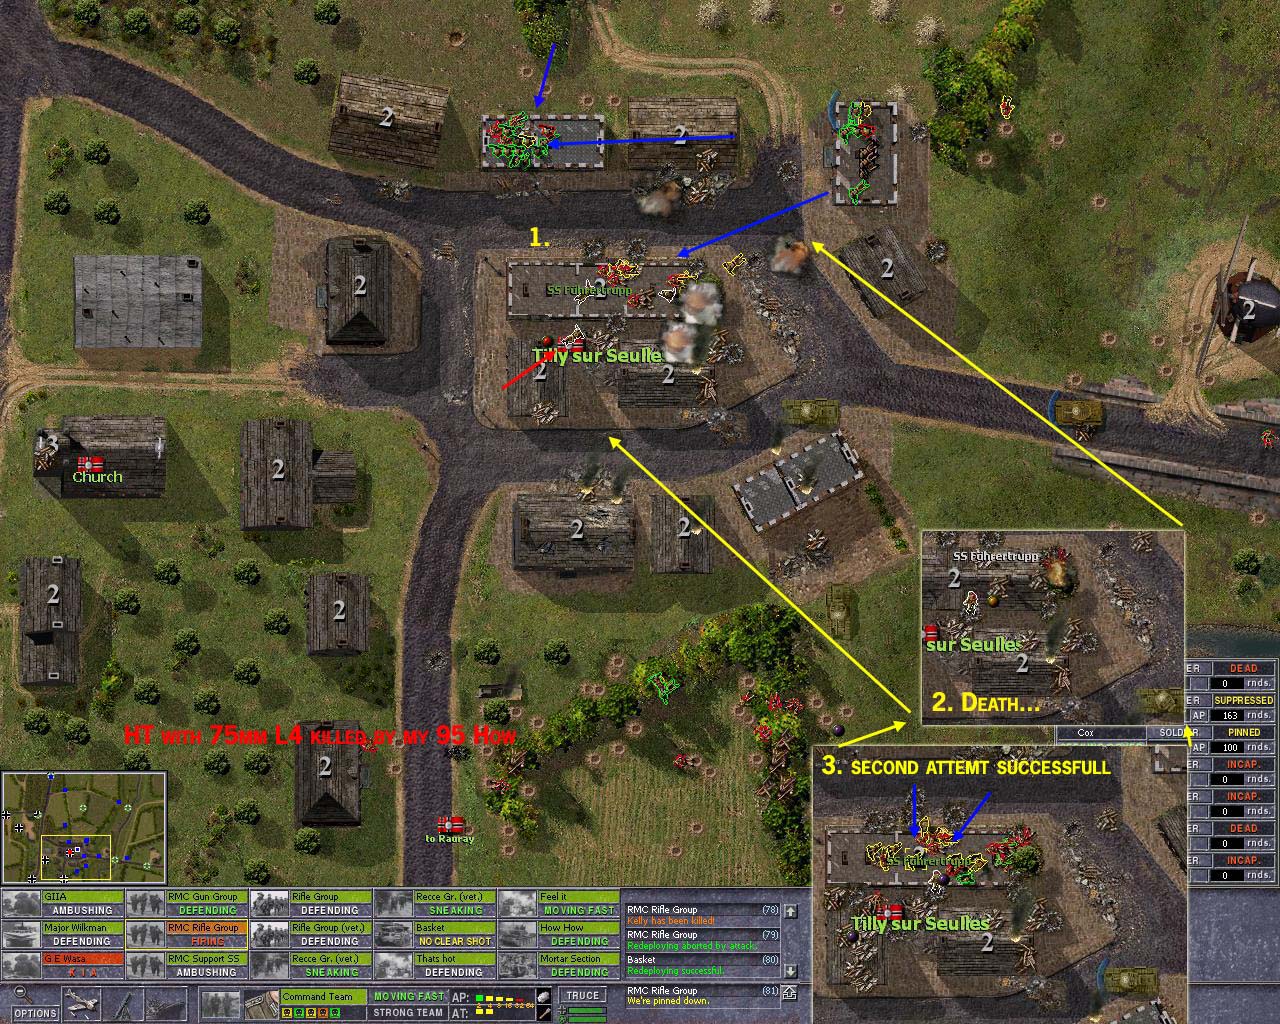
Work, the HT with 75mm L24 is killed soon by the 95mm Howizer.
That was nasty germans who killed a lot of my fine men. Totally unnecessary.
Second attempt was more successful, lets get em boys!
Yes, secure the main village! Damned those dimish Germans, they sneaked up that house and kill my men. What a waste!
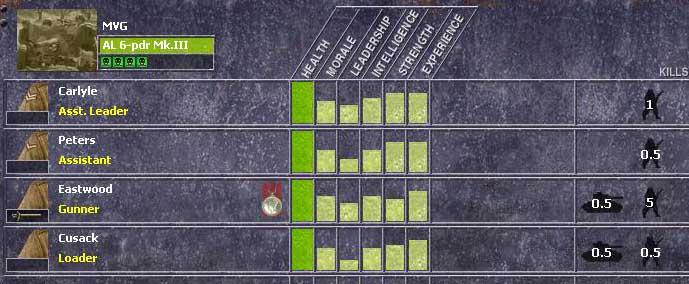
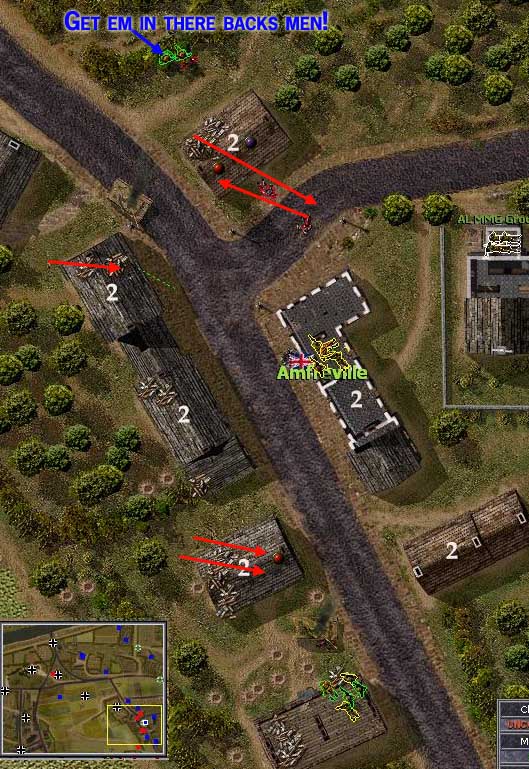
Medal award cemony!
Award motivation: The brave stopping of the German advance at Amfrecville, by killing of a Mk IV and for the following shelling of Germans infantry advance.. Well done men!
Back to the fighting part.
Day: 8 th
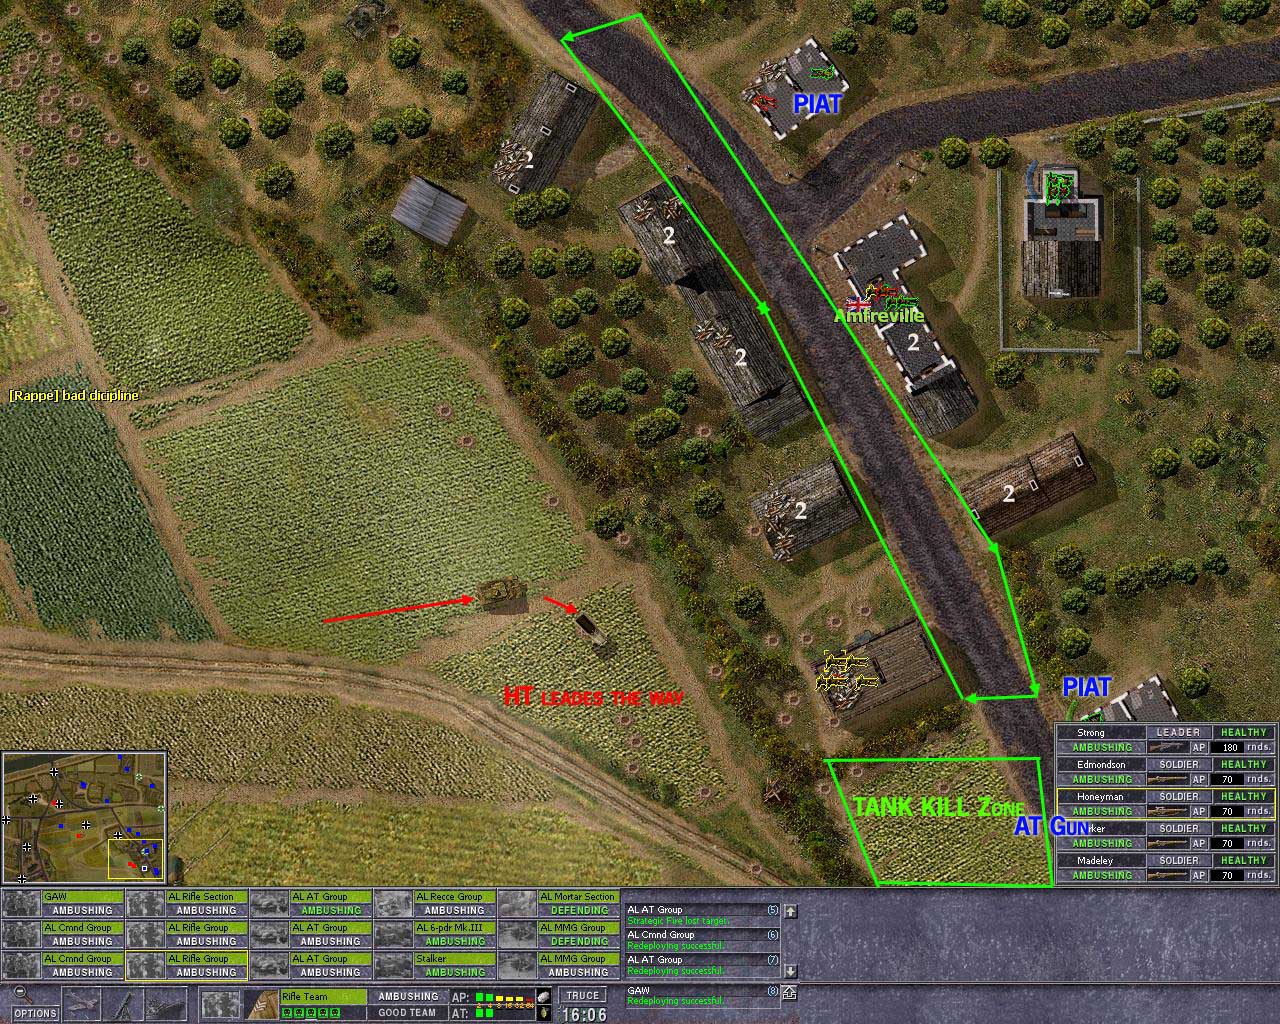
Map: Ranvill
The Germans will make a new attempt, its now hard to guess what they do.
I prepared some tank kill zones, 2 PIAT and 2 57mm AT guns will work together and try stop the Germans assault.
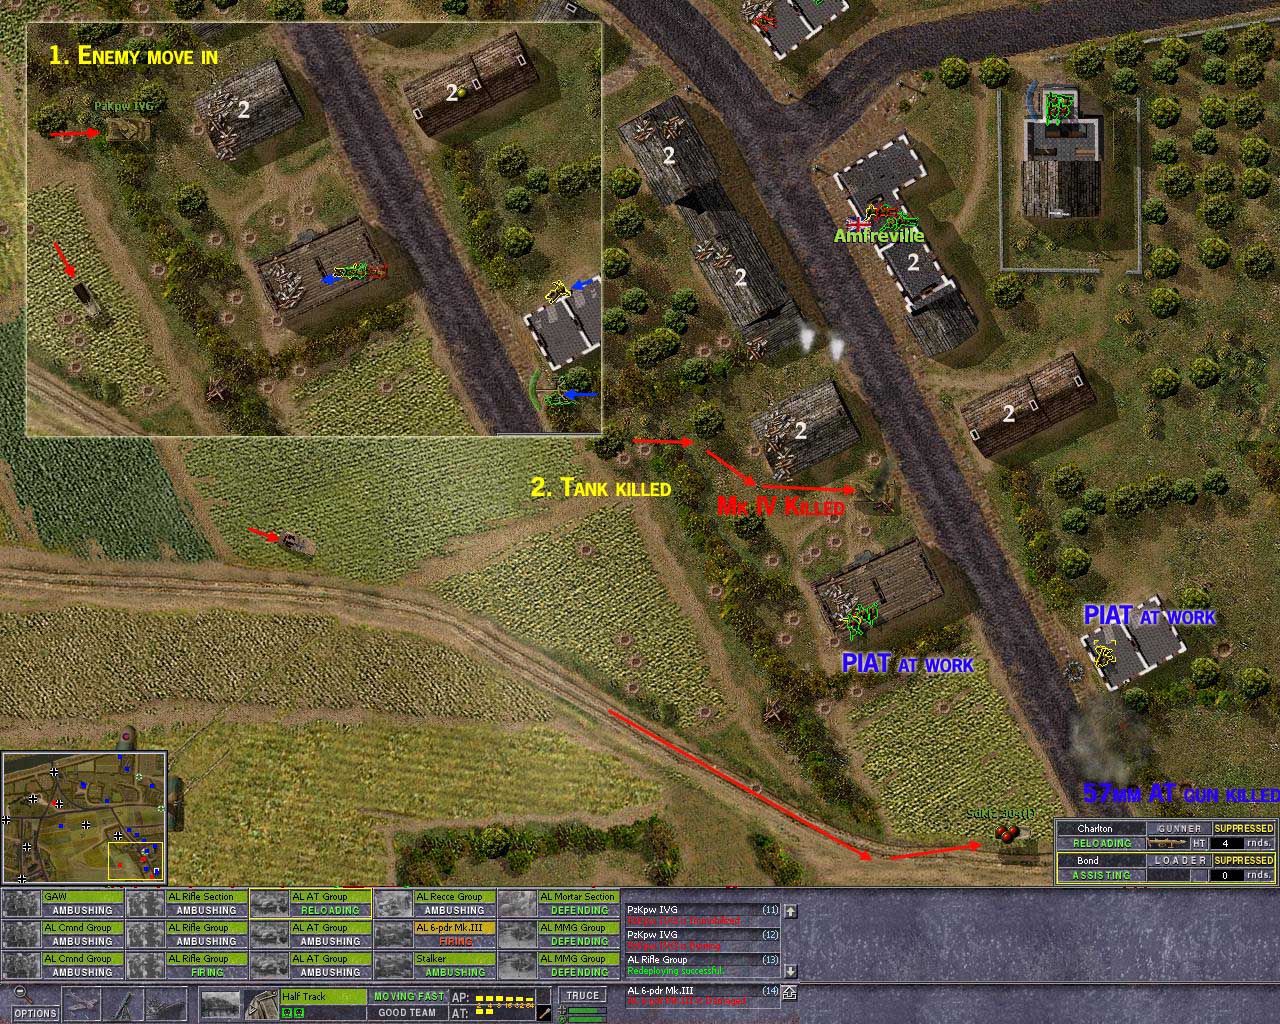
The Mk IV is neutrelized, his infantry team didn’t protect him well enough!
The damned HT destroyed my gun..
There we got the second Mk IV, ya, the PIAT and gun work perfect together.
Yah do it, get rid of em we must hold the whole village to be able to last some more rounds!
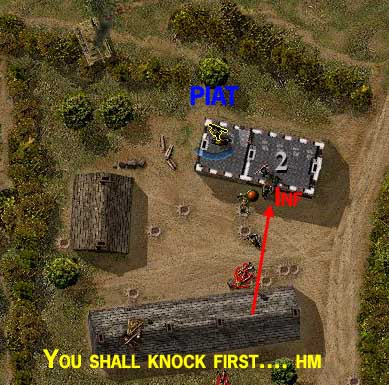
Yah, hm, haha, everything just work so perfect!
Damned, Dima is a sloppy commander, he ought to teach em to knock before enter, they was not welcome! My poor men!
Haha, another kill for the 57mm gun, they are indestructible!
I thought everything was working today! Uh, this is gone be bad..
Well, some more aria in South East village back to UK hands.
But North part seem a bit problematic!
Germans Lost 3 tanks, and 2 HT. UK losses was 2 guns and 1 PIAT and some other units.
Day: 8 th
Map: Bayeux
Hm, this will be easy… We know there are few things that is easy. Germans has a crap BG here, and all odds is on my side. But we are in a town, and any ambush of my men in a open street will result in heavy casualty’s.
I have no funnies, not even a tank with good HE, this is a weakness, but I have a lot of infantry, and they are well armed.
Problem is sometimes to set limit and reorganize the assult ass part mission is made.
If it go to easy, one is tempted to grab some more, and the organize and assemble men may be seen as a time delay witch may cause enemy to reorganize his defend and important time is lost.
Smoke cover advance Vicker in place to protect my exposed men.
It goes easy.
Easy, Dimas crap men make him be carious?
Finally resistance!
Vickers shall make there day bad..
Yeh, PIAT and Vickers shall silence that MG; and a Flamers is on its way from its Right side!
Sometimes one shall know when to stop… This would have been such time…
Dima has really played me here. He has let my men spread out, and im to eager to push on, he have several traps that I fall into soon.
Oh, I have so much to tell you all about what happnd here, I which I can do that someday. But we have to respect the Censor departments decisions.
Yeh, I was lured into that trap. But on the positive side, I gained really much of the map, In the start I was confined in the small South East corner, with limited options.
In next game, there is noo room for dimas little game he played here, if he don’t plan to set up ambush outside map ; ) … Something in me tell me, he will play some other tricks next time.. Damned partisan..
Several rolls of film and written reports has been lost in a C-47xp crash caused by some flak from the Germans.
Map: Bayeux
Date 10 th 6 am
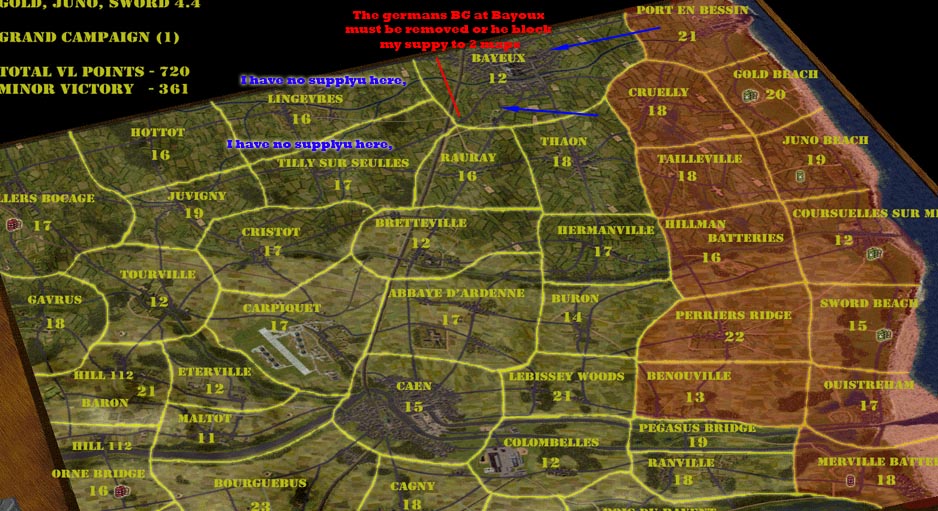
This map is v important to allied and ofcose to Germans, as it the hub to so many maps, and for the Germans they need just a unit on it to block the supply to move through, and allied must control whole map.
I have for many battles tried to through Dima out, but, that Russian Stalingrad glue is a special brew..
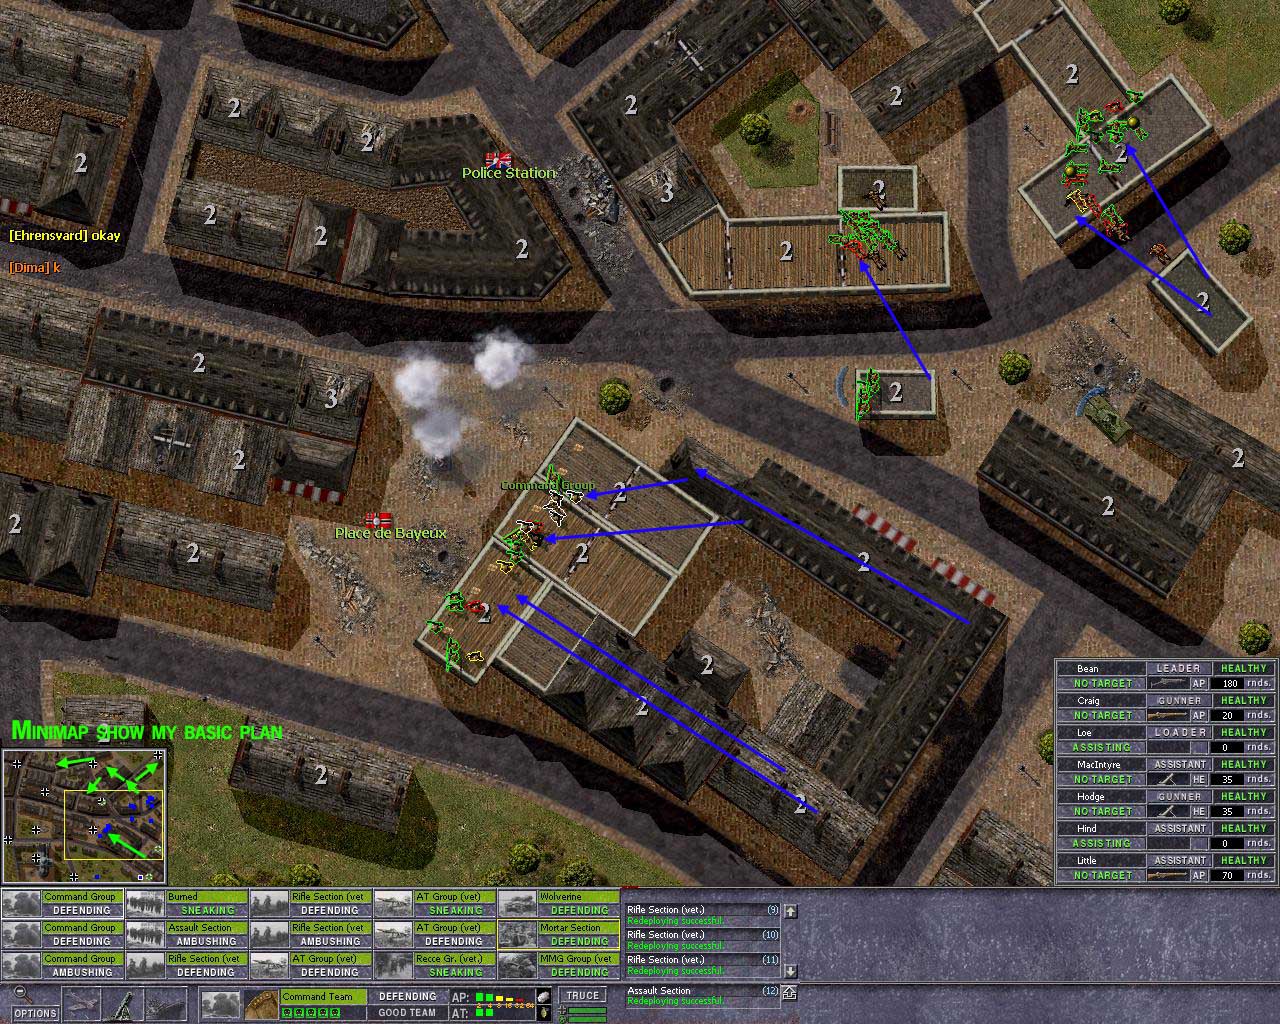
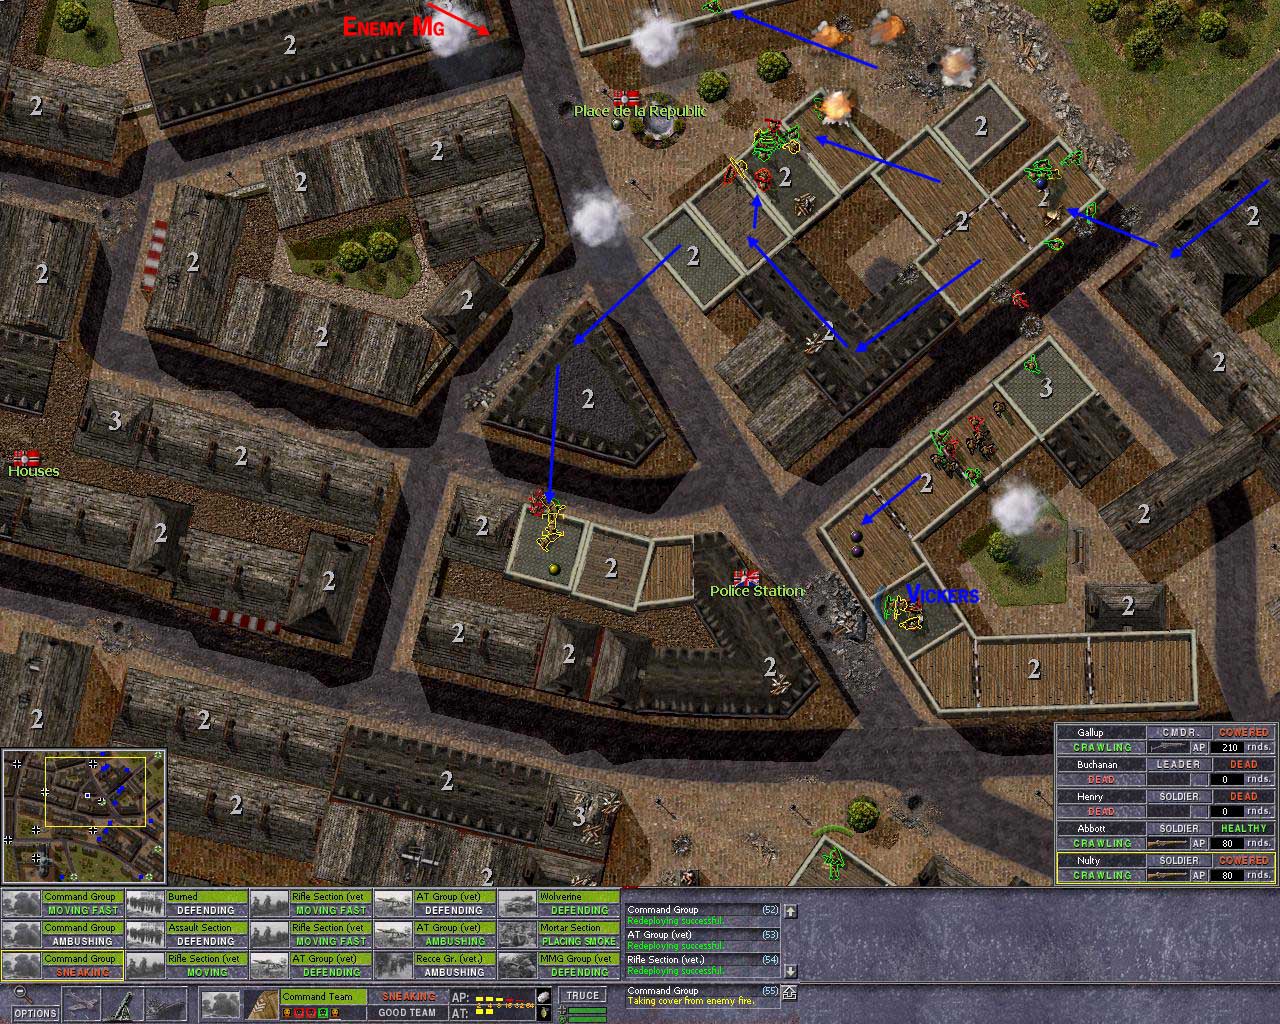
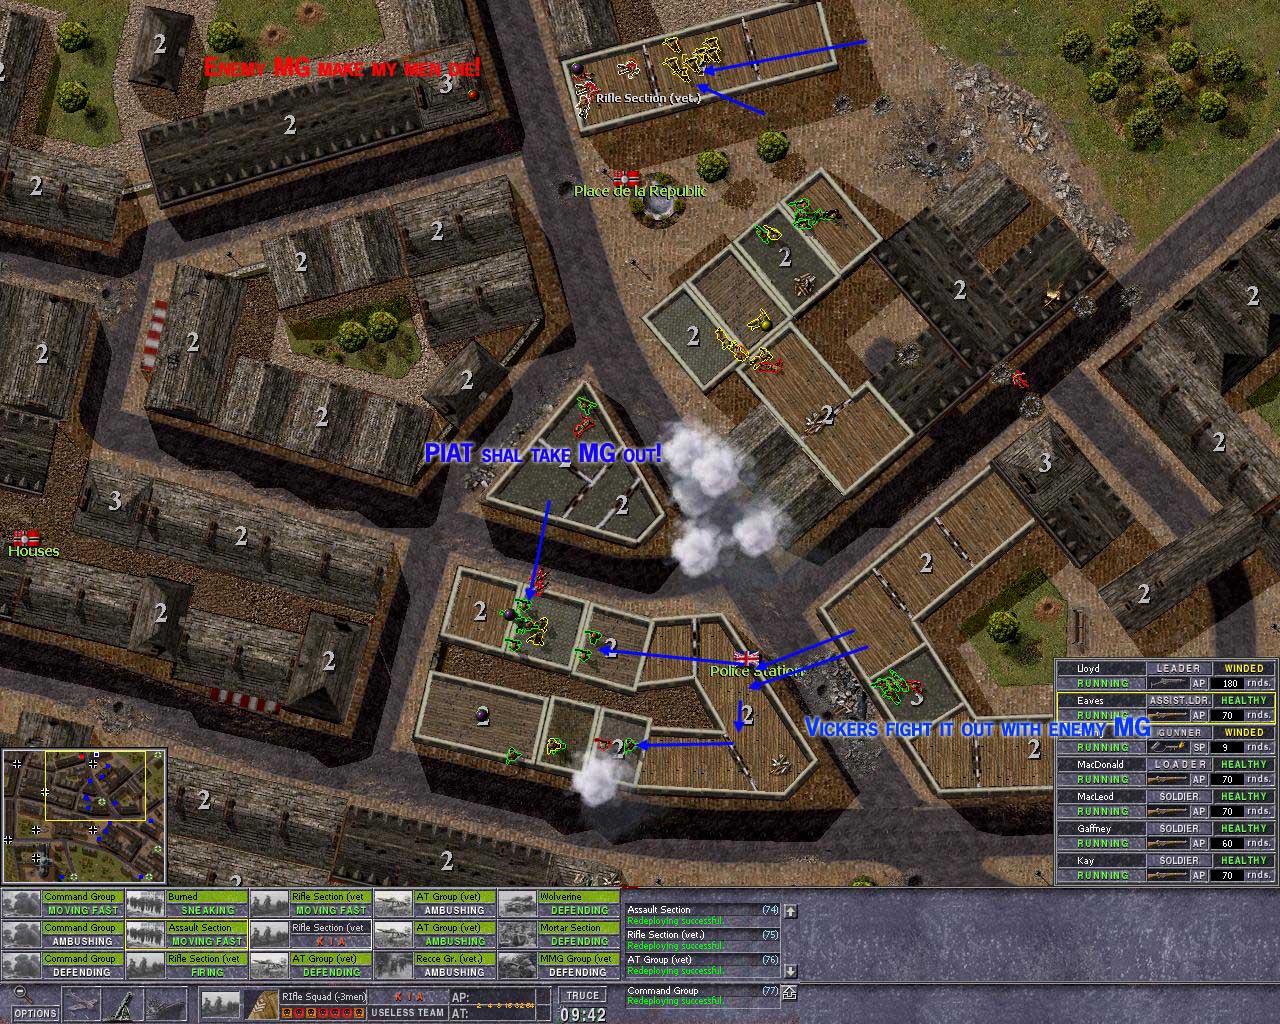
The battle begins, the allied force is in South, and it’s a massive force.
I have pasted many picks to one singe taken with minutes apart, and sequence is as yellow number say.
I have a Vickers for long range support in right side 2 story house.
1. The team is covered in smoke, this keep losses low, I also suspect the enemy mortars are at the Left south corner, and thus im inside there minimum range, this save life as Dima is the mortar man from hell.
At 2, we see the enemy, and the enemy MG is overwhelmed with fire.
At 3, enemy is so suppressed I send some team forward to kill em,
At 4, Speed things up, its so, that Dima is master of rearrange his troops, and if one give some time e will have a ambush ready and followed by counter assault
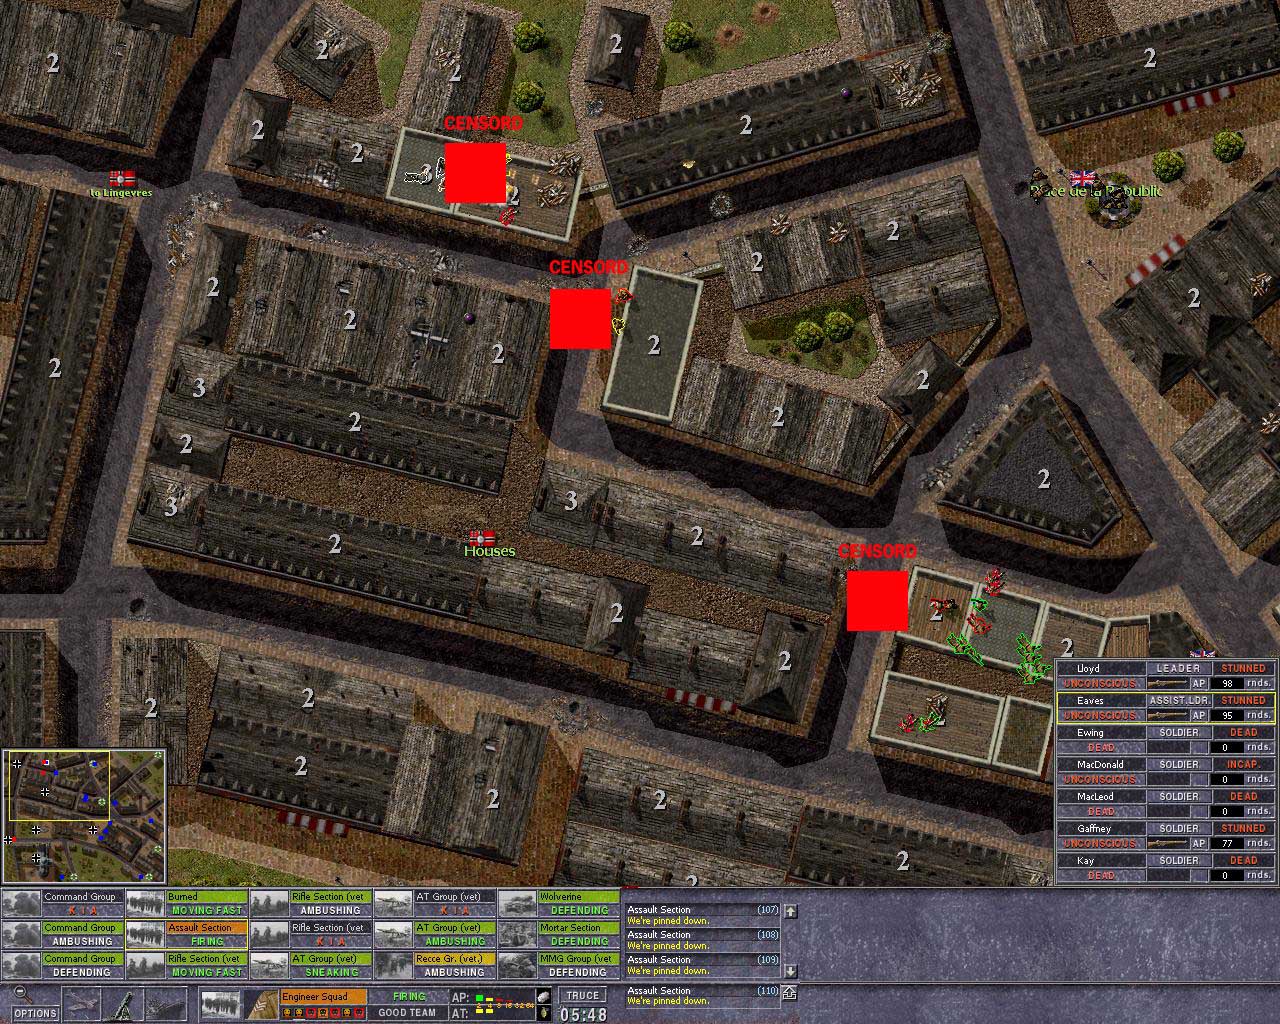
Well, then I forgot to take more pics , but in the end the Germans was through of, many life lost in the street fight just top of the yellow 4, and as that happen I moved in my North teams to grab VL in north,
End result:
Finally the map is cleared and supply’s move to my starving units.
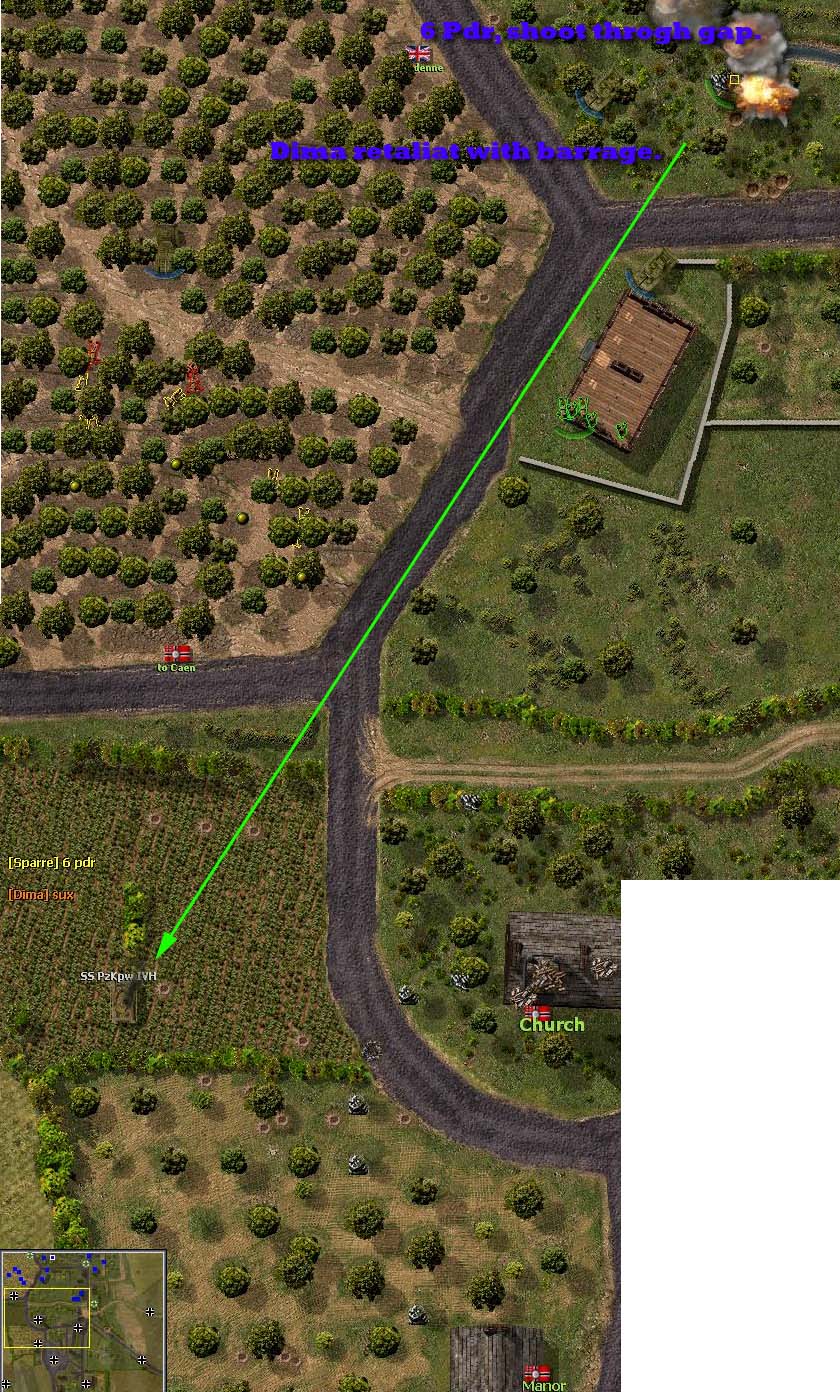
Yes, Dima have kicked me out and kicked the Allies around some times before on this horrible map. This time I come in from Top Right side, that make things a bit more easy.
By take the Exit to Caen (Left mid Exit) I deprive the Germans of there supply. This is the ONLY tactical goal in this fight.
But this starts ok, the 6 pdr kill the Mk IV, and Dima then call in the barrage and the poor gun is destroyed.
Here I try to get a PIAT to cover the right side of the church,
The Germans spot it, and for some reason send the tank forward, and the PIAT destroys it.
The Germans counter my moves by send in the Top North Right side tanks, probly aiming to derail my focus, and maybe take my supply VL up there?
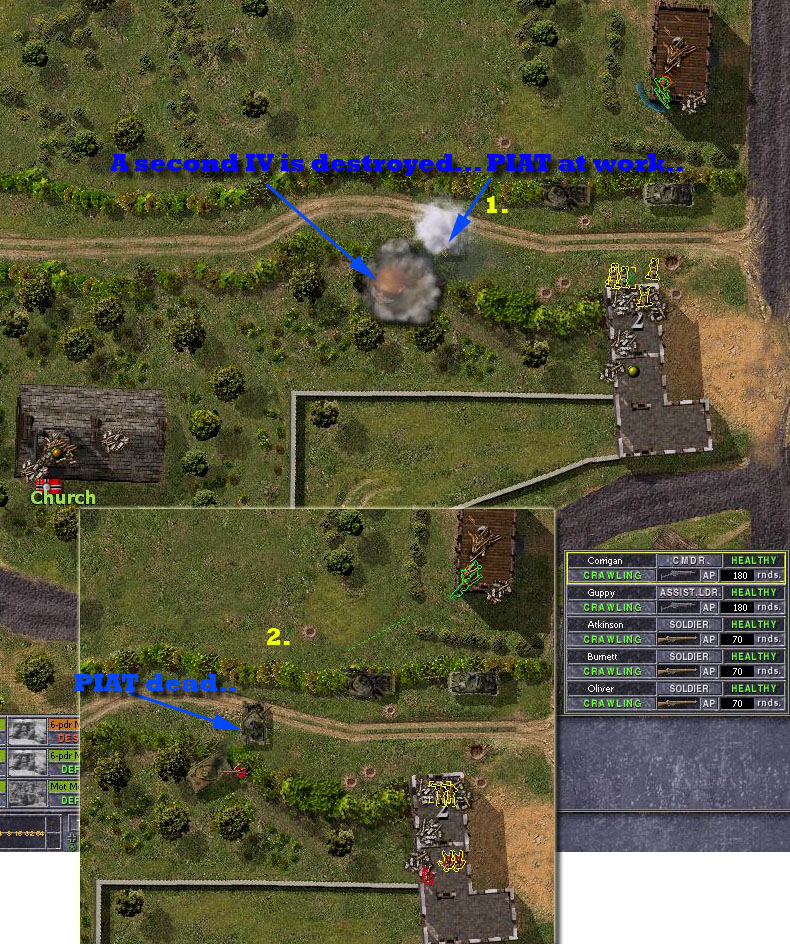
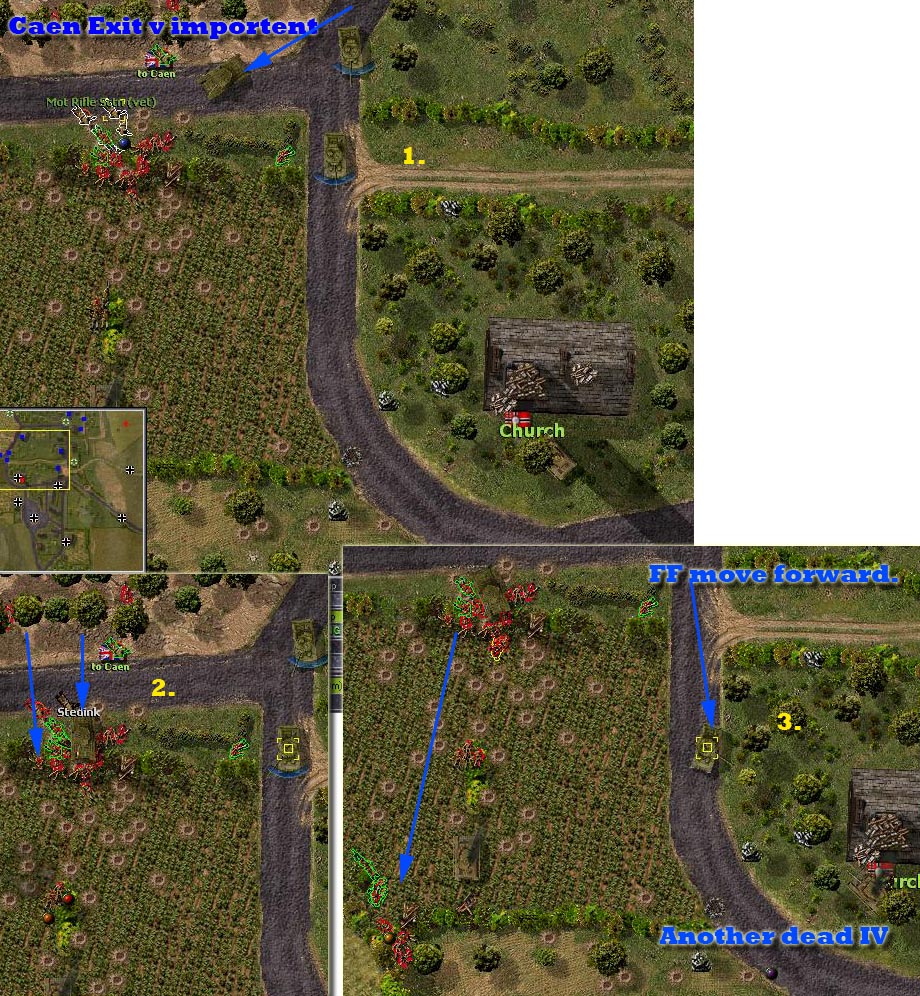
The fist IV moved forward at high speed, I placed a 6 pdr to guard that VL, and that came handy. 6 pdr kill the IV, and the second IV is sent southwards, probly to go round and help at other side of map at the left side Caen VL, the Second IV is killed by the same 6 pdr.
At the same time in Right side Caen VL:
Dima has a Scheck up in church tower, and he also sent in a new IV standing guard at church.
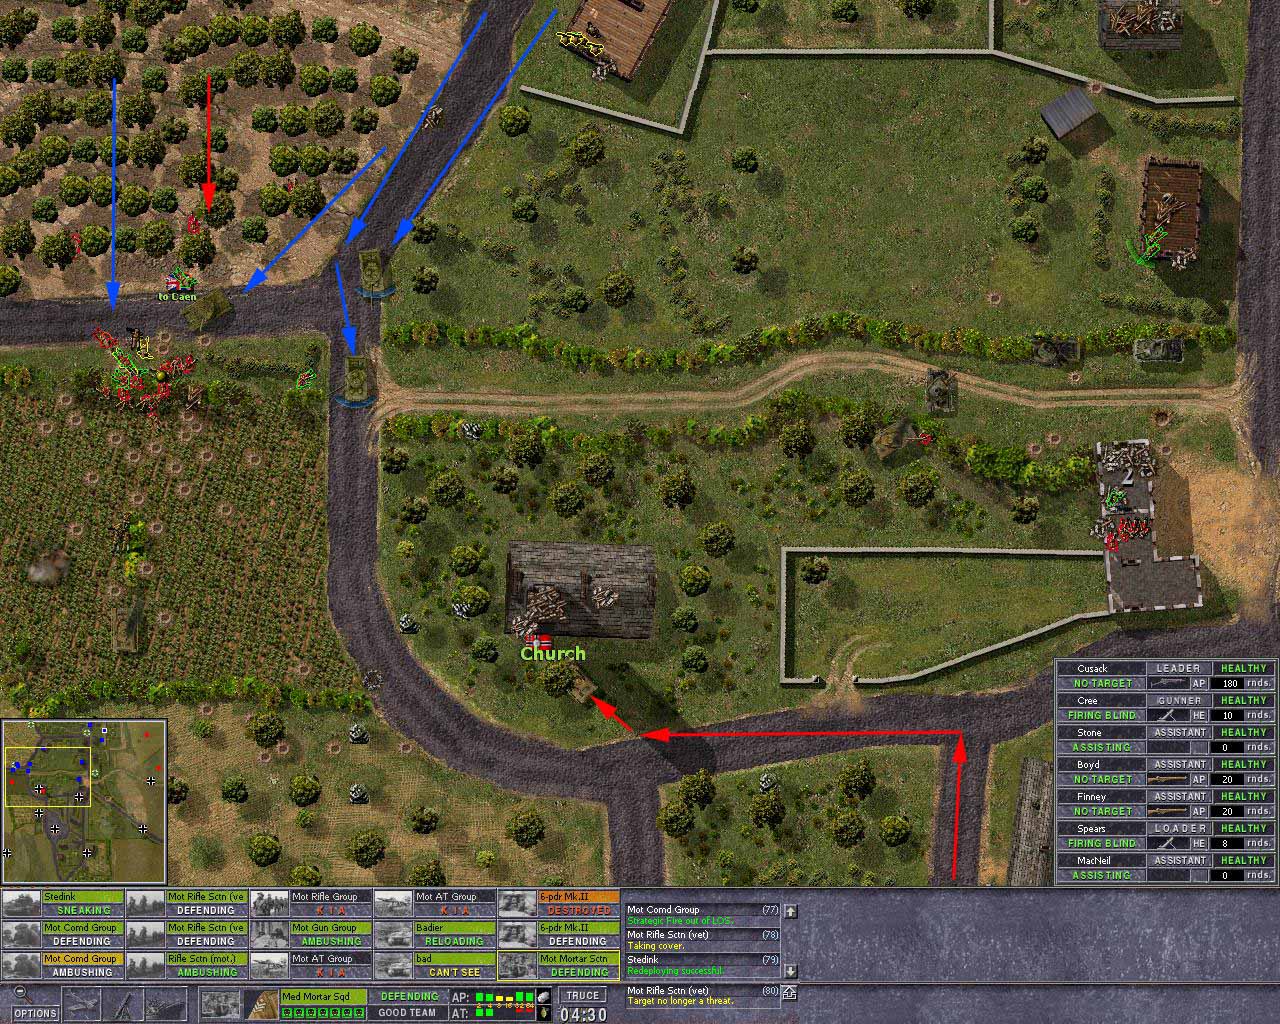
Now, dimas infantry is desperate, my 95mm howitzer move in, at same time the FF move forward to kill the IV behind the church.
End result, Germans lost 5 tanks model IV, the Caen VL is secure and Germans will have no fuel next battle. Well done men!
The maps north and right side is in UK control, and Germans has a partisan tactic here.
Dima focus on easy pray at low casualty.
What to do? Either assault from North, or from south, but not both at same time..
I decide to try the South aria..
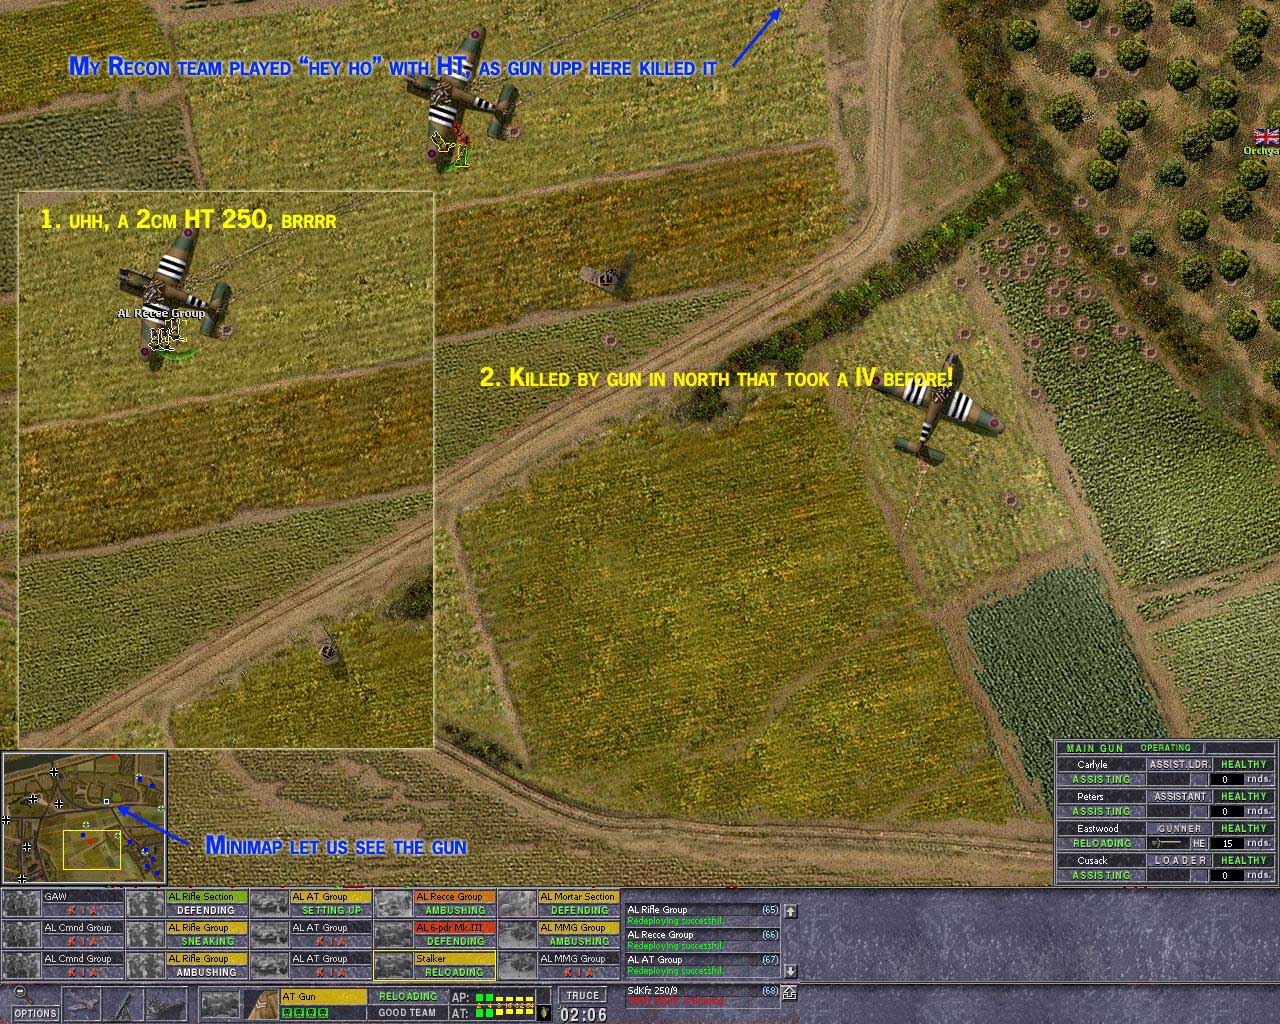
Dima has groped far in, and I can move rather simple, my AC with its canister ammo will make things easy if I approach some enemy inf, the AC cant take a AT gun shot thpough.
As I come a bit more up north, Dima has a Pak 40 wich make life short for my 2 AC,
Dima take light casualty’s, and play partisan really well.
I control the map, and Im rather happy to do that.
Dima has moved in a Panther BG, and that can be painful, for me.
But still the open arias, is threatening even for a panther, as both my 6 pdrs and FF can make more then a dent if hit panther in side, and as I control map, dima expect me to cover map from all sides..
He play safe, and sneak and try get a foot hold in left south aria.
I expected this move, so I placed a flamer there and a command team and a MG.
The germans attempt failed…
Movement.
This is the situation at the end of the 10 th 6 AM.
Maps: Lebissey Woods
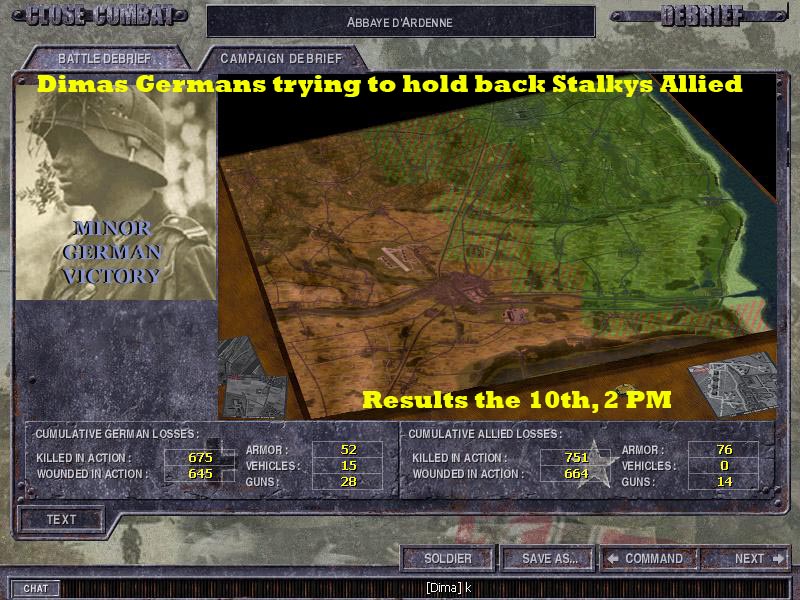
Date 10th 2 PM
This map is v imp for the GC, it hold the key to Caen.
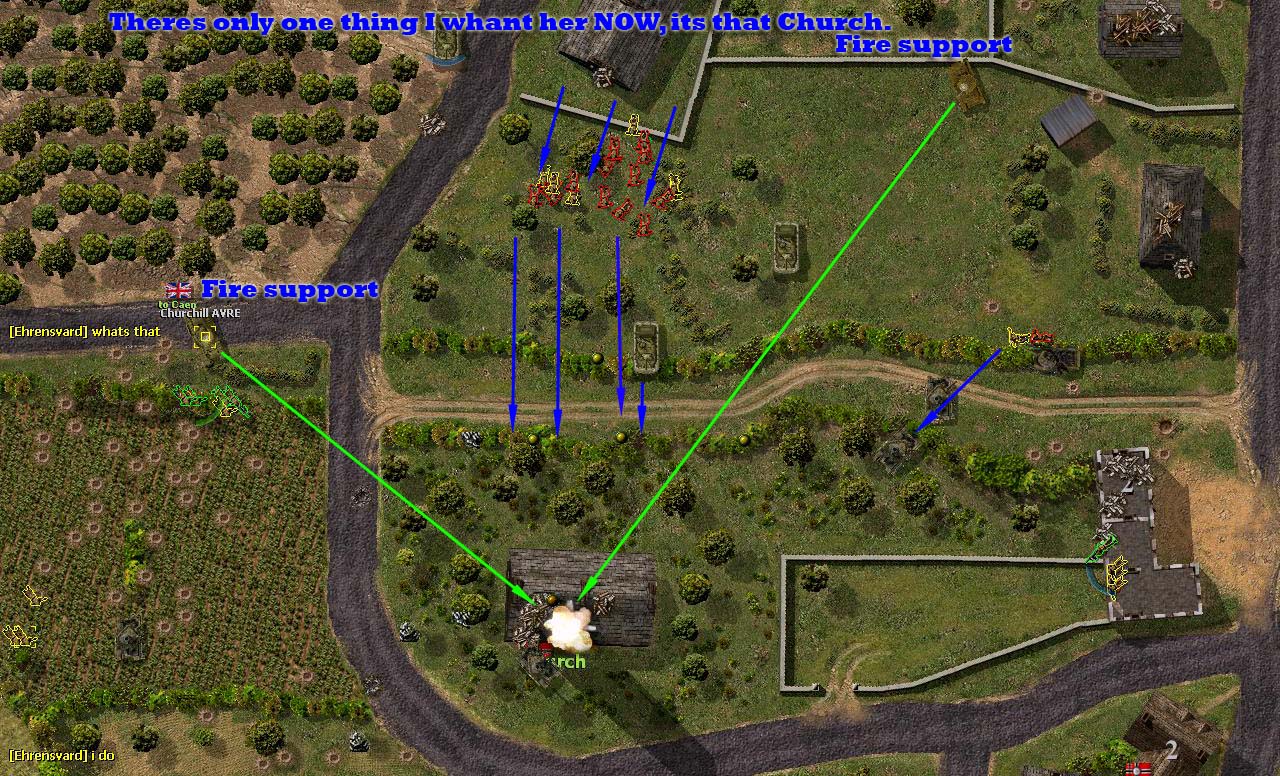
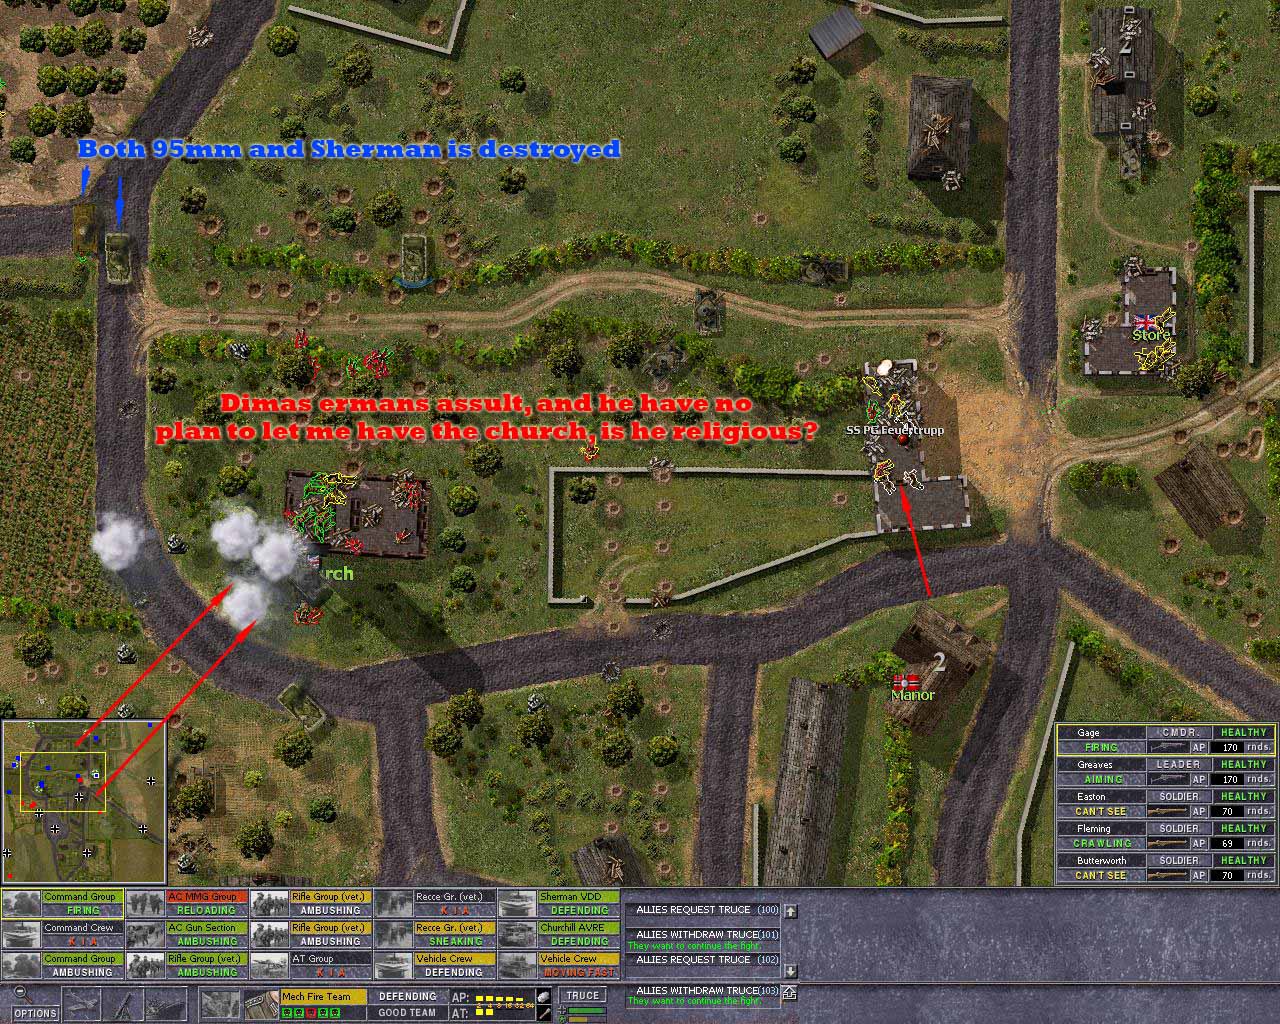
Tactic goal for this round: Get the church no matter what.
Dima probly has some schrecks in there that can pick my tanks of from the tower, so some massive suppression is in order for this to have any chance at all. The Suppression is take care of by 2 95mm howitzer tanks.
The church in it self will be stormed by infantry after the enemy is soften..
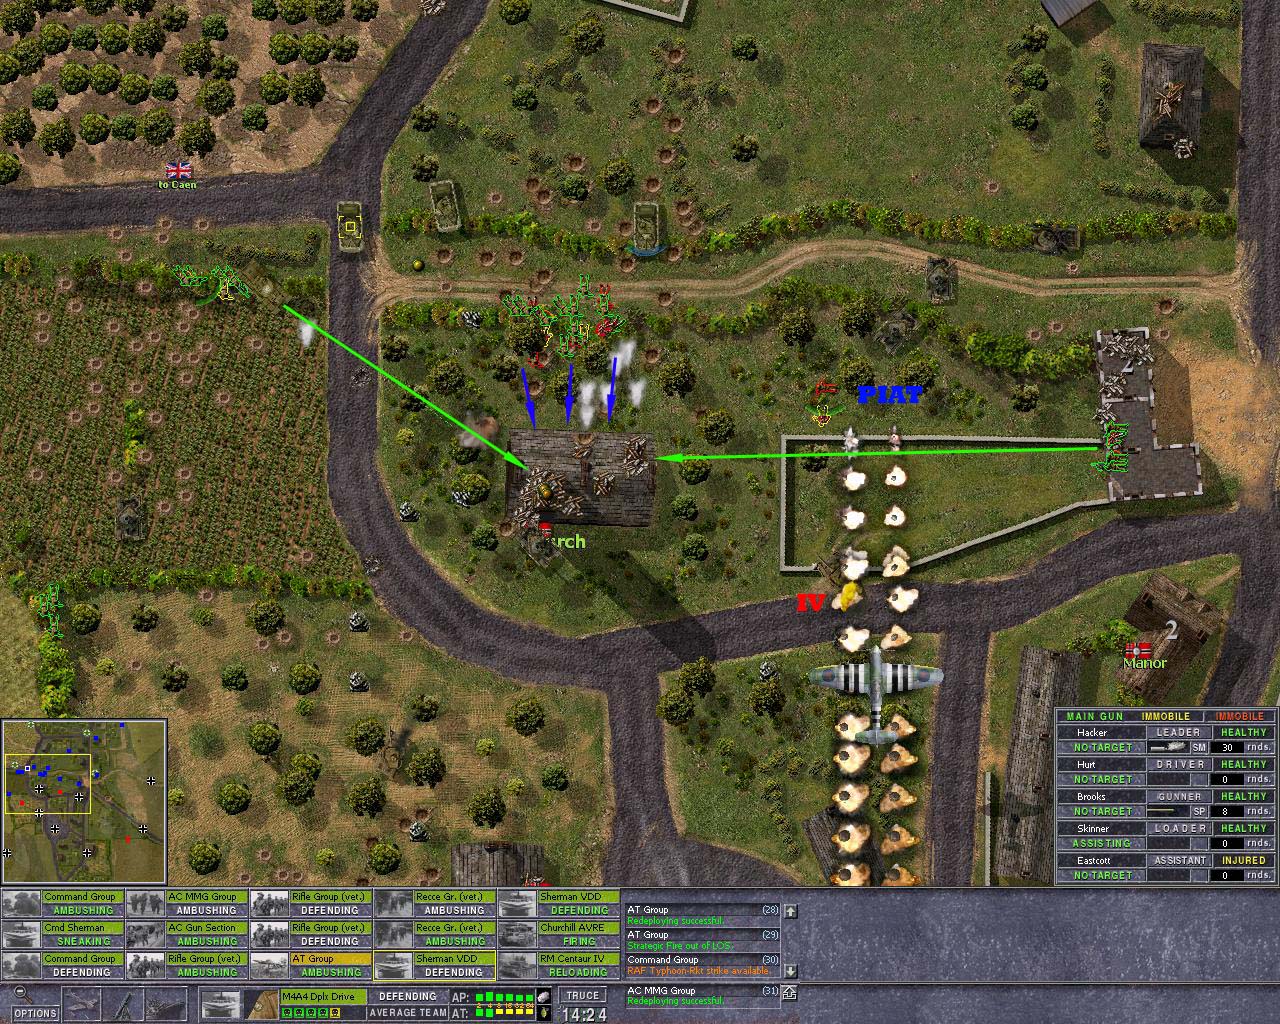
The Vickers team at right side provide some extra suppression so the enemy has little place to hide. On the left side a AVRE come in, and a enemy IV tank comes in to massacre my infantry, that IV is bombed by the RAF.
The infantry assult is barraged by Dima, and the tank following em is immobilized.
Dima has rearranged his defence, and the IV now is at left side, RAF dint do there work properly.
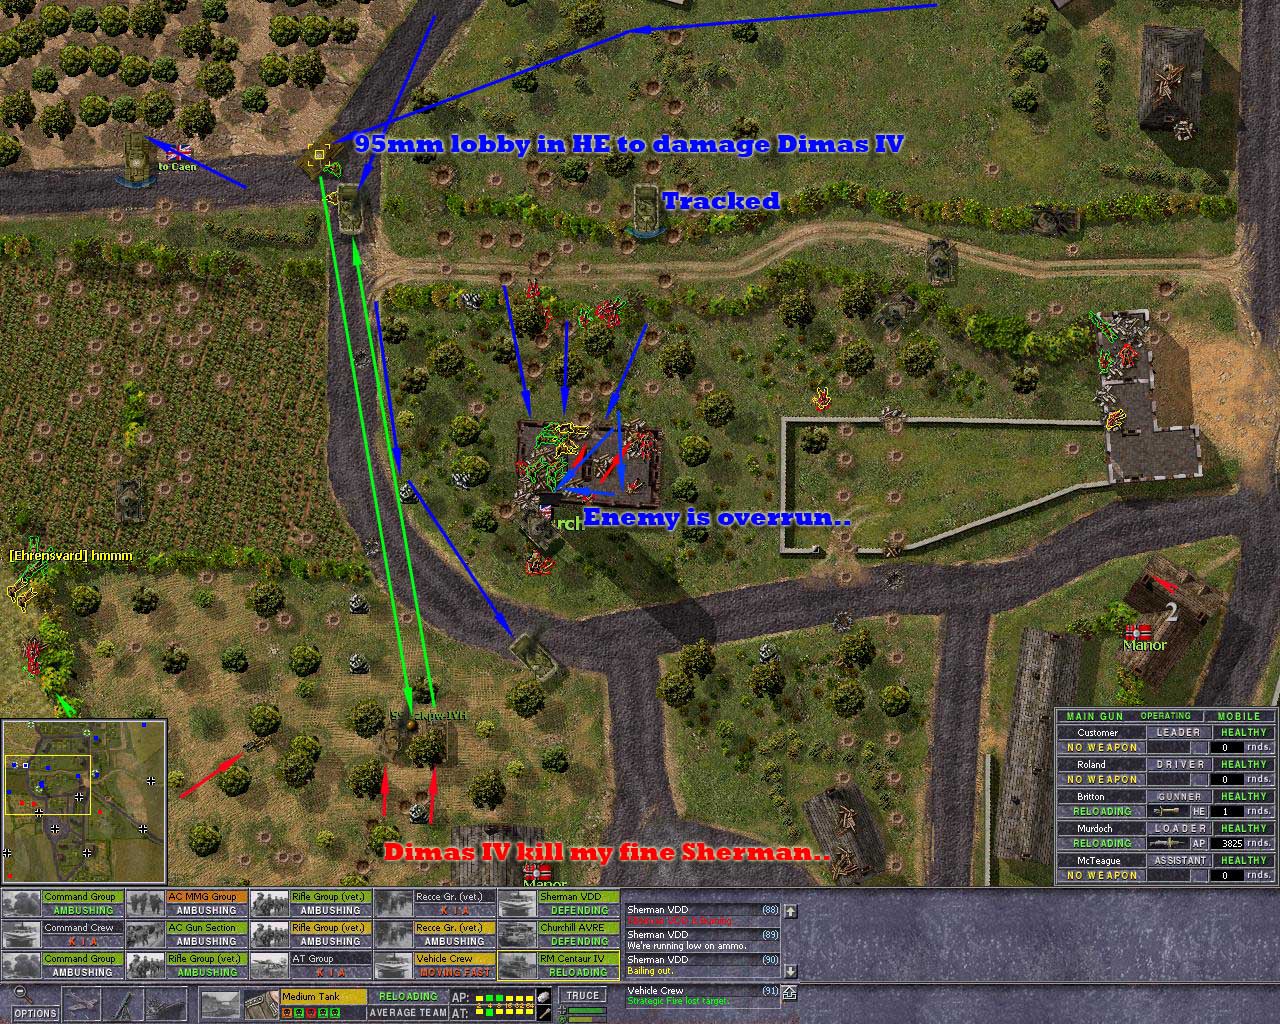
The smoking IV got killed by my Sherman, but the other IV then take out that Sherman, and later the 95mm to..
The church is taken by the infantry, but dima will not let this stand, here come his infantry to.
Situation is critical, dima moves in and my morale is really low.
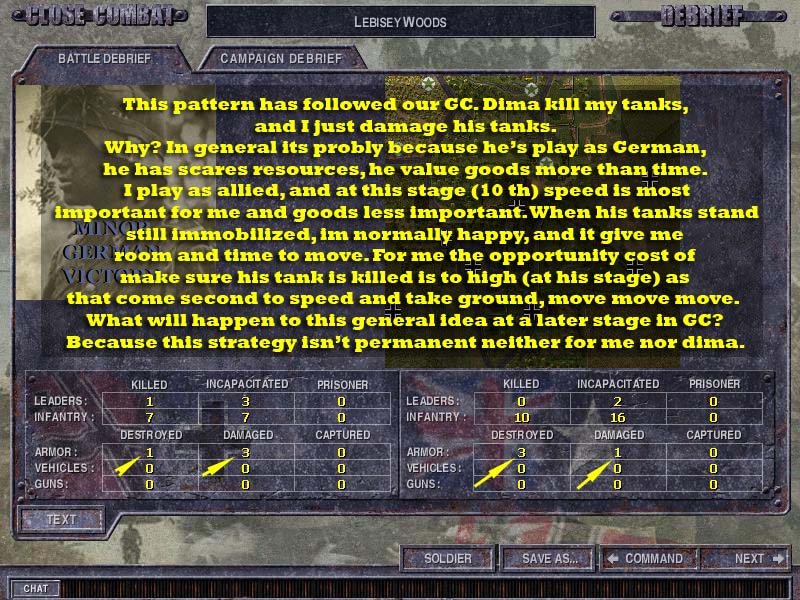
End result.
This pattern of destroyed vs damaged tanks has followed us through the this GC and all our GC I can remember.
Im not sure, but its most likely about opportunity cost, its to costly and risky to make sure his tanks is killed, take ground is more imp to me, and then I just hope his tanks isn’t repaired to next round.
Said that was in general, but In some battle, there just isnt any value to risk the last AT resources on the final kill, and ofcose in some battle there just inst any resorces left to use...
Dima has a total other general idea, he make sure my tanks are really dead, its also so he generally takes more deadly shots as he open fire, mostly in side. For me, I just want to stop his tank so any shot may do that, and then I can move.
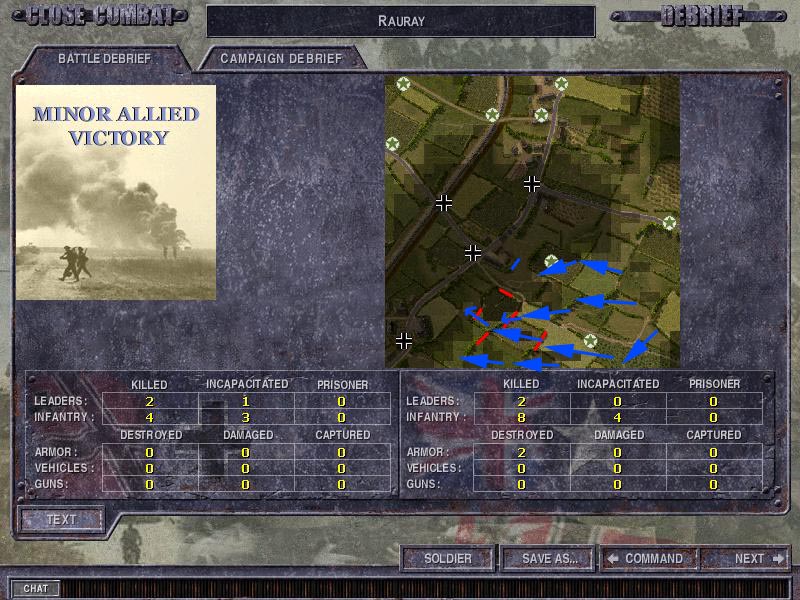
Maps: Rauray
Date 10th 2 PM
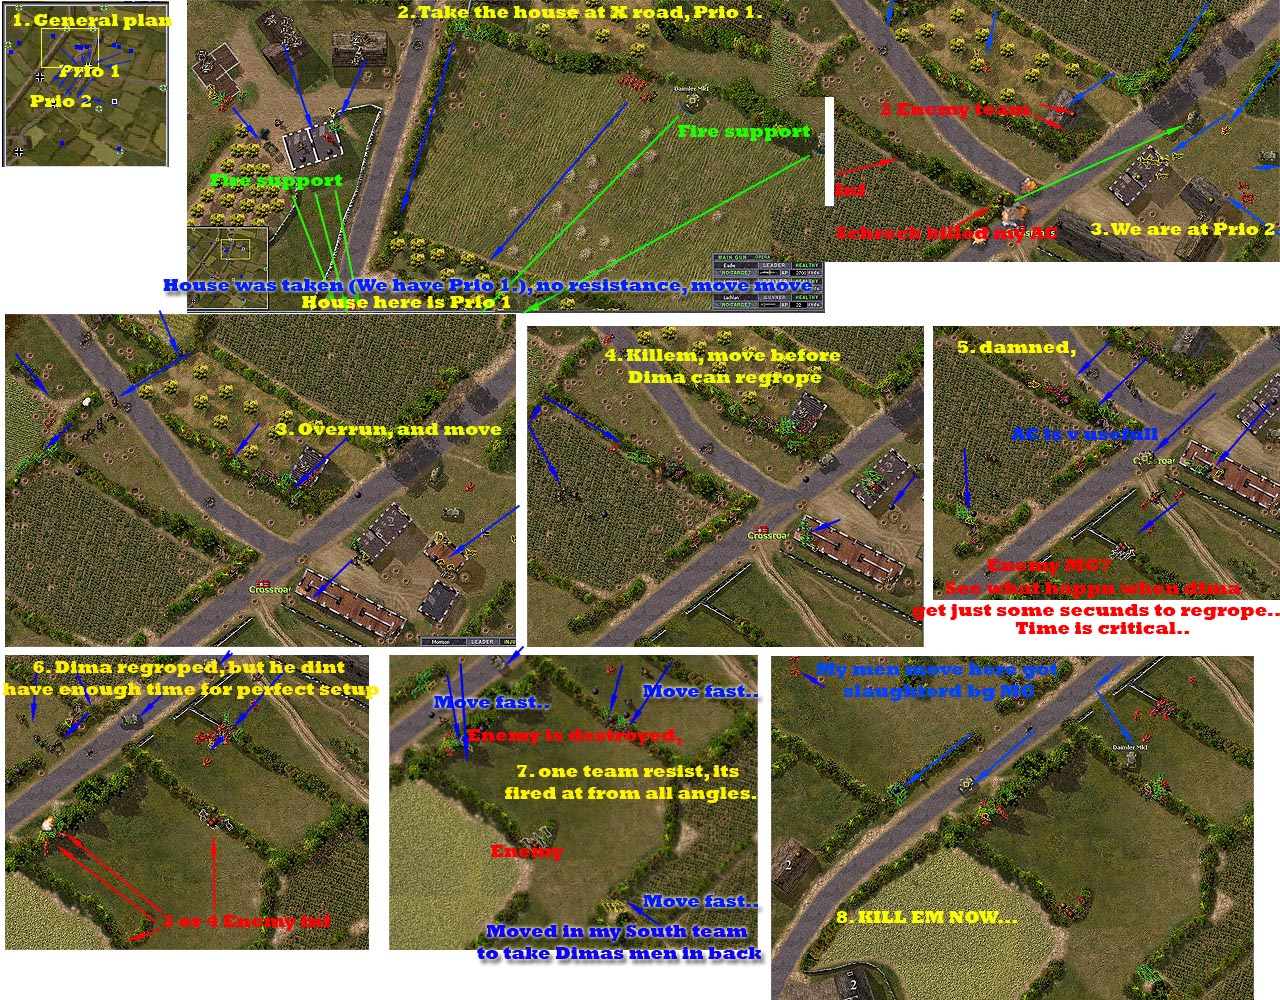
General idea, grab the center houses, and move to the X road, and secure that.
at 2) I suspected Dima would have some inf team and maybe a schreck in there, but if he had he removed em as he saw what he was up against. Hes master of the partisan warfare and isn’t that annoying.
At 3) We are moving to Prio 2, the X road and the buildings there. My AC has canisters, and they are really cool for infantry support, as long as they aint hit.. Dima score a Schreck hit on my fine AC, and its burning. I must kill that schreck, mortars pin it down, and I must move in some infantry to kill it.
At 4) The infantry team has flanked him, and his men is dealt with.
At 5) Crap, ambushed, but here the AC is so useful in infantry close support role, it take control of situation fast.
At 6) I move over his men, but there is a 3 rd and 4 th line of partisan ambushes, lucky I held my men close and the ACs near by, the 2 AC make all the difference..
AT 7) well, see what I mean, here he has the 5 th line of ambush… This is dealt with from three sides, as I moved up my South team to fire at the partisans backs.
At In top of map, the enemy MG42 shop my team into small parts, and that’s the danger of moving without cover, but sometimes it pays of, I like that, and its not my life to pay with anyway…
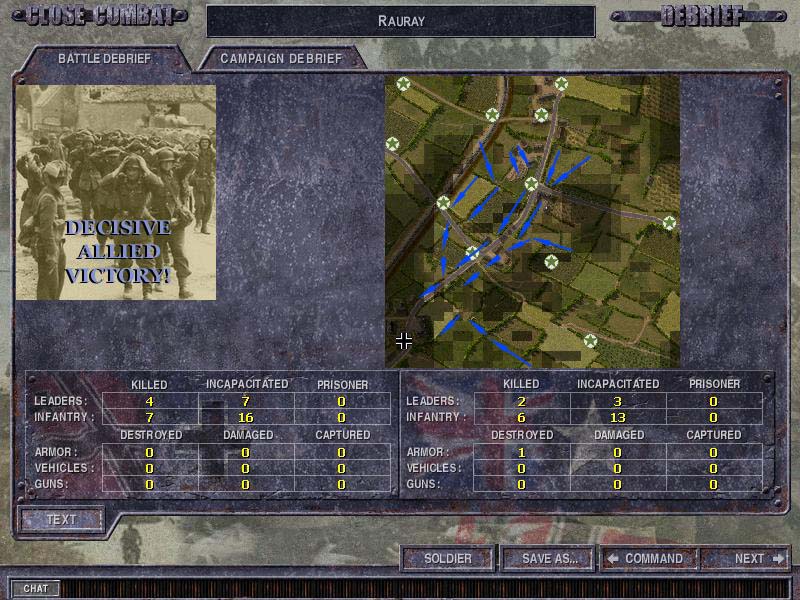
End result, so what’s some life’s for the grater good? I rather take 25 casualty’s in one go, then have to fight here 10 times and just have 10 casualty’s each time. This was fast and kill ratios was ok, and Germans are so boxed in they hardly can’t fight here one more time without suffer major losses.
Last edited by AT_Stalky on Mon Dec 08, 2008 11:48 am; edited 1 time in total
You cannot post new topics in this forum You cannot reply to topics in this forum You cannot edit your posts in this forum You cannot delete your posts in this forum You cannot vote in polls in this forum You cannot attach files in this forum You can download files in this forum
In August of 2004, Zappi, Homba, Bambam887, RedScorpion and MOOXE all pitched
in to create this Close Combat site. I would to thank all the people who have visited
and found this site to thier liking. I hope you had time to check out some
of the great Close Combat mods and our forums. I'd also like to thank
all the members of our volunteer staff that have helped over
the years, and all our users that contributed to this site!


/Gold.JPG)
/Gold1.JPG)
/Gold2.JPG)
/Gold3.JPG)
/Juno.JPG)
/Sword.JPG)
/Sword1.JPG)
/Sword2.JPG)
/Sword3.JPG)
/ouisterham.jpg)
/PeB.JPG)
/PEB1.jpg)
/Ouister-2.JPG)
/Ouister-21.JPG)
/Ranville.JPG)
/results_06.06.44_2.jpg)
/07.06/vs_Stalk_07.06.440002.jpg)
/07.06/vs_Stalk_07.06.440003.jpg)
/07.06/vs_Stalk_07.06.440004.jpg)
/07.06/vs_Stalk_07.06.440005.jpg)
/07.06/vs_Stalk_07.06.440007.jpg)
/07.06/vs_Stalk_07.06.440011.jpg)
/07.06/vs_Stalk_07.06.440012.jpg)
/07.06/vs_Stalk_07.06.440013.jpg)
/07.06/vs_Stalk_07.06.440015.jpg)
/07.06/vs_Stalk_07.06.440017.jpg)
/07.06/vs_Stalk_07.06.440018.jpg)
/07.06/vs_Stalk_07.06.440020.jpg)
/07.06/vs_Stalk_07.06.440021.jpg)
/07.06/vs_Stalk_07.06.440022.jpg)
/07.06/vs_Stalk_07.06.440024.jpg)
/07.06/vs_Stalk_07.06.440026.jpg)
/07.06/vs_Stalk_07.06.440027.jpg)
/07.06/vs_Stalk_07.06.440030.jpg)
/07.06/vs_Stalk_07.06.440031.jpg)
/07.06/vs_Stalk_07.06.440034.jpg)
/07.06/vs_Stalk_07.06.440036.jpg)
/07.06/vs_Stalk_07.06.440037.jpg)
/07.06/vs_Stalk_07.06.440041.jpg)
/07.06/vs_Stalk_07.06.440043.jpg)
/07.06/vs_Stalk_07.06.440044.jpg)
/07.06/vs_Stalk_07.06.440045.jpg)
/07.06/vs_Stalk_07.06.440046.jpg)
/07.06/vs_Stalk_07.06.440049.jpg)
/07.06/vs_Stalk_07.06.440052.jpg)
/07.06/vs_Stalk_07.06.440054.jpg)
/07.06/vs_Stalk_07.06.440055.jpg)
/07.06/vs_Stalk_07.06.440056.jpg)
/07.06/vs_Stalk_07.06.440058.jpg)
/07.06/vs_Stalk_07.06.440060.jpg)
/07.06/vs_Stalk_07.06.440063.jpg)
/07.06/vs_Stalk_07.06.440064.jpg)
/07.06/vs_Stalk_07.06.440065.jpg)
/07.06/vs_Stalk_07.06.440066.jpg)
/07.06/vs_Stalk_07.06.440067.jpg)
/07.06/vs_Stalk_07.06.44_20002.jpg)
/07.06/vs_Stalk_07.06.44_20003.jpg)
/07.06/vs_Stalk_07.06.44_20007.jpg)
/07.06/vs_Stalk_07.06.44_20011.jpg)
/07.06/vs_Stalk_07.06.44_20012.jpg)
/07.06/vs_Stalk_07.06.44_20014.jpg)
/07.06/vs_Stalk_07.06.44_20015.jpg)
/07.06/vs_Stalk_07.06.44_20018.jpg)
/07.06/vs_Stalk_07.06.44_20022.jpg)
/07.06/vs_Stalk_07.06.44_20025.jpg)
/07.06/vs_Stalk_07.06.44_20028.jpg)
/07.06/vs_Stalk_07.06.44_20030.jpg)
/07.06/vs_Stalk_07.06.44_20032.jpg)
/07.06/vs_Stalk_07.06.44_20036.jpg)
/07.06/vs_Stalk_07.06.44_20037.jpg) [/img]
[/img]
/07.06/vs_Stalk_07.06.44_20044.jpg)
/07.06/vs_Stalk_07.06.44_20046.jpg)
/07.06/vs_Stalk_07.06.44_20047.jpg)
/07.06/vs_Stalk_07.06.44_20049.jpg)
/07.06/vs_Stalk_07.06.440071.jpg)
/07.06/vs_Stalk_07.06.440072.jpg)
/07.06/vs_Stalk_07.06.440075.jpg)
/07.06/vs_Stalk_07.06.440076.jpg)
/07.06/vs_Stalk_07.06.440077.jpg)