| 6 AC destroyed.jpg | ||
| Description: |
|
|
| Filesize: | 155.16 KB | |
| Viewed: | 11138 Time(s) | |
 |
||
| 8 Clearing to Arnhem VL.jpg | ||
| Description: |
|
|
| Filesize: | 145.51 KB | |
| Viewed: | 11133 Time(s) | |
 |
||
| 9 Arnhem West Approach Clear!.jpg | ||
| Description: |
|
|
| Filesize: | 116.05 KB | |
| Viewed: | 11133 Time(s) | |
 |
||
| OOB2.jpg | ||
| Description: |
|
|
| Filesize: | 140.16 KB | |
| Viewed: | 11121 Time(s) | |
 |
||
| 1 Start.jpg | ||
| Description: |
|
|
| Filesize: | 108.5 KB | |
| Viewed: | 11121 Time(s) | |
 |
||
| 2 Assaulting the enemy.jpg | ||
| Description: |
|
|
| Filesize: | 152.92 KB | |
| Viewed: | 11116 Time(s) | |
 |
||
| 3 Tightening the noose.jpg | ||
| Description: |
|
|
| Filesize: | 130.6 KB | |
| Viewed: | 11116 Time(s) | |
 |
||
| 4 Approaching the enemy's last positions.jpg | ||
| Description: |
|
|
| Filesize: | 160.67 KB | |
| Viewed: | 11111 Time(s) | |
 |
||
| 5 Final Assault.jpg | ||
| Description: |
|
|
| Filesize: | 160.28 KB | |
| Viewed: | 11111 Time(s) | |
 |
||
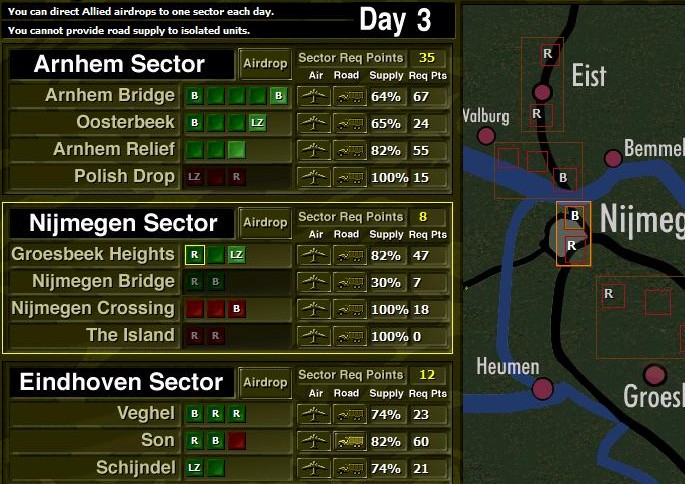
| 4 3rd Day Supply.jpg | ||
| Description: |
|
|
| Filesize: | 130.24 KB | |
| Viewed: | 11093 Time(s) | |
 |
||
| sigeena wrote (View Post): |
| We had anticipated the enemy to attack with tanks and once we spotted it, the order was given, to silently withdraw. We'll keep ourselves in better shape to fight them. |
| OOB2.jpg | ||
| Description: |
|
|
| Filesize: | 131.81 KB | |
| Viewed: | 11069 Time(s) | |
 |
||
| 1 Start.jpg | ||
| Description: |
|
|
| Filesize: | 125.38 KB | |
| Viewed: | 11069 Time(s) | |
 |
||
| 2 Assaulting the Villa.jpg | ||
| Description: |
|
|
| Filesize: | 173.31 KB | |
| Viewed: | 11046 Time(s) | |
 |
||
| 4 Destroyed ATG and HT.jpg | ||
| Description: |
|
|
| Filesize: | 147.64 KB | |
| Viewed: | 11046 Time(s) | |
 |
||
| 3 Loss of Villa.jpg | ||
| Description: |
|
|
| Filesize: | 141.52 KB | |
| Viewed: | 11043 Time(s) | |
 |
||
| 5 Loss of Assault teams.jpg | ||
| Description: |
|
|
| Filesize: | 171.9 KB | |
| Viewed: | 10530 Time(s) | |
 |
||
| 6 2nd Line.jpg | ||
| Description: |
|
|
| Filesize: | 141.32 KB | |
| Viewed: | 10530 Time(s) | |
 |
||
| 7 Loss of 2nd Line.jpg | ||
| Description: |
|
|
| Filesize: | 143.26 KB | |
| Viewed: | 10524 Time(s) | |
 |
||
| 8 End of Battle.jpg | ||
| Description: |
|
|
| Filesize: | 107.55 KB | |
| Viewed: | 10524 Time(s) | |
 |
||
output generated using printer-friendly topic mod. All times are GMT