sigeena

Rep: 14.2  
votes: 1
|
 Posted: Wed Aug 18, 2010 5:33 am Post subject: CC2 ABTF GC Posted: Wed Aug 18, 2010 5:33 am Post subject: CC2 ABTF GC |
 |
|
In view of the recent interest in Operation Market Garden by the release of Last Stand Arnhem, I've decided to launch a Grand Campaign of my very own on the vintage CC2, A Bridge Too Far.
Here's hoping that there's still interest and adoration for this 13 year old game.
I'll be playing with Real Para, as the Allies, on Veteran level. If time permits, I'll be posting a new battle everyday.
|
|
|
| Back to top |
|
| |
|
|
sigeena
Rep: 14.2
votes: 1
|
| Posted: Wed Aug 18, 2010 5:36 am Post subject: Day 1 Arnhem Sector |
|
|
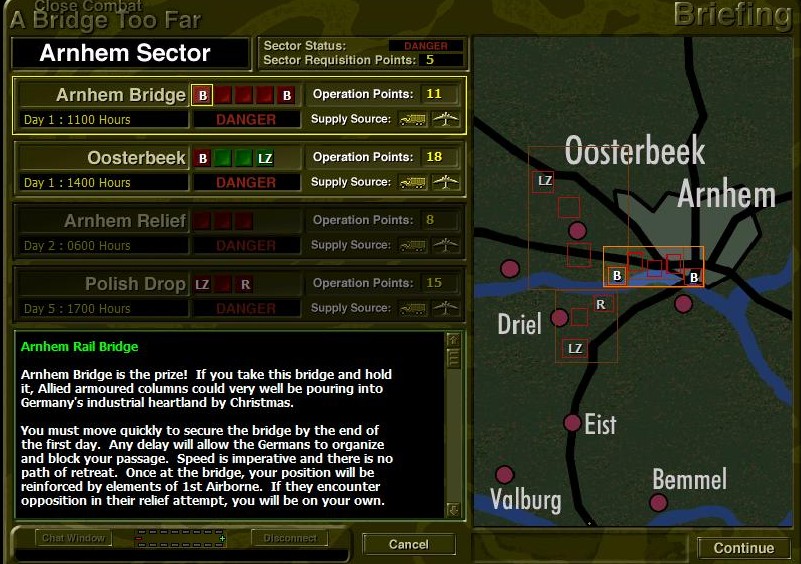
2 Operations in the 1st day of Arnhem Sector.
Arnhem Bridge Op will be a series of aggressive thrusting offensives (5 maps) to capture the Arnhem Bridge. Arnhem Bridge can be reached and captured by the end of the 1st day provided the 2nd Para does not dally, taking 1hr ceasefire after end of each successful map.
Oosterbeek Op will be the direct opposite of Arnhem Bridge. It will consists of defending the LZ from capture by German forces and failing so, about fighting for survival of the 1st AB
| Description: |
| Day 1 Arnhem Sector Briefing |
|
| Filesize: |
160.98 KB |
| Viewed: |
13107 Time(s) |
|
|
|
|
| Back to top |
|
| |
sigeena
Rep: 14.2
votes: 1
|
| Posted: Wed Aug 18, 2010 5:41 am Post subject: Arnhem Bridge Team List |
|
|
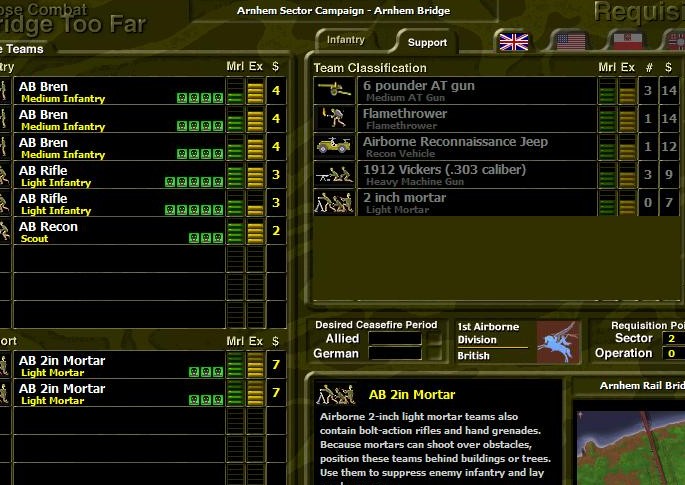
The original starting line-up consists of only 3 Bren, 2 Rifle and 1 Recon team. In an effort to beef-up firepower, I've req. for 2 teams of 2 Inch Mortar. I know these guys will be very useful with their smoke even when they are out of HE rounds.
| Description: |
| Team List- 2 Teams of 2 Inch Mortar added |
|
| Filesize: |
113.43 KB |
| Viewed: |
13106 Time(s) |
|
|
|
|
| Back to top |
|
| |
sigeena
Rep: 14.2
votes: 1
|
| Posted: Wed Aug 18, 2010 5:46 am Post subject: Arnhem Rail Bridge Map Assessment and Planning |
|
|
Map Assessment
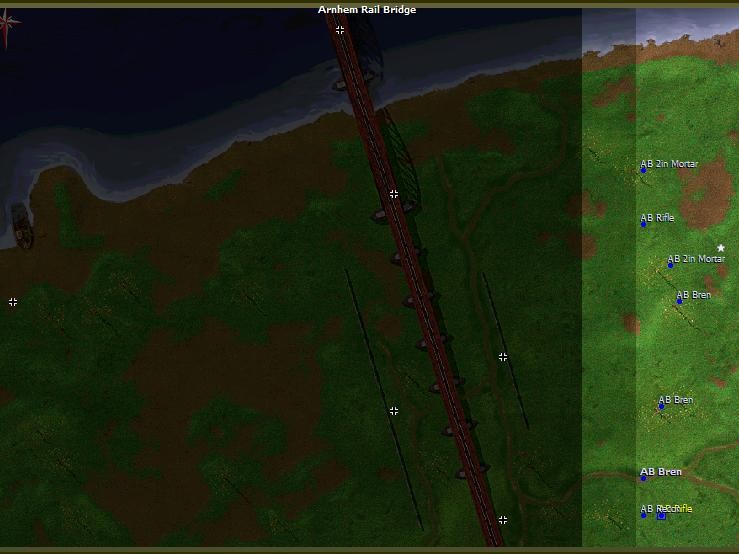
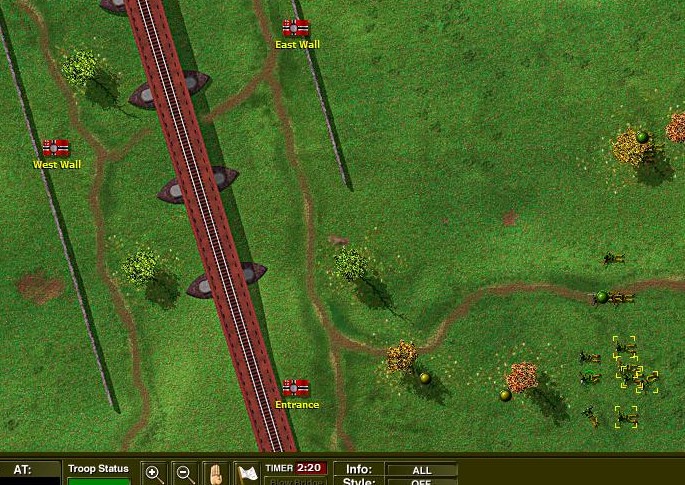
This map is dominated by the Rail Bridge superstructure in the centre of the map. Flanking the Rail Bridge are 2 walls, conveniently referred to as the West Wall and East Wall (it is idiosyncratic, since this map is fighting from the West to the East).
This bridge is rigged to blow, and to effectively defuse the detonation timer, it is important to capture all 3 VLs (Entrance, Approach and Rail Bridge) along the Rail Bridge superstructure. Further, the only way to reach the Rail Bridge VL to the top of this map is by access through the Entrance VL at the bottom of the map, and then moving along the Rail Bridge.
The bridge is typically rigged to blow within 3 mins. However, it may fail to detonate if any VL along it is captured by the Allies. Once it fails to detonate, another 30 sec or so is typically added before detonation sequence can be activated again.
Plan
This map is highly challenging to near impossible if the primary task, i.e., capture the bridge without it being blown, is to be achieved.
However, this map is only the 1st of 5 maps of the Arnhem Bridge Op, conservation of forces will be paramount for full success of this Op. Futhermore, a blown rail bridge may not significantly alter the chances of Victory if the Allies are successful elsewhere. With that in mind, the intent of the 2nd Para is to probe aggressively, but not foolhardily. It may also be possible to destroy all German forces within the 3 mins of detonation and therefore achieve the primary task.
| Description: |
| Shows initial deployment of teams prior to kick-off |
|
| Filesize: |
74.94 KB |
| Viewed: |
13102 Time(s) |
|
|
|
|
| Back to top |
|
| |
sigeena
Rep: 14.2
votes: 1
|
| Posted: Wed Aug 18, 2010 5:49 am Post subject: Arnhem Rail Bridge- 1st Probe by 2 teams |
|
|
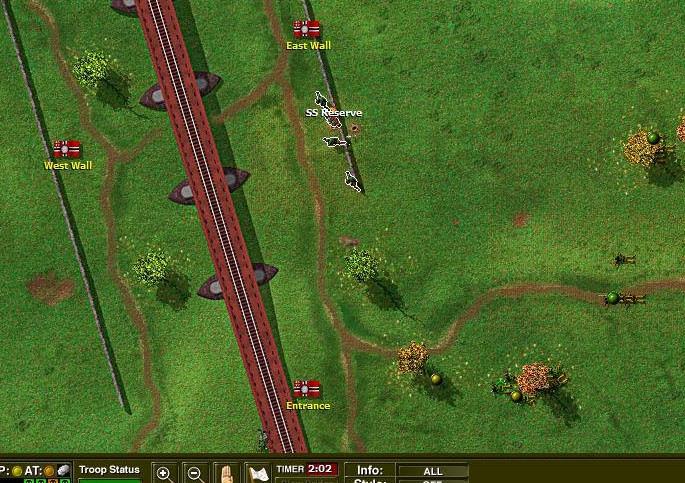
Since the entire East Wall dominates the open ground infront of it, the best approach is to flank it, heading along the trees to the bottom of the map towards the Entrance.
2 teams, consisting of 1 Rifle and 1 Recon have been tasked to probe forward. The 3 Bren and 2 Mortar teams are in position to open up on the East Wall once the enemy is discovered.
| Description: |
| 1 Recon and 1 Rifle team probing towards the Entrance VL |
|
| Filesize: |
158.62 KB |
| Viewed: |
13099 Time(s) |
|
|
|
|
| Back to top |
|
| |
sigeena
Rep: 14.2
votes: 1
|
| Posted: Wed Aug 18, 2010 5:52 am Post subject: Arnhem Rail Bridge- Contacted! |
|
|
Initial contact showed that both Entrance and East Wall VL are guarded by elements of SS Reserve troops. The 2nd Para responded immediately with suppressive firepower brought on by the Bren and Mortar teams.
| Description: |
| Contact by Recon team shows enemy at both Entrance VL and along East Wall |
|
| Filesize: |
157.47 KB |
| Viewed: |
13098 Time(s) |
|
|
|
|
| Back to top |
|
| |
sigeena
Rep: 14.2
votes: 1
|
| Posted: Wed Aug 18, 2010 5:55 am Post subject: Arnhem Rail Bridge- 2nd Probe, Diversion |
|
|
Another Rifle team has been tasked to sneak and probe towards the other flank of the East Wall. It quickly yielded contact with a fresh SS MG team, also guarding along the East Wall.
Mortar fire was quickly brought on top of the SS MG team. It has to be destroyed before capture of the East Wall VL can be effected. The converging fire of Mortar and Bren MG quickly did its job in suppressing all German forces along the East Wall.
| Description: |
| Rifle team probing forward on the opposite flank of East Wall. |
|
| Filesize: |
156.7 KB |
| Viewed: |
13096 Time(s) |
|
|
|
|
| Back to top |
|
| |
sigeena
Rep: 14.2
votes: 1
|
| Posted: Wed Aug 18, 2010 5:57 am Post subject: Arnhem Rail Bridge- General Advance |
|
|
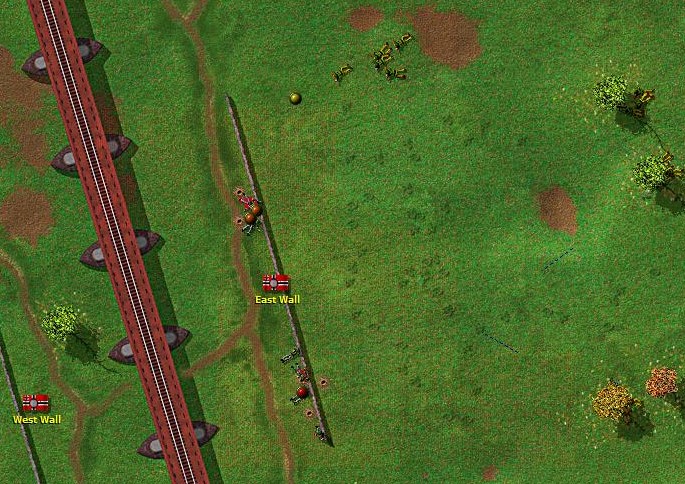
Once German forces along the East Wall have been destroyed or rendered ineffective, a general advance was made to the East Wall. Here, 2 Bren teams are shown making their way forward.
As the Rifle team continued to edge forward to uncover more positions along the West Wall, it was caught in no-man’s land by 2 SS MG teams. A short and sharp encounter which left the entire AB Rifle team KIA red.
| Description: |
| General Advance of AB Bren teams to consolidate on East Wall |
|
| Filesize: |
158.84 KB |
| Viewed: |
13096 Time(s) |
|
|
|
|
| Back to top |
|
| |
sigeena
Rep: 14.2
votes: 1
|
| Posted: Wed Aug 18, 2010 6:02 am Post subject: Arnhem Rail Bridge Captured! |
|
|
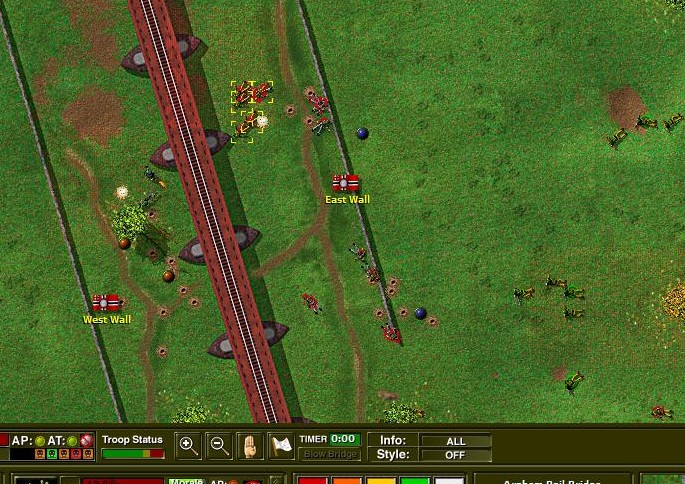
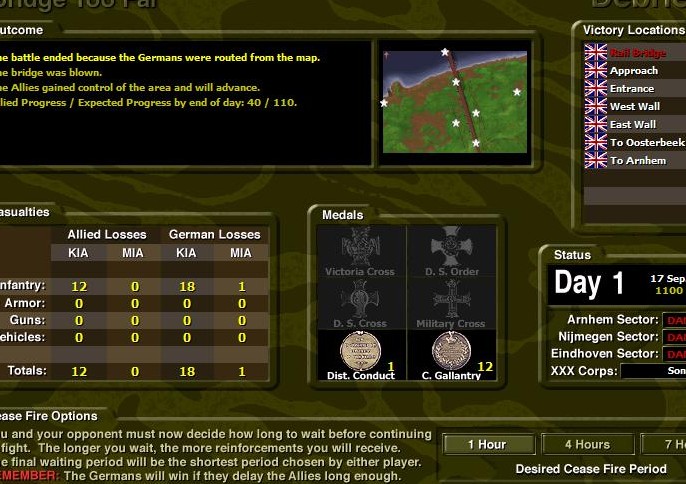
After the rest of the AB got onto the East Wall, the Germans blew the bridge and fled from the map.
A search of enemy bodies showed that there were 3 SS MG, 3 SS Reserve and 1 Panzerschreck team opposing our advance. Our probing assault had destroyed 2 SS MG, 2 SS Reserve and 1 Panzerschreck team, while only sustaining the complete loss of 1 AB Rifle team. A commendable and encouraging start.
Allies Germans
Soldiers 31 23
Losses 12 19
Remaining 19 4
1 hr ceasefire has been chosen and 2nd Para marches on towards the Arnhem Bridge.
| Description: |
|
| Filesize: |
114.68 KB |
| Viewed: |
13089 Time(s) |
|
|
|
|
| Back to top |
|
| |
sigeena
Rep: 14.2
votes: 1
|
| Posted: Thu Aug 19, 2010 3:28 am Post subject: Day 1 Eindhoven Sector |
|
|
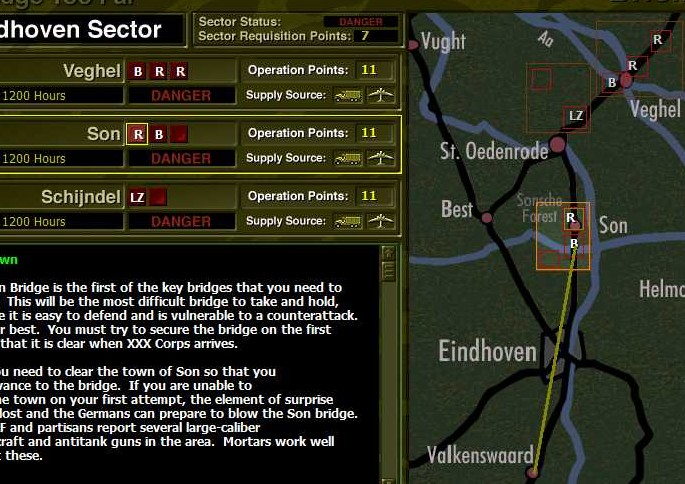
All 3 Operations will be active from the 1st Day of Eindhoven Sector.
The Son Op is typically the most challenging. Historically, Son Bridge was blown before the 101st managed to capture it. If 101st fails to capture the bridge intact, the Allies will have to wait for XXX Corps to effect contact and spend another 14 hours to build a Bailey bridge before moving along into the next phase. Potentially, degrading the possibility of a Overwhelming Allied Victory to a Decisive Allied Victory.
Schijndel Op is likely a sharp offensive encounter on the 1st day. Holding the LZ allows airdrops to be effected to the 101st. With XXX Corps expected to link up by the 2nd day, this Op is pretty inconsequential to the overall outcome of Eindhoven Sector and subsequently, the GC itself.
Veghel Op is potentially the most troublesome for the Eindhoven Sector. All 3 maps of this Op is important and critical to the overall success of the GC. The enemy is expected to put up minimal opposition in the area but will come back in greater strength after re-organisation.
| Description: |
| Day 1 Eindhoven Sector Briefing |
|
| Filesize: |
128.27 KB |
| Viewed: |
13076 Time(s) |
|
|
|
|
| Back to top |
|
| |
sigeena
Rep: 14.2
votes: 1
|
| Posted: Thu Aug 19, 2010 3:33 am Post subject: Son Team List |
|
|
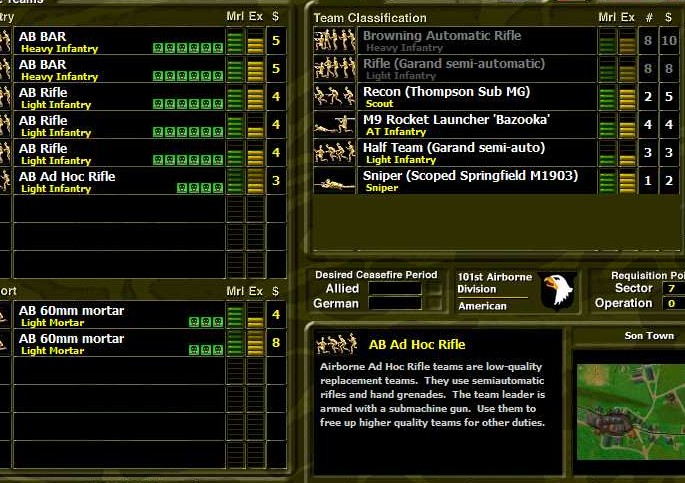
The starting line-up was a good mix of firepower and maneuver elements. Bolstered it with addition of Mortar and Ad Hoc team. Some Req. points (7) from the Sector has been left un-used. Save it for later.
| Description: |
| Team List- 1 AB Ad Hoc and 1 AB 60mm Mortar added |
|
| Filesize: |
127.67 KB |
| Viewed: |
13074 Time(s) |
|
|
|
|
| Back to top |
|
| |
sigeena
Rep: 14.2
votes: 1
|
| Posted: Thu Aug 19, 2010 3:38 am Post subject: Son Town Map Assessment and Planning |
|
|
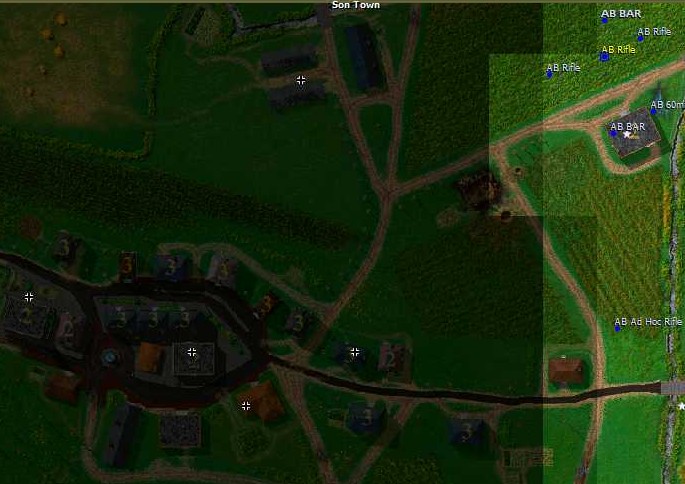
Map Assessment
Son Town is a good challenging map. There’s open ground and built-up-area. Most of the VLs will be in the Town itself.
The main road, near the bottom section of this map is the quickest avenue of approach. However, this approach is also pretty open and properly emplaced MG teams from the town will usually stop advances in their tracks. It doesn’t help that the enemy Flak gun probably sited in to cover this main road.
The alternative route lies along the top half of this map. The Convent VL, at the top right corner of this map, can cover most of the advance through the high grass till the Broom Factory VL (the cluster of three long factory buildings in the direct top half of this map)
Plan
The primary task is to capture this map and advance. The next map (Son Bridge) is potentially critical to the success of winning an Overwhelming Allied Victory. To conserve forces for the Son Bridge itself, it will be far better to flank the town and head towards the Broom Factory area. This will be the main effort.
A diversionary probe will also attempt to move via the main road axis. This should have the effect of drawing enemy attention from the main effort.
Once the main effort gains the flank of the town, it’ll be time for some Close Combat.
| Description: |
| Shows initial deployment of teams before kick-off |
|
| Filesize: |
89.89 KB |
| Viewed: |
13073 Time(s) |
|
|
|
|
| Back to top |
|
| |
sigeena
Rep: 14.2
votes: 1
|
| Posted: Thu Aug 19, 2010 3:42 am Post subject: Son Town- Diversionary Probe by Ad Hoc team |
|
|
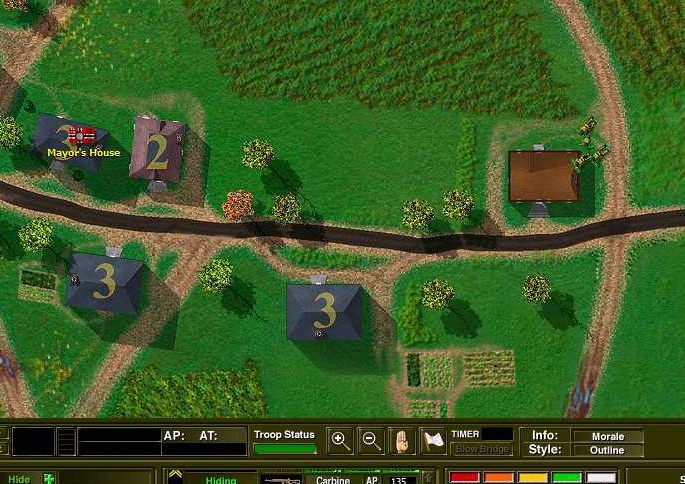
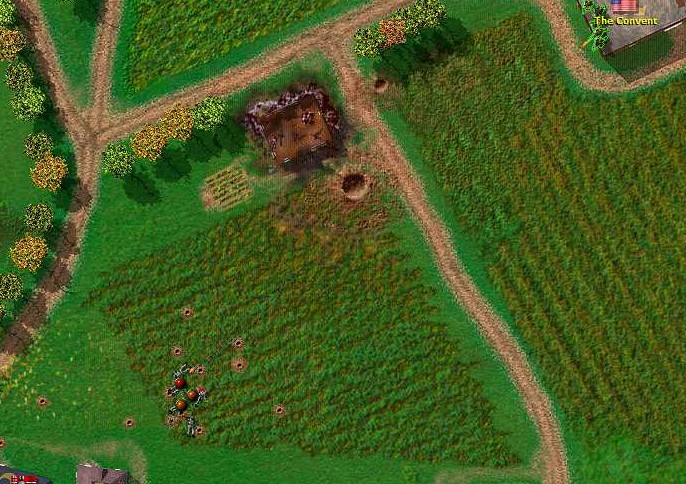
The Ad Hoc team sneaks towards the first house along the main road. Usually at least 1 of the multi-storeyed buildings will contain enemy teams. It’s okay, that’s their job, draw enemy fire and attention.
| Description: |
| Ad Hoc team sneaking into the wooden house |
|
| Filesize: |
129.89 KB |
| Viewed: |
13072 Time(s) |
|
|
|
|
| Back to top |
|
| |
sigeena
Rep: 14.2
votes: 1
|
| Posted: Thu Aug 19, 2010 3:45 am Post subject: Son Town- Main Effort |
|
|
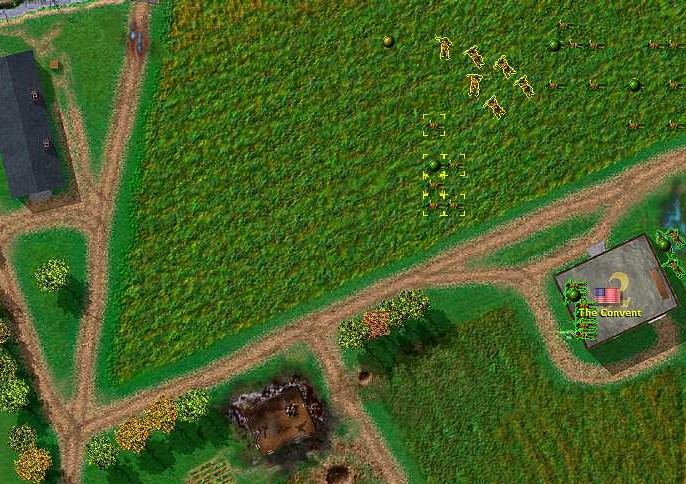
The main effort consists of 1 AB BAR and 3 AB Rifle teams. They will sneak through the tall grass towards the long factory on the left hand side. They will be supported by 1 AB BAR team in The Convent. 2 Mortar teams also standby to provide extra fire support.
If the enemy guard their left flank (the long factory) with a team, it may become bloody but I’m pretty sure there’s enough firepower to overwhelm the enemy.
| Description: |
| The rest of the teams are to flank the town |
|
| Filesize: |
159.8 KB |
| Viewed: |
13071 Time(s) |
|
|
|
|
| Back to top |
|
| |
sigeena
Rep: 14.2
votes: 1
|
| Posted: Thu Aug 19, 2010 3:50 am Post subject: Son Town- Enemy Contact and Smoke Out! |
|
|
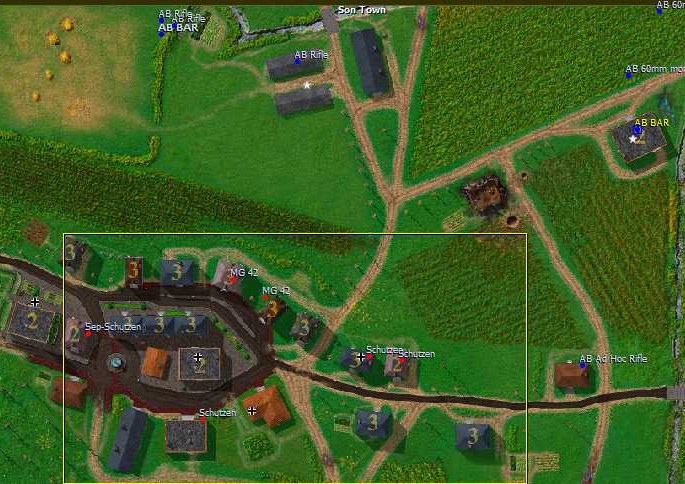
Suddenly, MG and rifle fire erupted along the row of 3 storeyed buildings at my flanking movement. Mortar teams immediately responded by laying smoke to disrupt observation of the main effort.
Enemy is definitely in force in town. At least 4 enemy teams have made contact, that's more than the 2 MG teams expected by intelligence?
Time to reconsider the flanking manoeuvre and pull-back instead?
| Description: |
| Smoke to obscure enemy observation of main effort |
|
| Filesize: |
137.13 KB |
| Viewed: |
13070 Time(s) |
|
|
|
|
| Back to top |
|
| |
sigeena
Rep: 14.2
votes: 1
|
| Posted: Thu Aug 19, 2010 3:53 am Post subject: Son Town- Enemy rushes forward |
|
|
The Germans rushs 1 Schutzen team in an attempt to fix my flanking movement. My AB BAR team opens up from cover and the first German blood is spilt.
This aggressive maneuver by the enemy galvanises the AB’s resolve to press on down the flank and close in with the enemy in the town.
| Description: |
| Enemy closing in but gets caught in the open |
|
| Filesize: |
154.66 KB |
| Viewed: |
12201 Time(s) |
|
|
|
|
| Back to top |
|
| |
sigeena
Rep: 14.2
votes: 1
|
| Posted: Thu Aug 19, 2010 3:56 am Post subject: Son Town- Quick Overview |
|
|
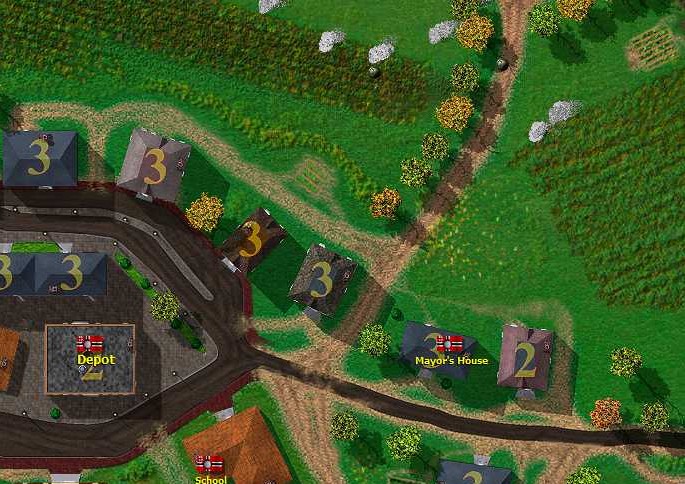
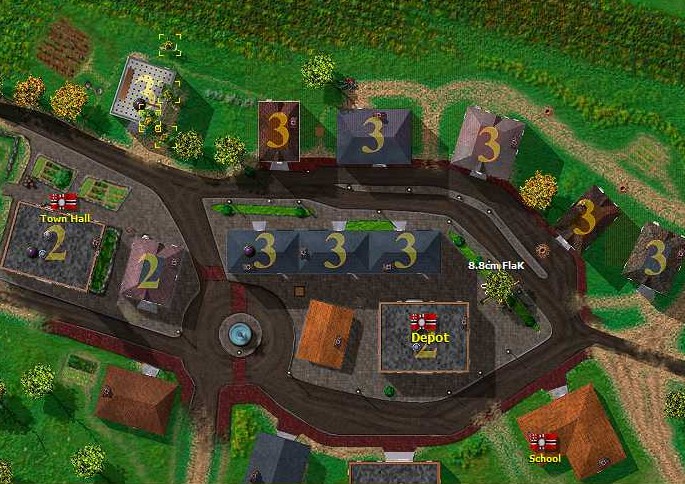
The main effort has been successful in gaining the flank of the town. From here on, it’ll be a pretty covered approach to the Town Hall VL (near the Sep-Schutzen red dot) at the rear of the town.
Enemy dispositions are clearly revealed. There’s still an enemy Flak gun somewhere. Both forces are pretty evenly matched in terms of numbers.
| Description: |
| Enemy dispositions and our positions |
|
| Filesize: |
131.49 KB |
| Viewed: |
12202 Time(s) |
|
|
|
|
| Back to top |
|
| |
sigeena
Rep: 14.2
votes: 1
|
| Posted: Thu Aug 19, 2010 3:58 am Post subject: Son Town- Flak Gun position |
|
|
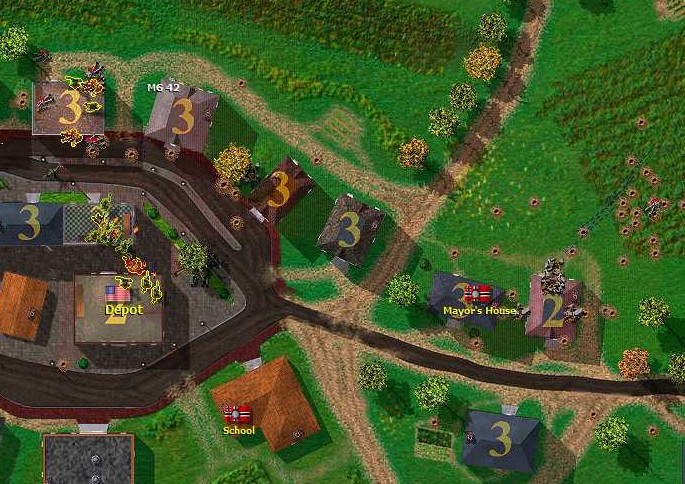
As the first AB team enters into the town, the enemy Flak gun is spotted. On the double now, let’s destroy the enemy before they can re-org themselves to meet us on the flank.
| Description: |
|
| Filesize: |
148.91 KB |
| Viewed: |
12201 Time(s) |
|
|
|
|
| Back to top |
|
| |
sigeena
Rep: 14.2
votes: 1
|
| Posted: Thu Aug 19, 2010 4:02 am Post subject: Son Town- Close Combat |
|
|
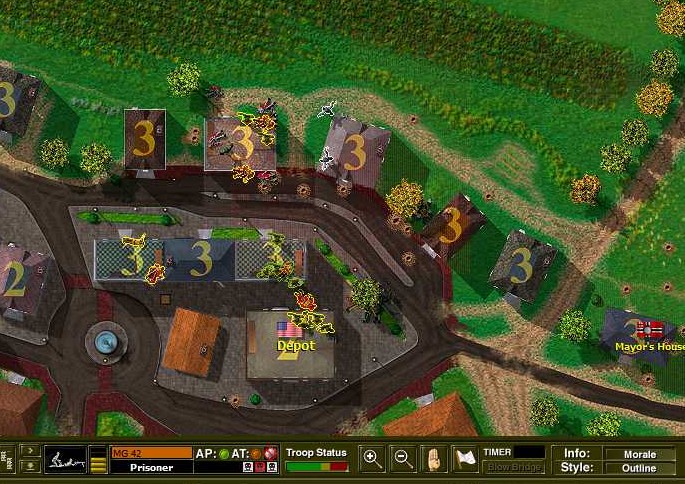
The AB teams quickly re-align themselves and close in with the enemy. Some have already begun to surrender while others continue the uneven struggle. The greatest amount of AB casualties was also suffered at this point. Our flanking force is tired from all that sneaking around and running.
The Flak gun is destroyed by a barrage of grenades.
On the other side of the town, the diversionary element of 1 Ad Hoc team begins to advance down the main road, closing the ring around the enemy.
| Description: |
| All attention to flush out the enemy from the stone houses. |
|
| Filesize: |
155.58 KB |
| Viewed: |
12200 Time(s) |
|
|
|
|
| Back to top |
|
| |
sigeena
Rep: 14.2
votes: 1
|
| Posted: Thu Aug 19, 2010 4:04 am Post subject: Son Town- Fight is over |
|
|
Once the MG team realises that they are about to be surrounded and have no hope of escape, they give up. Enemy morale plummets and the fight is over.
| Description: |
| Enemy surrender and mop-up |
|
| Filesize: |
150.88 KB |
| Viewed: |
12198 Time(s) |
|
|
|
|
| Back to top |
|
| |


