sigeena

Rep: 14.2  
votes: 1
|
 Posted: Thu Aug 19, 2010 4:07 am Post subject: Son Town Captured! Posted: Thu Aug 19, 2010 4:07 am Post subject: Son Town Captured! |
 |
|
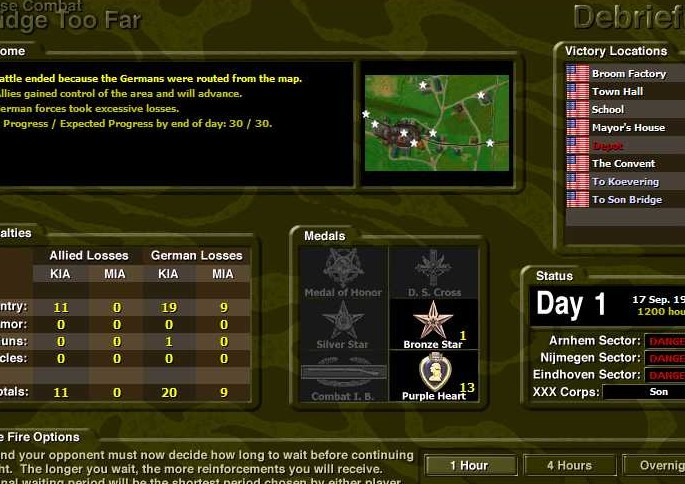
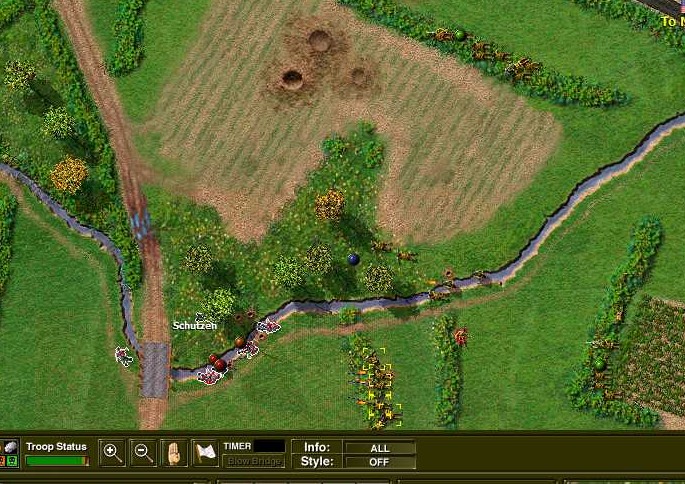
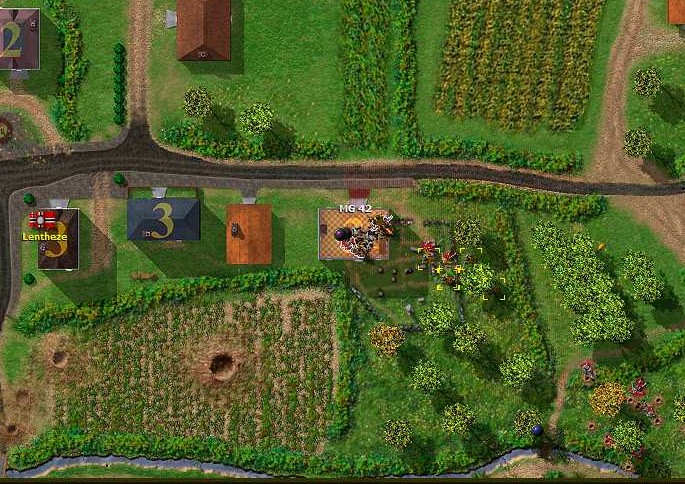
The enemy body count revealed that opposing us were 2 MG42, 3 Schutzen, 1 8.8cm Flak and 1 Panzerschreck team. We had destroyed and captured most of the enemy, only 1 Schutzen team was able to escape relatively unhurt. Our losses were relatively low in comparison. Another successful start.
Allies Germans
Soldiers 40 36
Losses 11 28
Remaining 29 8
1 hr ceasefire has been chosen. The next map, Son Bridge, is expected to be a lot harder, and heavy casualties should not be avoided if the Bridge can be captured intact.
| Description: |
|
| Filesize: |
115.5 KB |
| Viewed: |
9339 Time(s) |
|
|
|
|
| Back to top |
|
| |
|
|
Ivan_Zaitzev

Rep: 56.1
votes: 3
|
| Posted: Thu Aug 19, 2010 8:48 pm Post subject: Re: CC2 ABTF GC |
|
|
| Nice AAR, brings back a lot of good memories.
|
The real Close Combat starts when you are out of ammo.
Have you hugged your AT Gun today?
My Youtube Channel
http://closecombat2.blogspot.com |
|
| Back to top |
|
| |
sigeena
Rep: 14.2
votes: 1
|
| Posted: Fri Aug 20, 2010 1:41 pm Post subject: Schijndel Team List |
|
|
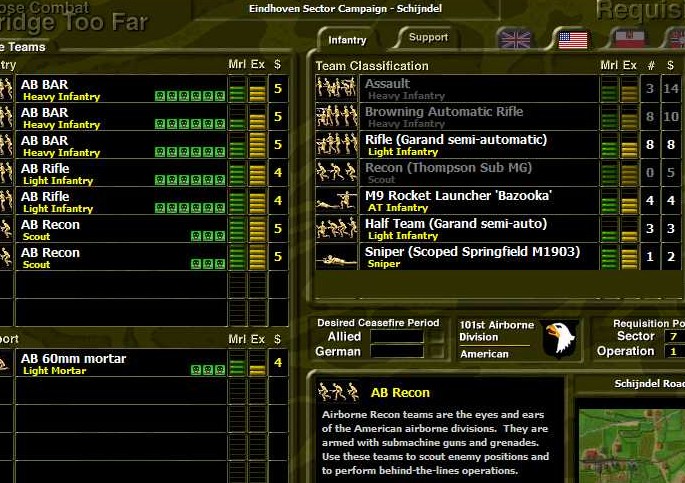
The next battle is Schijndel Road, in the Schijndel Op. Capturing the Schijndel Road allows air resupply to be allocated to the 101st.
Schijndel Road is close terrain, with hedgerows all over the map. 2 AB Recon teams are called up to form the point.
| Description: |
| Team List- 2 AB Recon added |
|
| Filesize: |
138.05 KB |
| Viewed: |
9321 Time(s) |
|
|
|
|
| Back to top |
|
| |
sigeena
Rep: 14.2
votes: 1
|
| Posted: Fri Aug 20, 2010 1:44 pm Post subject: Schijndel Road Map Assessment and Planning |
|
|
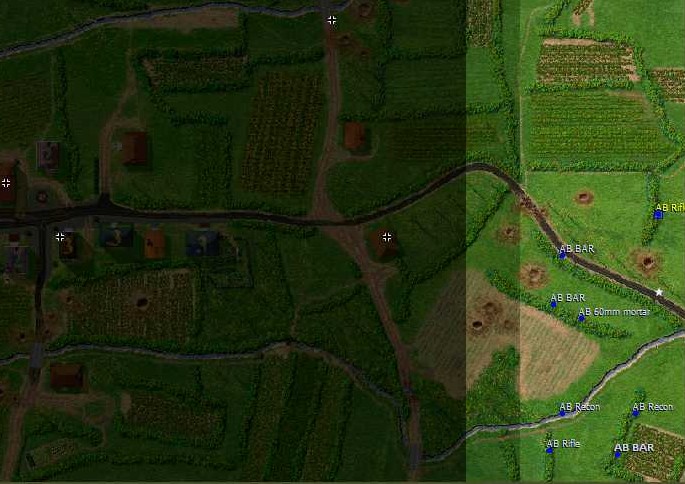
Assessment
The map consists of a small built-up-area on the German side of the map. Between that and the Allied Start line, are lots of hedgerows and though its nothing like the Norman countryside, a lot of the fight will erupt without warning. It’s important therefore that the teams move within mutually supporting distances of each other to quickly win local fire superiority.
Plan
To reduce the possibility of losing control of the firefight, the 2 AB Recon teams will lead the advance. Once contacted, they will fix and develop the situation. The teams that are directly following behind (3 BAR, 2 Rifle) will seek to move around the flanks and overwhelm the enemy.
Once we enter the buildings in force, the enemy is likely to flee.
| Description: |
| Shows initial deployment of teams prior to kickoff. |
|
| Filesize: |
100.04 KB |
| Viewed: |
9320 Time(s) |
|
|
|
|
| Back to top |
|
| |
sigeena
Rep: 14.2
votes: 1
|
| Posted: Fri Aug 20, 2010 1:46 pm Post subject: Schijndel Road- Recon stepping off |
|
|
The point Recon team sneaks into the next hedgerow to spot the enemy. The rest of the other teams lie in mutually supporting positions in anticipation of imminent enemy contact.
| Description: |
|
| Filesize: |
151.23 KB |
| Viewed: |
9319 Time(s) |
|
|
|
|
| Back to top |
|
| |
sigeena
Rep: 14.2
votes: 1
|
| Posted: Fri Aug 20, 2010 1:47 pm Post subject: Schijndel Road- Contacted 1 Schutzen |
|
|
As expected, shortly after moving off, an enemy team was just found patrolling just behind the corner. Immediately, the supporting teams sprang into action. Mortar bombs fell on the enemy position as they turn to flee. More men poured forward to get at the enemy.
| Description: |
|
| Filesize: |
156.09 KB |
| Viewed: |
9318 Time(s) |
|
|
|
|
| Back to top |
|
| |
sigeena
Rep: 14.2
votes: 1
|
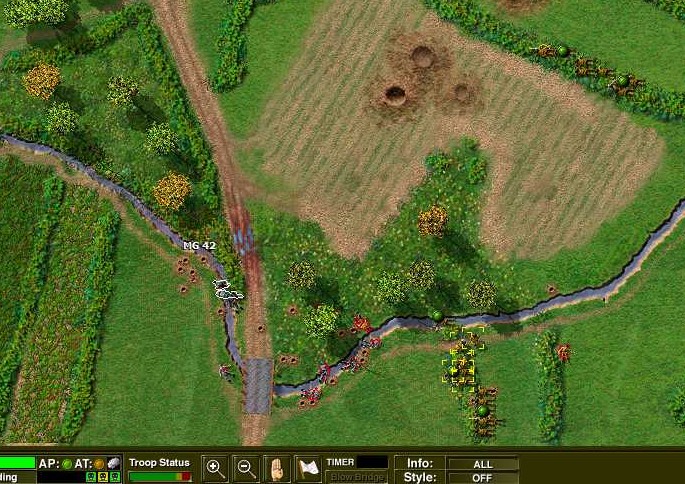
| Posted: Fri Aug 20, 2010 1:49 pm Post subject: Schijndel Road- Contact 1 MG42 |
|
|
Shortly after destroying the Schutzen team, a MG42 team made contact. Committing more men into the firing line, the AB seeks to overwhelm the MG42 with a frontal assault.
| Description: |
|
| Filesize: |
160.35 KB |
| Viewed: |
9317 Time(s) |
|
|
|
|
| Back to top |
|
| |
sigeena
Rep: 14.2
votes: 1
|
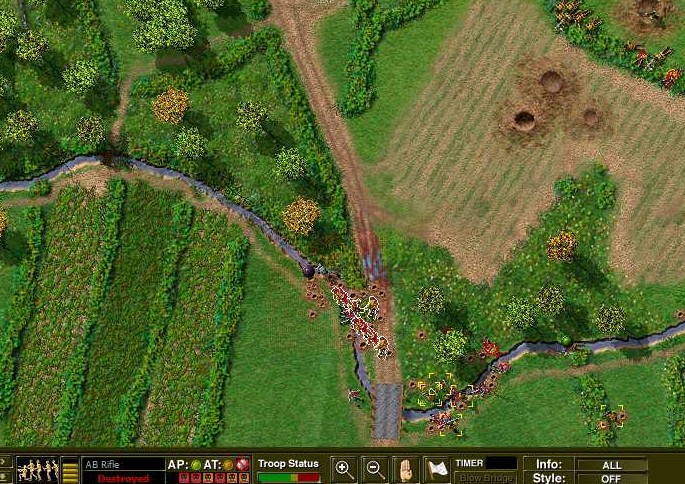
| Posted: Fri Aug 20, 2010 1:50 pm Post subject: Schijndel Road- Poor command decision |
|
|
Sensing that the enemy couldn’t keep up with their firepower, the Allied teams rushed forward, seeking to close in with grenades. Unseen, a German sniper placed at the flanks of the enemy MG was successful in picking out AB as they moved without proper cover.
In the end, the enemy was overwhelmed but at the complete loss of 1 AB Rifle team. It was a impetuous decision by the Allied commander.
| Description: |
|
| Filesize: |
173.46 KB |
| Viewed: |
9316 Time(s) |
|
|
|
|
| Back to top |
|
| |
sigeena
Rep: 14.2
votes: 1
|
| Posted: Fri Aug 20, 2010 1:53 pm Post subject: Schijndel Road- Suppressed and destroyed |
|
|
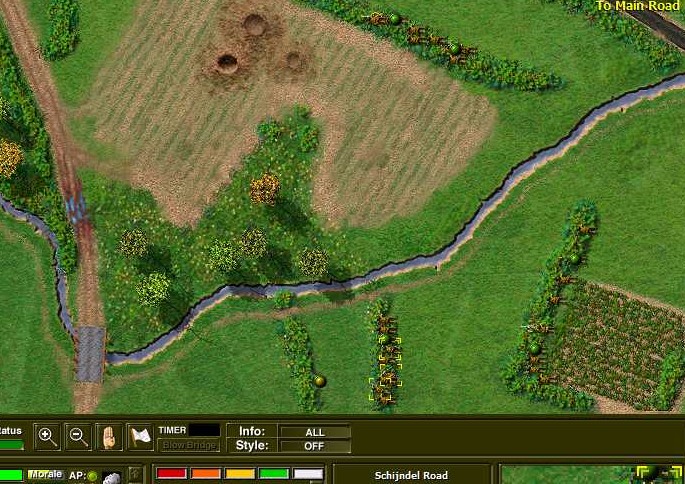
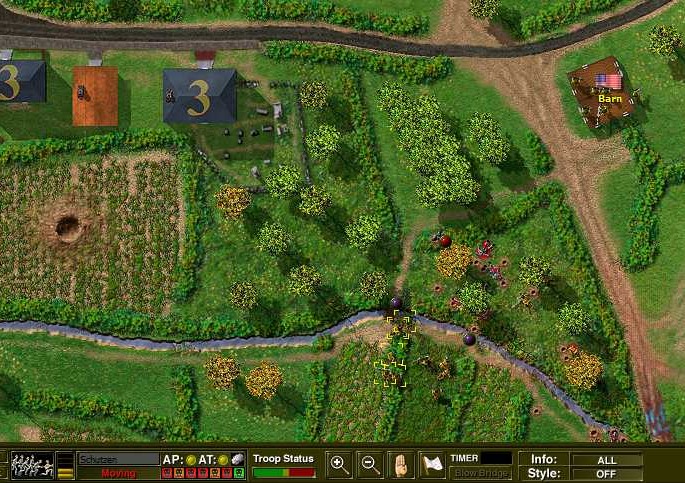
The remaining AB teams quickly re-organised themselves and stepped off again into the next hedgerows. This time round, they will stay closer together, and move by bounds.
Another enemy team was found moving forward in the orchard area. The Allies quickly spread themselves out as the 60mm Mortar team launched bombs to cover their advance. A suppressed team is often a dead team. The Schutzen team wasn’t able to move too far once they hit the ground. The assaulting AB Rifle and BAR teams swarmed around and got on top of them.
On the upper right hand corner of this picture, a AB BAR team rushes into Barn VL to cover the assault teams’ flank and provide overwatch against possible enemy troops from the 3 storey building.
| Description: |
| Enemy outflanked and suppressed |
|
| Filesize: |
169.1 KB |
| Viewed: |
9315 Time(s) |
|
|
|
|
| Back to top |
|
| |
sigeena
Rep: 14.2
votes: 1
|
| Posted: Fri Aug 20, 2010 1:55 pm Post subject: Schijndel Road- Reaching the build-up area |
|
|
The final line of resistance took place in the 3 storey building. More Allied bodies fell before enemy resistance was overcome.
| Description: |
|
| Filesize: |
167.63 KB |
| Viewed: |
9311 Time(s) |
|
|
|
|
| Back to top |
|
| |
sigeena
Rep: 14.2
votes: 1
|
| Posted: Fri Aug 20, 2010 1:57 pm Post subject: Schijndel Road Captured- LZ is open |
|
|
We had been successful but wasteful as well. The numbers speak for themselves. The enemy has used themselves poorly, committing troops forward in piecemeal fashion, unable to co-ordinate themselves.
Allies Germans
Soldiers 39 27
Losses 19 22
Remaining 20 5
1 hr ceasefire has been chosen. Driving the enemy off Schijndel Road is sufficient to secure air supply for the Eindhoven Sector.
| Description: |
|
| Filesize: |
112.26 KB |
| Viewed: |
9340 Time(s) |

|
|
|
|
| Back to top |
|
| |
sigeena
Rep: 14.2
votes: 1
|
| Posted: Mon Aug 23, 2010 2:50 am Post subject: Veghel Team List |
|
|
Veghel Operation is the last of the Eindhoven Sector.
It begins with a Bridge map, followed by the 2 Road maps. Capture and maintaining control of this Op is vital to the success of the GC. It is expected that the 101st will face little difficulty in capturing all objectives in the 1st day.
As you can see in the screenie, we tried to add more indirect fire support to the already rather large BG of 3 BAR and 3 Rifle teams.
| Description: |
| Team List- AB Ad Hoc and AB 60mm Mortar added |
|
| Filesize: |
135.24 KB |
| Viewed: |
9329 Time(s) |

|
|
|
|
| Back to top |
|
| |
sigeena
Rep: 14.2
votes: 1
|
| Posted: Mon Aug 23, 2010 3:00 am Post subject: Veghel Bridge Map Assessment and Planning |
|
|
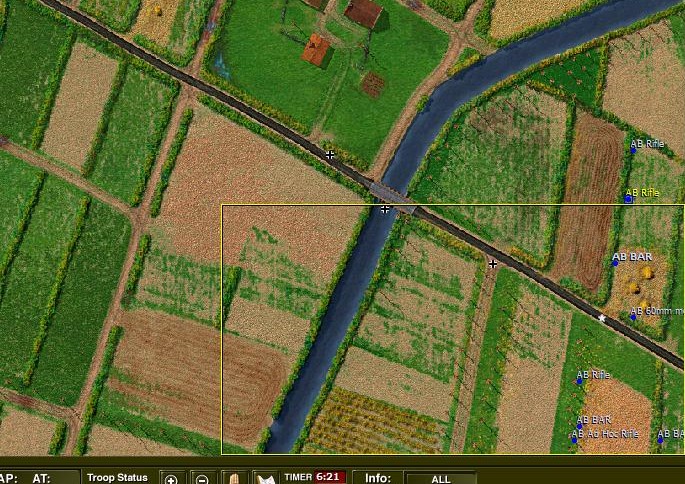
Map Assessment
The terrain encountered here is very conducive to infantry fighting. Long rows of hedgerows and treelines with LOS averaging 80-100 metres. The bridge will form the centre of gravity for most of the fighting. The enemy seeks to delay us till they can detonate and destroy it. We will seek to overwhelm any resistance in front of the bridge.
If the enemy is behind the bridge in force, they are usually in the cluster of buildings to the upper edge of the map.
Plan
We will go with most of our fighting elements in line, with both flanks attempting to support each other by consistently extending the enemy. The treeline to the bottom of the map is usually covered by enemy teams.
The time sequence for the bridge detonation is pretty long, 6 mins plus. There should be adequate time for capturing the bridge intact.
| Description: |
| Took the screenie slightly after kicking off |
|
| Filesize: |
169.12 KB |
| Viewed: |
9328 Time(s) |
|
|
|
|
| Back to top |
|
| |
sigeena
Rep: 14.2
votes: 1
|
| Posted: Mon Aug 23, 2010 3:05 am Post subject: Veghel Bridge- Short and Sharp Encounter |
|
|
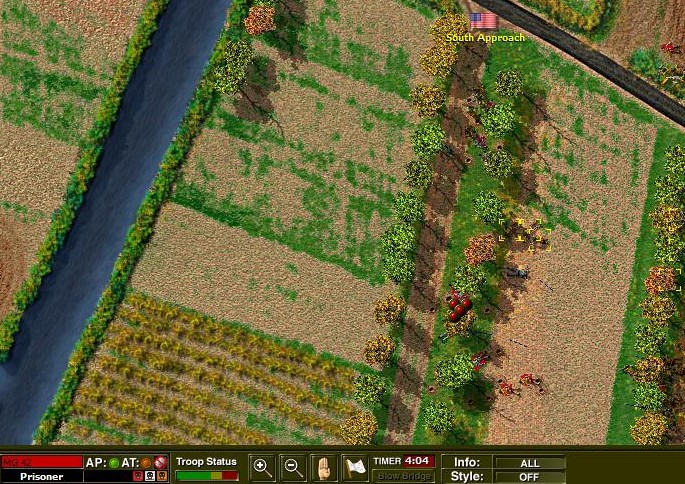
Just as expected, the enemy was in force in the opposite treeline to the bottom of the map.
As the left flank fix the enemy movement by direct fire, the right flank surged forward and swung towards the South Approach VL to close in on the enemy. The Mortar team accounted for quite a few kills as well with shell burst in the tree line.
After 2 minutes of moderate firefight, the enemy gave up and pulled out.
| Description: |
| 2 minutes in and we're about over. |
|
| Filesize: |
185.88 KB |
| Viewed: |
9327 Time(s) |
|
|
|
|
| Back to top |
|
| |
sigeena
Rep: 14.2
votes: 1
|
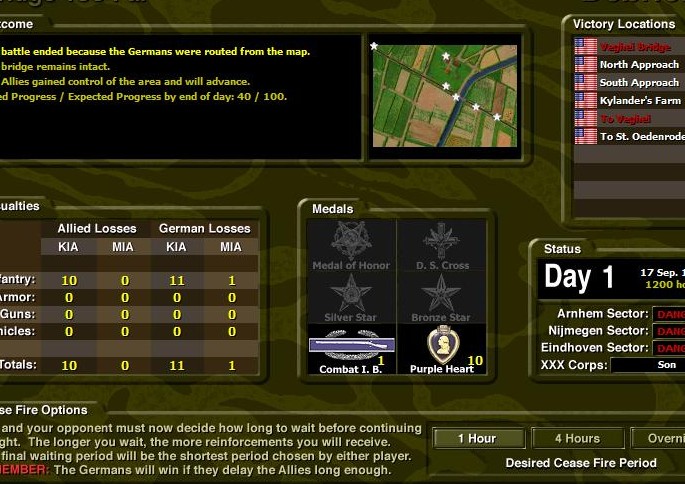
| Posted: Mon Aug 23, 2010 3:16 am Post subject: Veghel Bridge Captured! |
|
|
Not much to reflect on, there was only minimal opposition (2 MG, 1 Schutzen, 1 Aufklarer, 1 Reserve and 1 Panzerschreck). At least 1 MG, 1 Reserve and 1 Panzerschreck were too far away to get involved in the outcome.
Allies Germans
Soldiers 43 22
Losses 10 11
Remaining 33 11
As usual, 1 hr ceasefire was agreed and the 101st moves forward to the next map.
| Description: |
|
| Filesize: |
116.12 KB |
| Viewed: |
9326 Time(s) |
|
|
|
|
| Back to top |
|
| |
sigeena
Rep: 14.2
votes: 1
|
| Posted: Mon Aug 23, 2010 7:36 am Post subject: Re: CC2 ABTF GC |
|
|
| Ivan_Zaitzev wrote (View Post):
|
|
Nice AAR, brings back a lot of good memories.
|
Ah yes, and I always seem to find that CC2 is more challenging than CC3 and CC5. The AI seems to deploy its teams better. The mortars suppress, rather than kill.
I installed CC5 the other day, just for fun, and un-installed it after 5 hours. It was unappealing.
|
|
|
| Back to top |
|
| |
pagskier
Rep: 25
|
| Posted: Mon Aug 23, 2010 5:51 pm Post subject: Re: CC2 ABTF GC |
|
|
CC2 is just the best
too bad I actually broke my CD 
|
|
|
| Back to top |
|
| |
sigeena
Rep: 14.2
votes: 1
|
| Posted: Tue Aug 24, 2010 4:13 am Post subject: Arnhem Suburbs |
|
|
The next map was back in Arnhem again, for the Arnhem Bridge Op.
The second Map in Arnhem Bridge Op is Arnhem Suburbs. In the previous battle, we had taken a quick 1 hr ceasefire. Enemy teams remaining consists of 1 MG and 1 Reserve. We can expect them to beef up their teams with 2 or more infantry teams.
Our team list was as previously. 3 Bren (3 men left per team), 1 Rifle (2 men team), 1 Recon (2 men team) and 2 Mortar teams (full 3 men team). No additions were made.
|
|
|
| Back to top |
|
| |
sigeena
Rep: 14.2
votes: 1
|
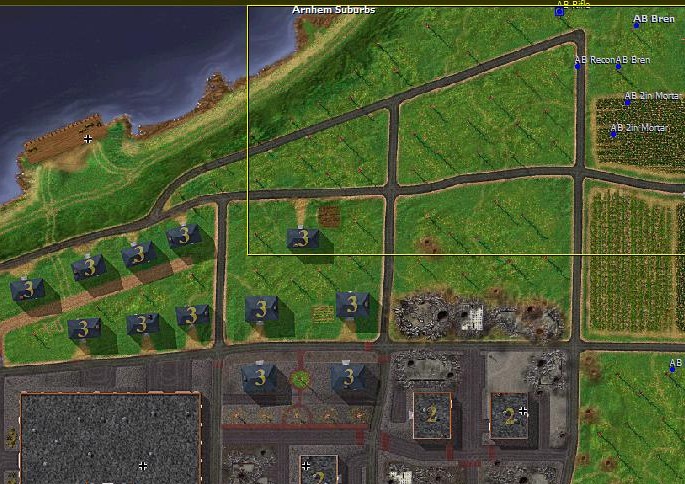
| Posted: Tue Aug 24, 2010 4:28 am Post subject: Arnhem Suburbs Map Assessment and Planning |
|
|
Map Assessment
This is a challenging map. Almost half of it are buildings while the other half are covered in trees. Our terrain begins in the forested area whereas the enemy begins on much better ground with cover and height advantage of buildings.
The nearest VL is the Prison VL, located in the 2 storey building to the bottom right hand corner of the map. A direct contest of it from disadvantageous ground from the forest can only be conducted at risk of high casualties.
The road along the upper half of the map, leading towards the River Front VL, can safely avoid the observation of enemy from the Prison VL.
There is also a large multi-complexed building to the bottom left hand corner. This is the St. Elisabeth VL. It favours the defense if they are there in force.
Planning
Much of the initial considerations for planning for the previous map remains the same. It's important to conserve forces for the 1st day capture of Arnhem Bridge. In that respect, an immediate assault of the Prison VL will be discounted.
The main force, in flanking, along the River Front VL will be able to secure the other VLs. When the enemy has no choice but to react to our flank, they will rush out of their cover.
We still have quite a alot of firepower in the 3 Bren and 2 Mortar teams. However our manuvre elements are pretty weak in manpower. Both only 2 men teams from the previous encounter.
If the enemy can be caught in the open, we should destroy them with ease.
| Description: |
| Initial deployment right after kicking off |
|
| Filesize: |
144.98 KB |
| Viewed: |
9170 Time(s) |
|
|
|
|
| Back to top |
|
| |
sigeena
Rep: 14.2
votes: 1
|
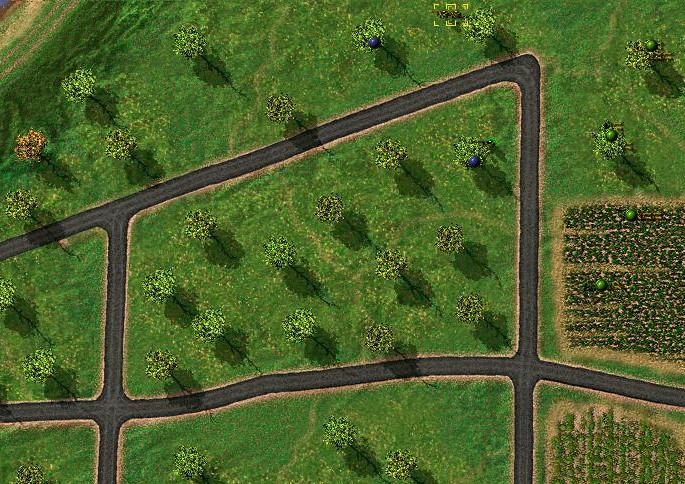
| Posted: Tue Aug 24, 2010 4:32 am Post subject: Arnhem Suburbs- Flank Movt |
|
|
The Rifle and Recon teams move ahead as point, while the Bren teams keep 1 bound behind.
In this way, we reached close to the 1st building along the River Front VL with barely a contact made. It looks like the enemy is likely to be massed at the Prison VL, to the front.
| Description: |
| The main force, approaching by the River Front |
|
| Filesize: |
169.44 KB |
| Viewed: |
9167 Time(s) |
|
|
|
|
| Back to top |
|
| |


