This quick how-to guide will show you the steps to take with your firewall settings in order to play online. The ports you need open are the range 2300-2400 and 47624 all for UDP/TCP modes. Forwarding these ports enabled you to host a game of CC2 thru CC5 online as a direct connection or through www.gameranger.com
Direct fire mortars are the most effective way for suppression and killing enemy teams with mortars. Having your mortar teams numbered for quick access will also assist in hitting your opponent fast. In the video below you will see how fast I can bring down fire on out in the open running troops. The enemy team is wiped out. I assigned the mortar team 1 by pressing CRTL+1. The input sequence of my firing is 1, v, left click, m.
Direct fire has one huge disadvantage. The team will give their position away either by rifle fire or the graphic of the mortar firing. In some versions of Close Combat the supporting members of the team will engage with their rifles. In the direct fire role you must be prepared to defend your team, they are too valuable to lose.
81mm mortar teams are mobile but move very slowly and have a long setup time. Using these teams for direct fire is usually a bad idea. The 60mm mortar teams are much more mobile and have a quicker setup time. They can follow an advance and bring down fire for your assaulters. There are 120mm mortars that are mobile, but moving them is as painful as moving a 17pdr ATG. Other mods have the 120mm mortars set as static units unable to move. If you decide to use direct fire, always ensure you check the mortars minimum firing distance!
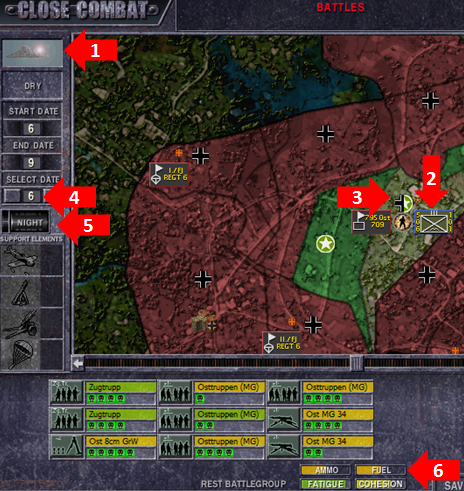
Have you taken an absence from Close Combat? You may have some old campaigns in your save folder with opponents still out there ready to pick up the torch. Here are some easy checks you can make when you enter the strategic screen to get back into things. You wouldn't of overlooked them when you were playing regularly, but they are easy to forget when you'v been gone awhile. Follow the steps to get back into the groove and possibly gain a surprise advantage over your opponent.
Pre Battle Verifications
1. Check the weather. Bad weather can create muddy terrain.
2. Check composition of enemy battle group. If its infantry, leave the ATGs and Panzershrecks at home.
3. Open the map preview and check to see which road exits you own. Trace your supply line back to a friendly depot.
4. Cycle through the dates to find out what reinforcements are deploying and how much time is left in the campaign.
5. Check the time of day, and if its night. If its the last round of battles for the day use your support or lose it!
6. Check your units level of supply. Ammo, Fuel, Fatigue and Cohesion. The latter two for the rereleases.
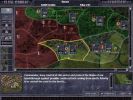
May 13th, 1940, morning. Mouzon is a French Major Supply Depot. Reinforcements will spawn in the bottom left corner. Currently the French 5eRDP BG (AI) pinned down by PzRgt.1/1Pz on in that small corner. Morale is on and the battles are set at 15 minutes. You own all the commanding features including the two story house next to thier deploy zone. You have full LOS everywhere.
The Plan
Keep the battlegroup pinned in the corner. The AI can have the bridge, but not the North end of it. The two story house is a bonus, but you don't need it. Take some some armour or anti tank guns to cover the North end of the bridge from vehicles. You will be mostly static in this fight. The units you should focus on bringing are mortars, MG34s, only two command teams (left & right flank), an anti tank or inf gun and remainder riflemen.
Disband or not?
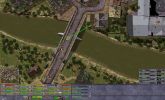
Keep in mind this battle is vs the AI with morale on. To disband this unit you will not need to capture the VLs. A straight up firefight across the river will drop his morale significantly enough to push the AI off the map. The bonuses to this are not in your favour except the fact he loses all 15 units. Next reinforcement phase he will regain the full attack square deployment box. You will be pushed back beyond some of the houses covering the bridge.
On this particular map, keeping him on the map whittling his forces down piecemeal every battle is in your favour. Your forces get to stay in cover all the time, while he has to march forward on pavement. You only have to concentrate on covering the North end of the bridge. You may have to capture the bridge VL to push his deploy back every now and then. Doing this you have to be careful of his morale. Keeping your men on ambush the entire time and only opening fire on the men coming to the North end of the bridge is key.
If this battle was vs a human opponent your tactics will have some changes. First of all morale will most likely be off, so to disband him you will have to capture the VLs or destroy every last man. This is also not in your favour. In this example, its only day two of the entire campaign. You have to let your unit sit and eventually die (due to attrition) on this map to hold him in that corner. This tactic could also force your opponent to disband his unit at the strategic phase in order to get a better start when a new unit spawns. Manually disbanding works out in your opponents favour in this case.
In Disbanding Part Two, we'll go over the differences in disband rules from CC5 to TLD and the best ways to make disbanding work for you throughout a campaign. There are major differences due to this rule being fixed for The Longest Day.
In August of 2004, Zappi, Homba, Bambam887, RedScorpion and MOOXE all pitched
in to create this Close Combat site. I would to thank all the people who have visited
and found this site to thier liking. I hope you had time to check out some
of the great Close Combat mods and our forums. I'd also like to thank
all the members of our volunteer staff that have helped over
the years, and all our users that contributed to this site!