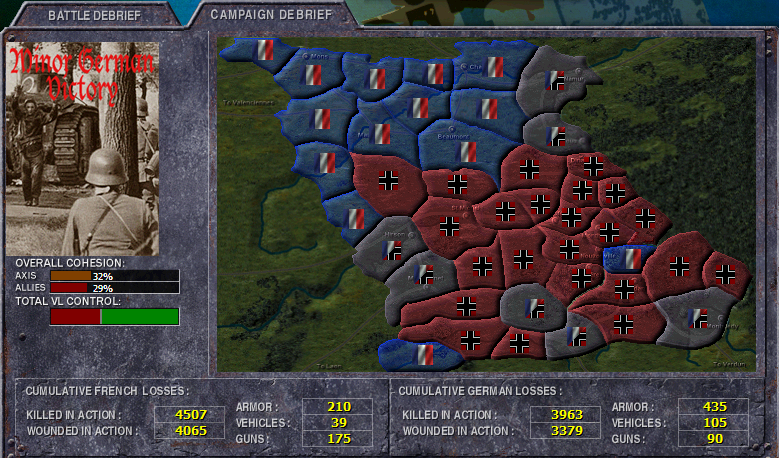
The Meuse Team Grand Campaign started 31 October 2020 has ended 12 February 2021. After more than 400 multiplayer battles the Axis achieved a minor victory on 18 May Midday Turn 2, Allies surrendered on turn 19 May Night. More than 400 battles were recorded and livestreamed, most of which you can replay at the Meuse Playlist on YouTube. Many of the battles could be watched live from both German and French perspective.
Allies
Axis
MOOXE
Pzt_Crackwise
KG_Loki
RD_Viceroy
Marinesku13
Hedgehog
Gallows
Mad_Matx
Blitzkrieg
irishwolf75
RD_Tigercub
RD_Steiner
Allied Plan
Grand Strategy - Four key strategies were employed by the Allies. The first strategy was to make it as painful as possible for the Axis to advance west. Axis had overwhelming odds with the massive amount of infantry and equipment, Allied defeat was inevitable, winning attrition was the Allies only option. Defending the bridge maps as long as possible was key to the strategy. Once a defensive positions was untenable, Allies would pull back or do a one team disband. The first strategy remained the same after losing the bridge maps but more emphasis was put on tactics in order to preserve infantry as the Axis began to break though the centre. Towards mid campaign the second strategy was employed to move battlegroups from the south to the centre in order to dull the breakout. Miscommunication errors resulted in battlegroups attacking, retreating or abandoning maps that they were not ordered to. To counter the AI making unplanned moves for the Allies, some movements were cancelled in favour of staying put. Eventually the centre collapsed with elite Axis battle groups crushing the Allies, most notably the Axis IR GD unit. The third strategy was an attempt was made to establish a defensive line in the north along the Sombre river bridge maps, Berlaimont/Maubeuge/Thuin/Charleroi. A defensive line was created with severely depleted Allied units but this defensive line was not attacked. The fourth strategy was a counterattack in the south. Spawning the newer and previously disbanded French battlegroups in the south over the final two days to capture maps behind the Axis front line. This was abandoned due to movement errors and Axis advances. Once the Axis occupied all the depot maps in the south, and made it to western edge of the map cutting our forces in two, the Allies surrendered.
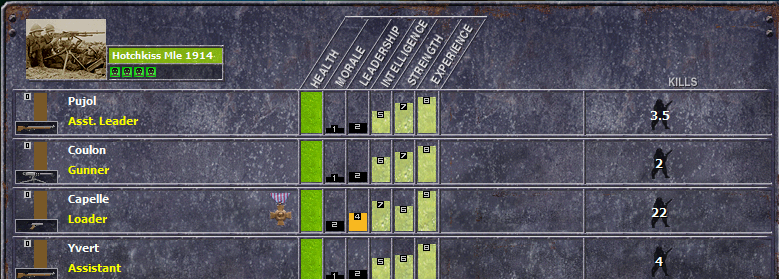
Top French hero who survived with more than 10 kills.
Vehicle Tactics - The Allies had many light tanks of the H37/H38 variants. Light tank were effective to hold infantry down and could also take many hits from Axis tanks and survive. The S-35 and D-47 medium tanks were effective vs Axis tanks but in too few numbers and only in select few BGs, they would not make much difference. The Char heavy tanks were the biggest deterrent to Axis making advances. Typically the heavy tanks when paired, or grouped with smaller tanks could advance freely on a map and easily dispatched Pz3 and Pz4s. The tactic of tag teaming was not widely used here, having two or more tanks team up on one, as the maps were more confined in general. Many of the available tank strength were lost in the first half of the campaign, only the 28/1 and 4DCR retained armour that could be used effectively until the end. Allied vehicles were very few. The armoured MG tanks and 81mm mortar cars did not make a difference in the campaign. Support was applied to all maps with Axis medium tanks.
Infantry Tactics - Ambush techniques were the most effective way for Allies to deal with Axis infantry. Generally Allied infantry were weaker, less experienced and had lower morale. In close quarter combat Axis infantry could beat Allied infantry. Early in the campaign it was learned that firefights from house to house are a waste of ammunition, especially considering Allied forces were without supply so often. To counter the Axis strengths and Allied own lack of ammo, Allied infantry was forced into ambushes. Typically an ambush would be a couple of teams hiding in the back of a building and another team watching the approach. Once Axis infantry began crossing the approach (usually a road) and filtering into the occupied house, the Allies would drop mortars and bring up their infantry to the edge to fire on the Axis infantry suppressed on the street. This was an effective tactic if the Allies did not let too many Axis infantry get in the house. Consequences of letting Axis into the houses were annihilation and surrender. More or less mid way through the campaign and force pools were dwindling it became essential to manage casualties in battle. Infantry teams who sufferered 50% casualties were pulled back for second line defense. If the player kept the losses at no more than 50% the team would get replacements after the battle was complete. If the team received more than 50% casualties, they were used as "dead" teams. The dead teams could assault or hold first line defenses as they were going to be lost after battle anyways.
Axis Plan
Grand Strategy - The Axis came in strong attempting to cross the bridges, taking large amounts of casualties. Not long into the campaign the Axis began attacking bridge maps from the north or south bypassing the actual bridge on the map. This was the most effective method to crossing a bridge map. It effectively turned the map into an Allied island without supply. Nouzonville held out for days in this condition. Houx held out until the end, but was also bypassed by Axis units fighting through the exit VLs. Once across the bridges many of the Axis units has been so badly depleted the general advance stopped until fresh units spawned to take over. These new units took over and began an assault through the centre around and through Brognon/Aubigny, the Allies who were so badly depleted they could not hold up for very long. The breakout began in the centre around mid campaign and expanded into the south closer to the end of campaign. On 18 May midday turn two, after more than 400 battles and no strong Allied units available to stem the onslaught, Axis achieved minor victory. The subsequent turns made the Axis victory even stronger as no Allies units could stop the elite infantry and vehicles pouring through.
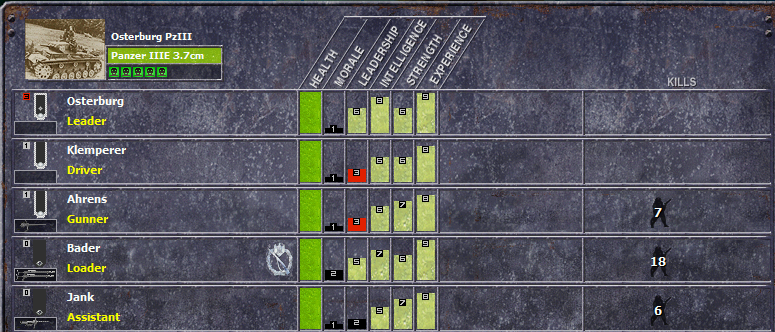
Top German hero who survived with more than 10 kills.
Vehicle Tactics - Axis force pools contained many vehicles. Machine guns cars, halftracks, light and medium tanks. In general tag teaming was not able to employed by the Axis in most cases. Many vehicles were not used in the early days of the campaign in favour of taking strong infantry squads. This led to some Axis battlegroups having very few infantry but up to 20-30 vehicles. Vehicles were used more often towards the second half of the campaign in support of infantry. Beginning mid campaign the Allies had few anti tank weapons to stop vehicles and breakouts were accomplished by Axis mechanized battle groups. Support was applied to all Allied battlegroups that had Char tanks.
Infantry Tactics - Ambush tactics were used on defensive maps the same way Allies used them. Early on it was realized teams with 50% casualties needed to retreat and let full teams carry on the attack in order to beat attrition. Using this tactic it was not uncommon for the Axis to lose almost nothing from an attack, which widened the imbalance of infantry teams vs the Allies. Against weak Allied infantry, Axis sometimes just assaulted through while the Allies melted or surrendered. The initial grenade volleys and follow-up close combat wiped out the Allied teams. Firefights occurring across streets were won by Axis as they had stronger small arms and higher experience. Axis infantry could win anytime in close quarter, but lose when they were pinned in the streets. Blitzkrieging was done with the infantry.
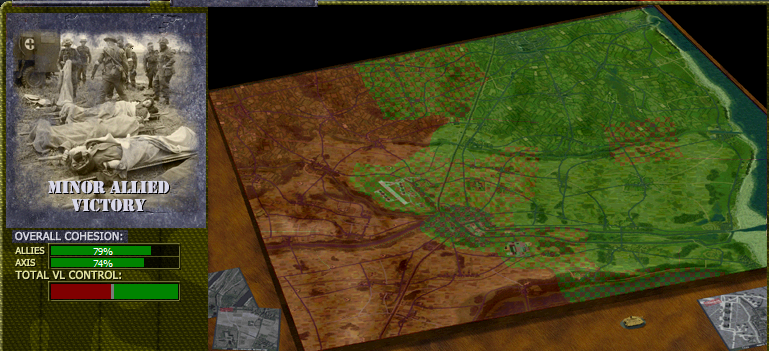
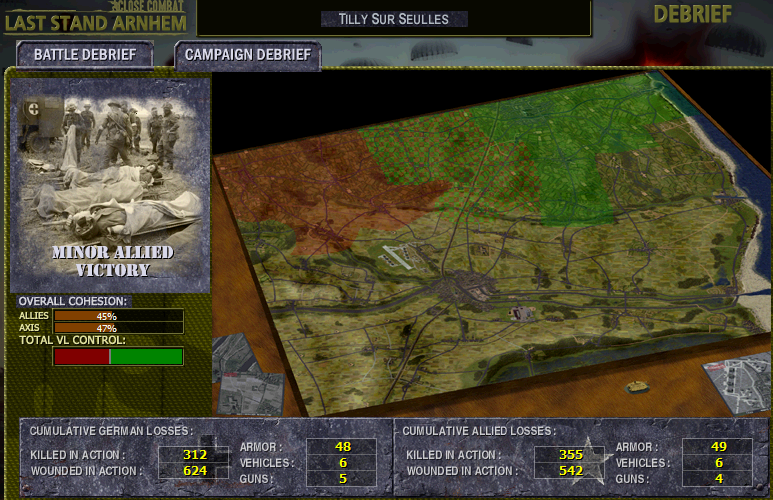
Gold Juno Sword Campaign Finished with Allied Minor Victory!
The Gold Juno Sword team campaign which began 31 July 20 has finished 27 Oct 20 after 284 individual battles. The game ended on the 23rd of June 1944 with an Allied minor victory. There were eight days and 15 strategic moves left. The Axis surrendered only a day or two after the Allies achieving the minor victory. The game was organized via Discord. All Allied and Axis AARs are publically viewable now on the Discord, follow https://discord.gg/ufKxftbn to join.
Many of our battles were streamed live for team mates and opponents to watch. 197 recorded battles are posted on the Gold Juno Sword Team Grand Campaign playlist. There are a few battles were you can watch both sides.
Allies
Axis
MOOXE
RD_Steiner
RD_Viceroy
Gamerat
Pzt_XLegione
Argilas
Pzt_Crackwise
irishwolf75
Mad_Matx
Tigercub
RD_Knights
DAK_Mapache
Krasmikaze
Pzt_Chessmaster
Reindeer dundee
Guzzi85
KG_Loki
Dima
Allied Plan
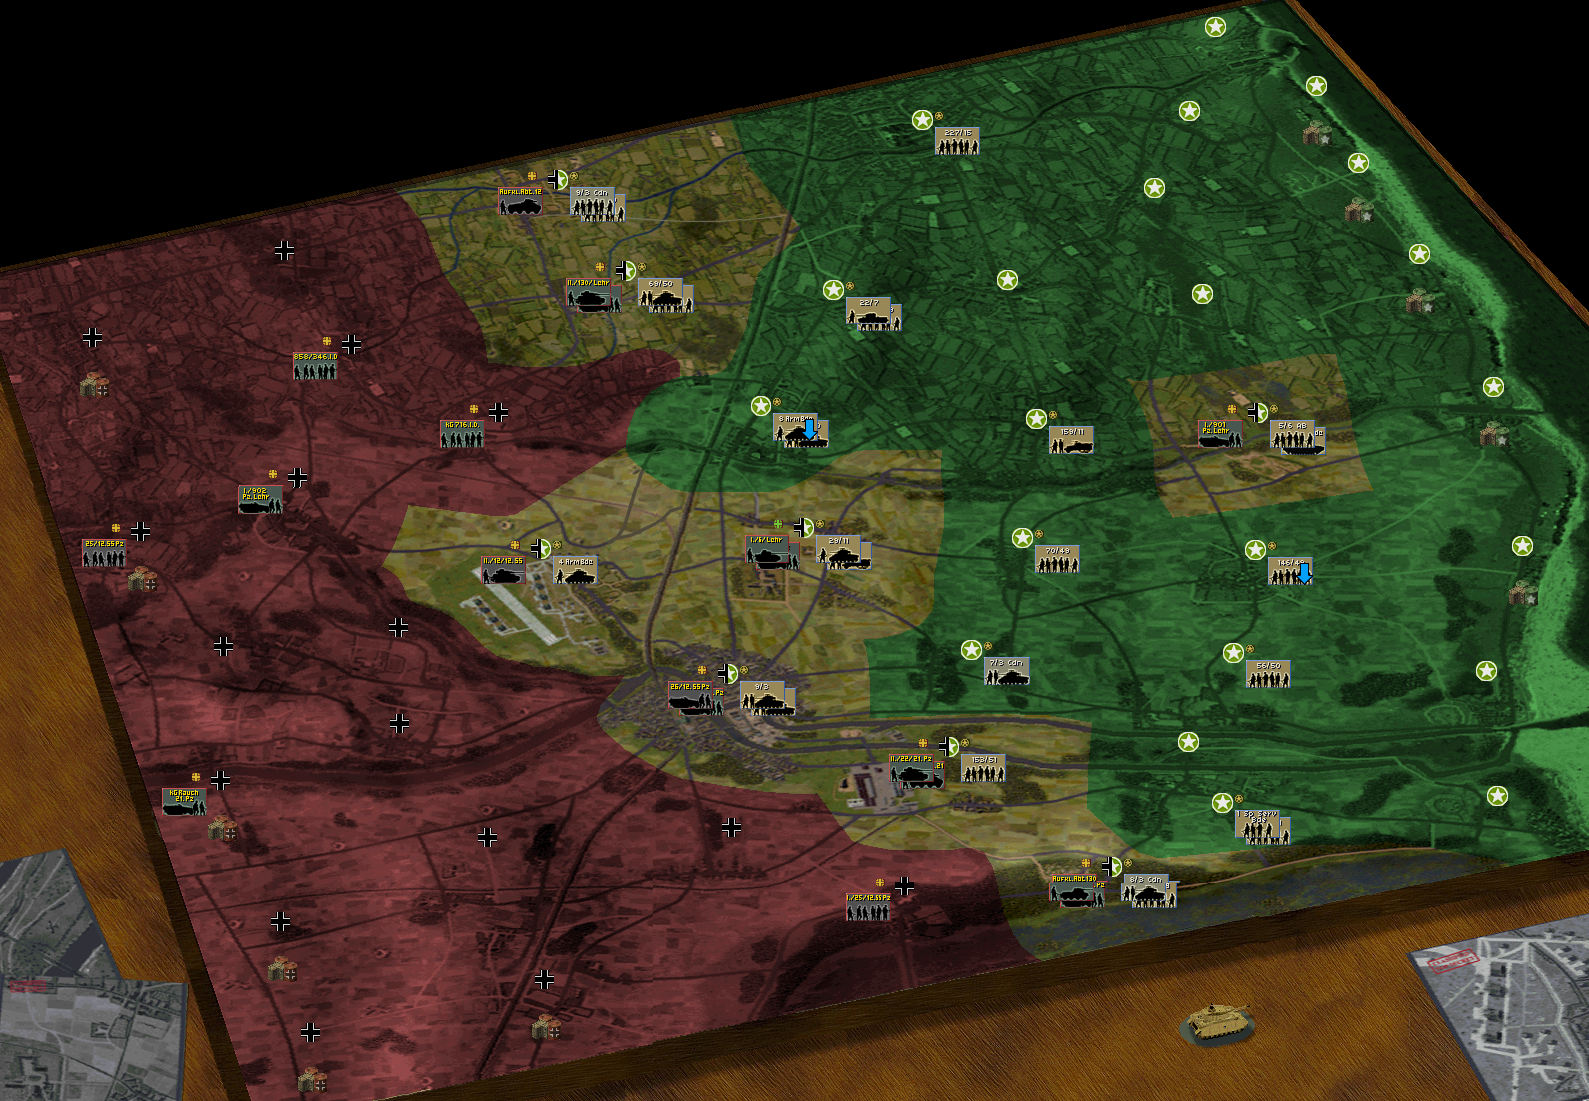
Grand Strategy - Overall the Allies were aiming for a minor victory. The initial strategy for the Allies was to bypass the beach maps as quick as possible taking whatever losses they had to advance. Clearing beaching was secondary. It was critical to capture Bayeux and Buron in meeting engagements. Bayeux and Buron were both attacked the morning of 7 June. Bayeux was cleared in the afternoon. Buron entered a long drawn our battle against Panthers leading to the Allies being disbanded early on, but still leading to the eventual fall of the map for the Axis. Strategy from 7 June onwards was bringing the front forward in line with Bayeux and Buron, stabilizing it with defensible deploys and grinding out German tanks. Once stabilized the next priority was to remove Axis lateral movement. Stacking BGs in Last Stand Arnhem enabled both sides to move laterally between the front line. Once lateral movement options for Axis were removed, the Allies moved west. The maps south of the Orne River in the Airborne section were largely set to defence. The minor victory would come from the North maps and the strategy in the South was simply to tie up Axis BGs.
Armour Tactics - Allied armour outnumbered Axis by about 5-1. In the beginning race to establish the Bayeux and Buron front Allied armour losses were not a concern. Eventually when the Axis Panthers and BGs with many Panzer IVs arrived a tactic had to be established. Quickly the Allies decided to tag team enemy tanks. Tag teaming meant engaging any Axis tank with two or more Allied tanks. This tactic served two purposed. First, it greatly increased our chances for a knockout. Secondly it forced Axis players to reposition their tanks to avoid this tactic. Our second tactic was to assign air support to all Axis BGs that had Tigers, Panthers or JagsD tanks. Air support was always an RAF Typhoon strike. Air strikes knocked out tanks maybe 20% of the time and damaged them occasionally as well. Our final armour tactic was to damage and withdraw. Immobilized tanks or tanks sustaining other damage were removed from the force pool at battles end so they were equivalent to knocking them out.
Infantry Tactics - Allies did not employ any special infantry tactics. Allied infantry vastly outnumbered Axis and the majority of Allied infantry in the force pools was not used. As we had to stay mobile, and most of our maps we needed to continue attacking on, support teams were not used as much. Vickers MMG, snipers, recce teams, PIATs half sections and a few others did not see much battle. Instead Allies took the larger full 5-7 man squads for assaulting. Anti-tank guns were sparsely used as we remained mobile throughout the campaign.
Axis Plan (from Allied perspective)
Grand Strategy - The Axis fought a long delaying action. This delaying action was helped by lateral movement and BG stacking. The Axis placed their best armoured units on maps they considered anchor points of their defence. Lingevres held with Panthers, Buron held out with Panthers for days until retreating to Abbaye Ardenne. Tiger tanks held the South flank in Bavent. Very very few counter attacks were made and almost no Allied controlled maps were attacked. In general once ground was lost few attempts were made to take it back.
Armour Tactics - Axis armour tactics played hand in hand with the long delaying action. Tanks were deployed for defensive battles. On some occasions they were deployed in areas offering little movement acting as a stationary turret with line of sight towards likely enemy positions. In the first weeks of the campaign the Axis kept five tanks per map on the line while not utilizing anti-tank guns as much. As armour dwindled, more anti-tank guns appeared, more armoured cars and shreks did as well.
Infantry Tactics - Infantry also played into the delaying role of the Axis strategy. No notable tactics were seen except a lack of counter attacking. Allies did notice how powerful the German MG42 was when compared to our Vickers MMG. The MG42 took could take out open topped armour and lightly armoured cars. In the later stages of the campaign shreks were employed and quite useful at killing tanks.
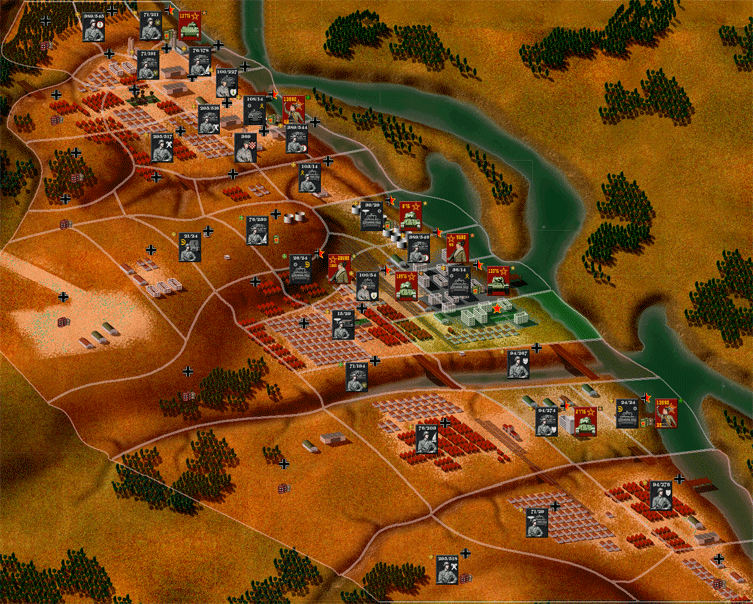
Final casualties and positions.
To play the Gold Juno Sword mod for Last Stand Arnhem, download it here GJS 9.1 Plugin.
The Warm Up Operation concluded August 9th, 2020. The operation used the Gold Juno Sword v9.1 mod for Last Stand Arnhem. This Warm Up Operation was played as a precursor to a full grand campaign in order to iron out house rules, file sharing and teams. Teams were split up roughly 10 vs 10. A total of 44 were battles played. Allies achieved a minor victory, the final score being 165 vs 134.
All organization took place on Discord. Games were played using RAdmin VPN and GameRanger. Recorded games are on Youtube at Warm Up Op. Live streamed games were played at MOOXE's Twitch. We expect more live streaming and recorded games for the Grand Campaign.
If you want to join or are looking for more information on how to join or watch the Grand Campaign contact Irishwolf75 of RD_Viceroy on Discord.
Grand Campaign "Push to the Volga" is complete. KG_Loki (aka CC_Infected_x_X) and I started this GC back in December 2016. I asked for a campaign already started as I hate beach maps. That is, attacking out of a small square against superior positions on day one. The campaign was on turn two of day one. We carried on from here until the end. Germans set to line and Russians on recruit and 15 minute games. Recruit gives the Russians more tanks and a handful of tanks in units that otherwise would not have them. We chose to view each others force pools prior to battle but not actual units chosen for the battle. We played over 300 battles playing for around 65-70 hours total over six months.
220 battles were recorded using Bandicam. They are available to watch on Youtube at Stalingrad Unedited. They are unedited and not narrated, just raw in game video.
German Plan
Grand Strategy - My strategy was to meet Loki's armour with mine in the center and move all my infantry units north around RO Settlements through Sculturny Park to get behind the T-34s. This flanking migration of infantry took days and careful planning that strategic moves did not get messed up. Southern strategy was to check the Russians in Grain Elevator and Southern Ferry Terminal. The southern area below Chuikov's HQ and Tsarista Crossing remained quiet for most of campaign after the Russians were pushed back to the Southern Ferry Terminal.
Armour Tactics - Russian armour was very centralized, in about five battle groups. Upwards of 20-25 T-34s in four of them and 30 odd KV-1s in the fifth. Any armour losses suffered reverberated throughout the campaign so I used them carefully. Brute force could not be used against the Russians for fear of a devastating loss of armour. I was usually attacking out of a box with limited sight. My tactics were threefold to beat Russian armour. First German armour would be grouped, sometimes five tanks parked side by side. This would overwhelm any single tanks spotted. Secondly, airstrike support was exclusively targeted on enemy tanks. Finally, all my attacks had the exit VLs in mind. I was never able to force a breakthrough with these tactics but I did force the Russians back very slowly.
Infantry Tactics - German infantry was far superior to Russian and more numerous. While attacking I knew my losses would be greater, and at times much greater. I learned quickly to run my men only to the outer walls of buildings, not to rush in. Once they got to the wall they would fight with grenades first then small arms all together. If I had them rush in, they would get mowed down by waiting Russians. The infantry fighting was brutal. One map in particular that was the most frustrating was Mokraya Mechetka, the northern most center map. I spent days trying to remove the Russians. The map favours defence with its deep gullies and a dry river bed bisecting the map laterally. Each gully had the steep slope terrain element which made infantry movement extremely slow. I ended up attacking from three different directions with three different units. Eventually the Loki just retreated from the map.
Russian Plan (from my perspective)
Grand Strategy - Loki fought a delaying actions most of the game. In the first couple days Loki retreated east quickly to ensure better defensive positions. These days are crucial for the Russians. If the Germans make a breakthroughm, there are no Russian units in depth to stop them, the Russians have only a single line of defence, Loki ensured it was not broken by the early retreats. Loki's armour was deployed to center of the map, in and around RO Settlements, Mamayev Kurgan, Shooting Range, Barracks Hill and West Stalingrad. Infantry units made up the northern flank. In the south a single Guards infantry unit held the Ferry Terminal for most of the game.
Armour Tactics - T-34s were deployed mainly in a static defence role behind natural obstacles and buildings. They had superior firing positions with their turrets already facing the proper direction. German tanks had to roll into their LOS and traverse to shoot. Loki's armour units were deployed to maps that favored long lines of sight and few buildings. Mamayev Kurgan is the best example of this deployment. I was disbanded two or three times attacking into this map. The KV-1s were mostly a deterrent for most of the game, they were used very sparingly.
Infantry Tactics - Russian infantry was sub par is most battle groups. Loki made the best of this ambushing my men. There were two notable ambush spots. The first being in the bottom of a gully in a trench. German infantry would crest the top of the gully hitting the steep slope element and get picked off by one by less superior infantry. The second ambush spot was within ruined buildings in the second room. As Germans would enter the first room blind, Russian infantry would pick them off as they entered. I dealt with this effectively with the tactic I mentioned above, it was still costly.
Lessons Learned
Russian Maxims are the top machine gun in the mod. German machine guns do not compare.
Panzer3 tanks seemed superior to T-34s, Panzer4 were not.
German ATRs would not perform nearly as good as Russian ATRs. Russian ATRs worked great against ATGs.
Russian T-60 and T-70s are hard to destroy. They would take many hits leaving crew injured but would not die until hit with sustained fire.
Stugs would get damaged in all encounters with tanks, ATGs and ATRs. Not a reliable tank. Most Stugs were gone by mid campaign.
Mortars were only effective at killing standing infantry. No ATG or open topped vehicle was killed due to mortar fire.
Final casualties and positions.
Want to download CC5 Stalingrad? Here's the Installation Guide to get you started.
In August of 2004, Zappi, Homba, Bambam887, RedScorpion and MOOXE all pitched
in to create this Close Combat site. I would to thank all the people who have visited
and found this site to thier liking. I hope you had time to check out some
of the great Close Combat mods and our forums. I'd also like to thank
all the members of our volunteer staff that have helped over
the years, and all our users that contributed to this site!