Several rolls of film and written reports has been lost in a C-47xp crash caused by some flak from the Germans.
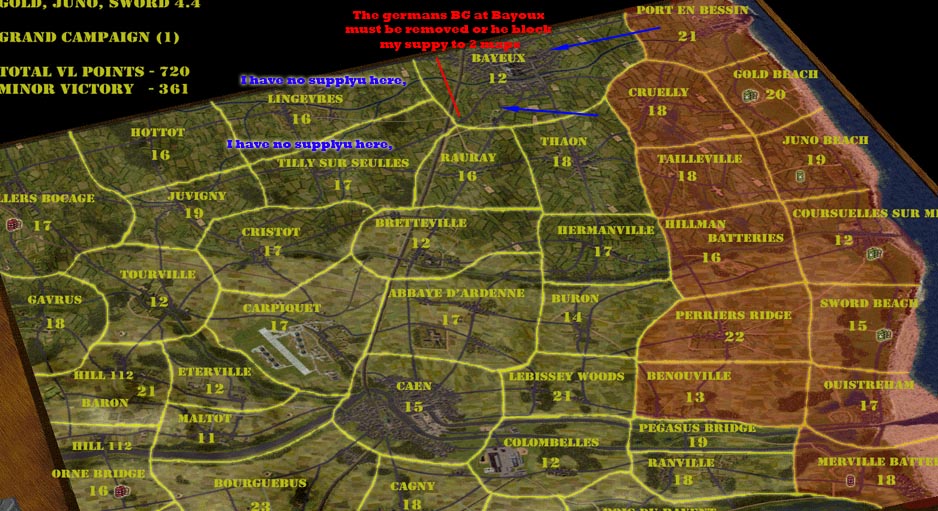
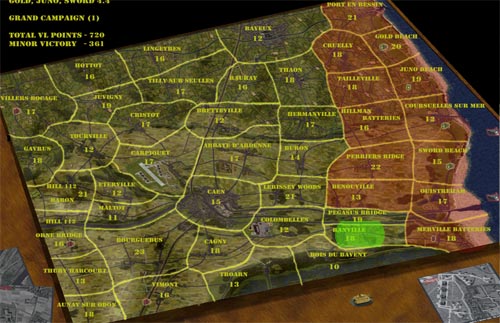
Map: Bayeux
Date 10 th 6 am
This map is v important to allied and ofcose to Germans, as it the hub to so many maps, and for the Germans they need just a unit on it to block the supply to move through, and allied must control whole map.
I have for many battles tried to through Dima out, but, that Russian Stalingrad glue is a special brew..
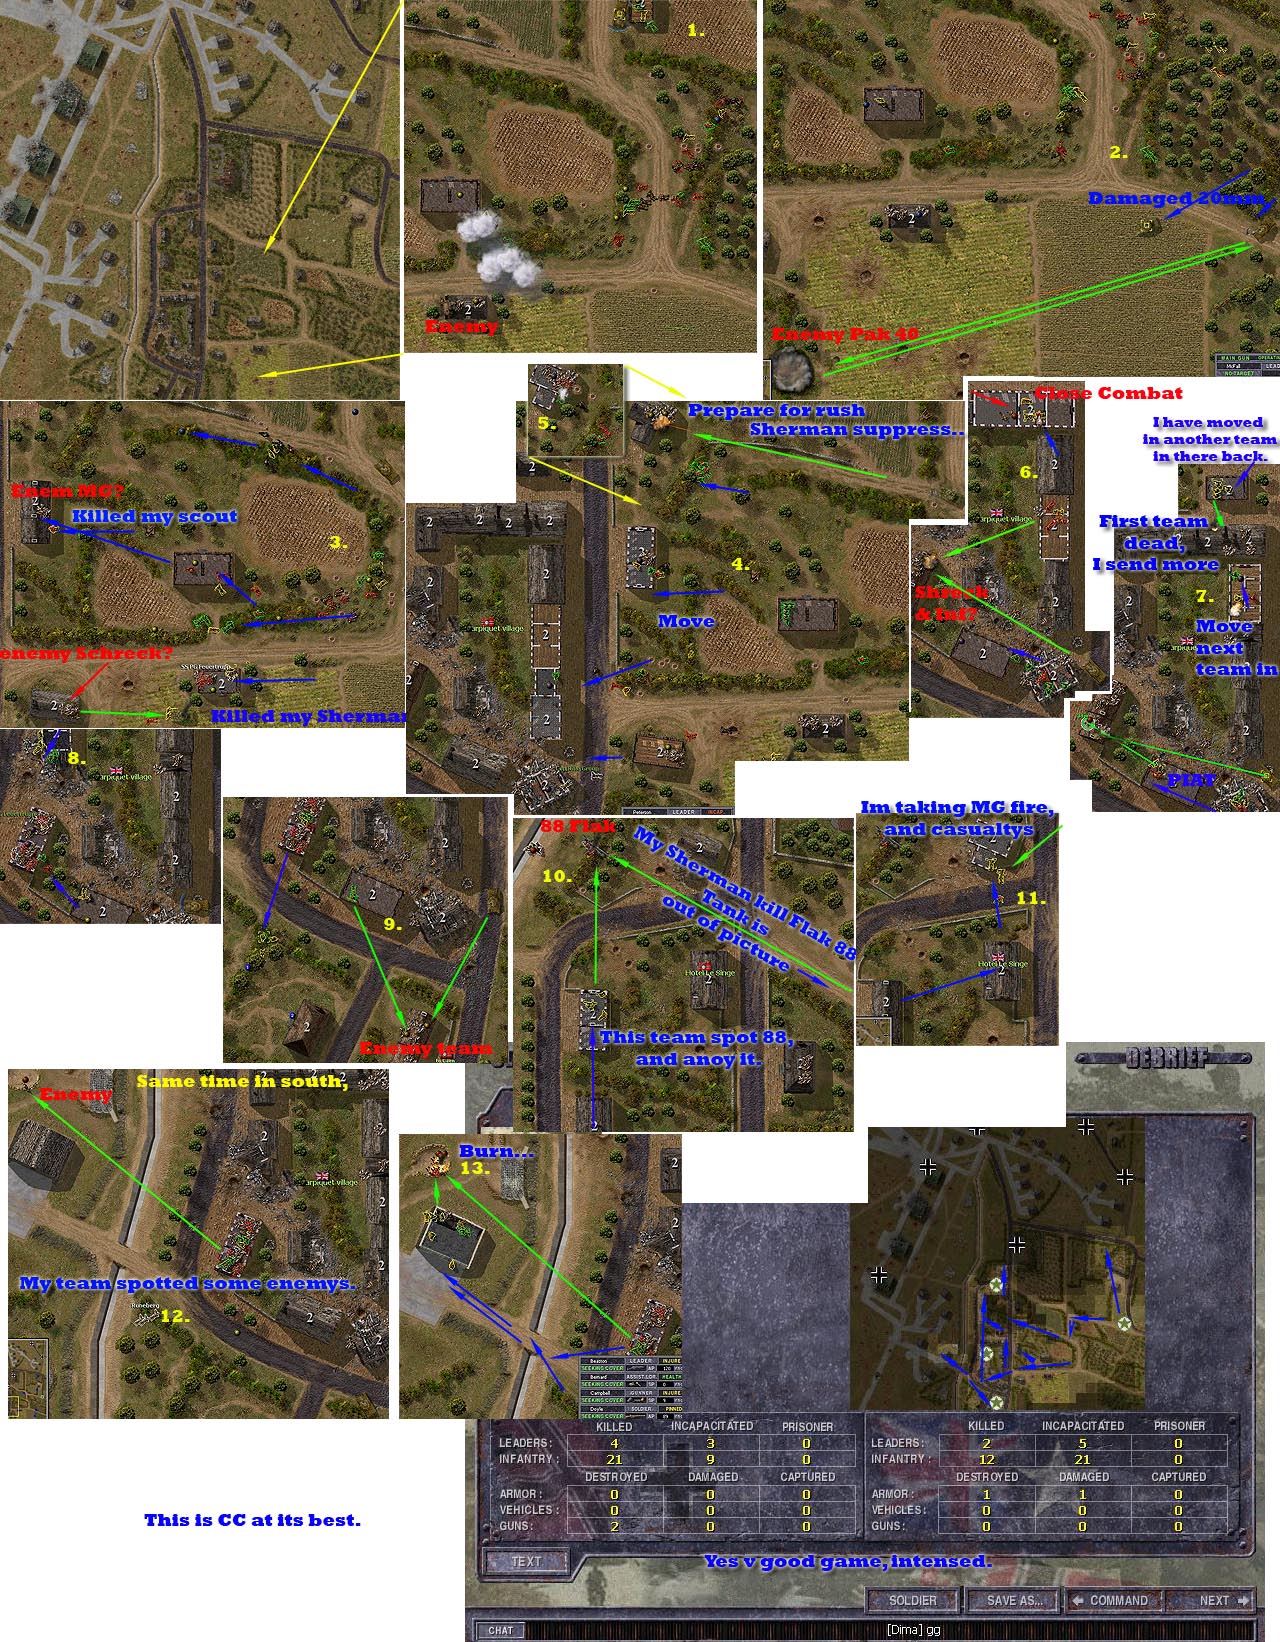
The battle begins, the allied force is in South, and it’s a massive force.
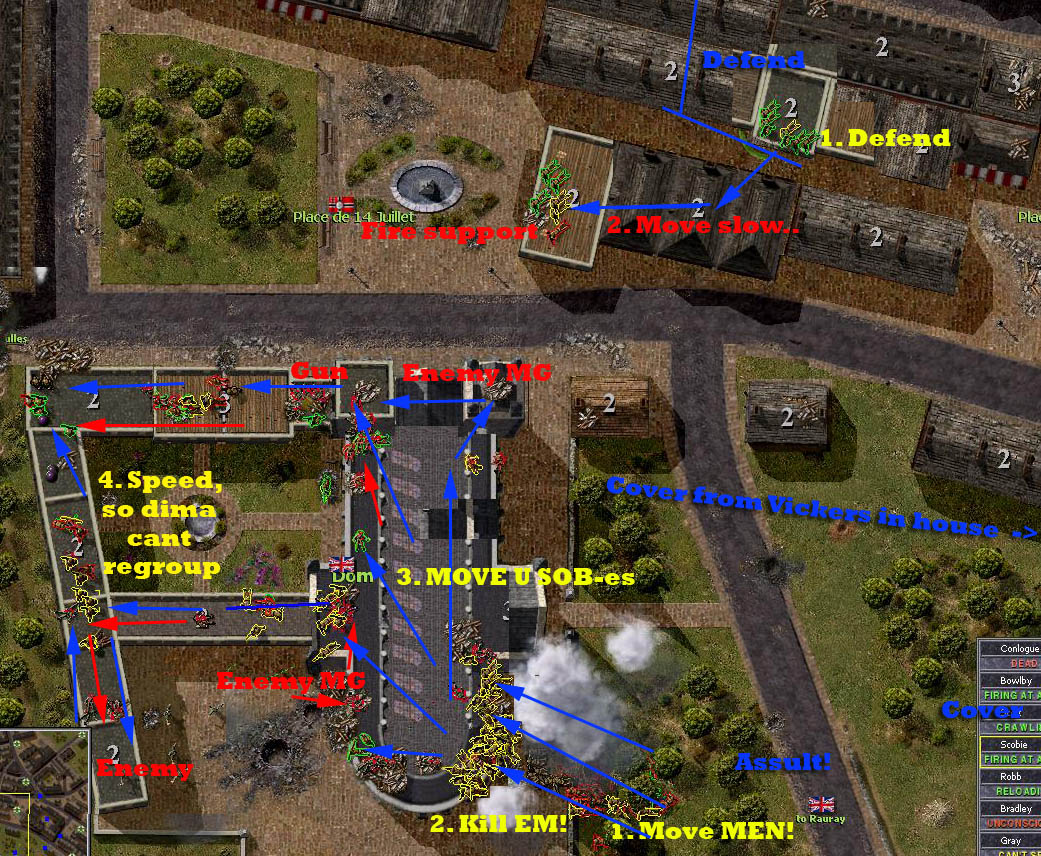
I have pasted many picks to one singe taken with minutes apart, and sequence is as yellow number say.
I have a Vickers for long range support in right side 2 story house.
1. The team is covered in smoke, this keep losses low, I also suspect the enemy mortars are at the Left south corner, and thus im inside there minimum range, this save life as Dima is the mortar man from hell.
At 2, we see the enemy, and the enemy MG is overwhelmed with fire.
At 3, enemy is so suppressed I send some team forward to kill em,
At 4, Speed things up, its so, that Dima is master of rearrange his troops, and if one give some time e will have a ambush ready and followed by counter assault
Well, then I forgot to take more pics , but in the end the Germans was through of, many life lost in the street fight just top of the yellow 4, and as that happen I moved in my North teams to grab VL in north,
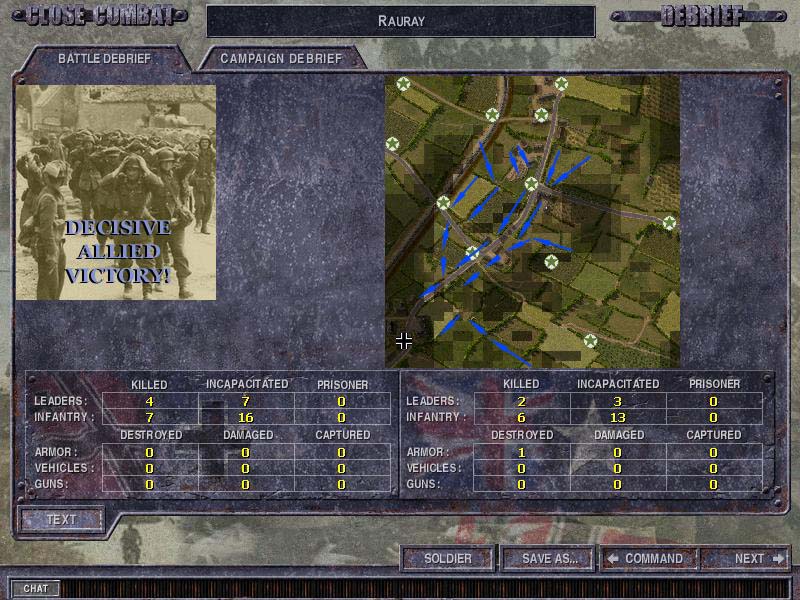
End result:
Finally the map is cleared and supply’s move to my starving units.
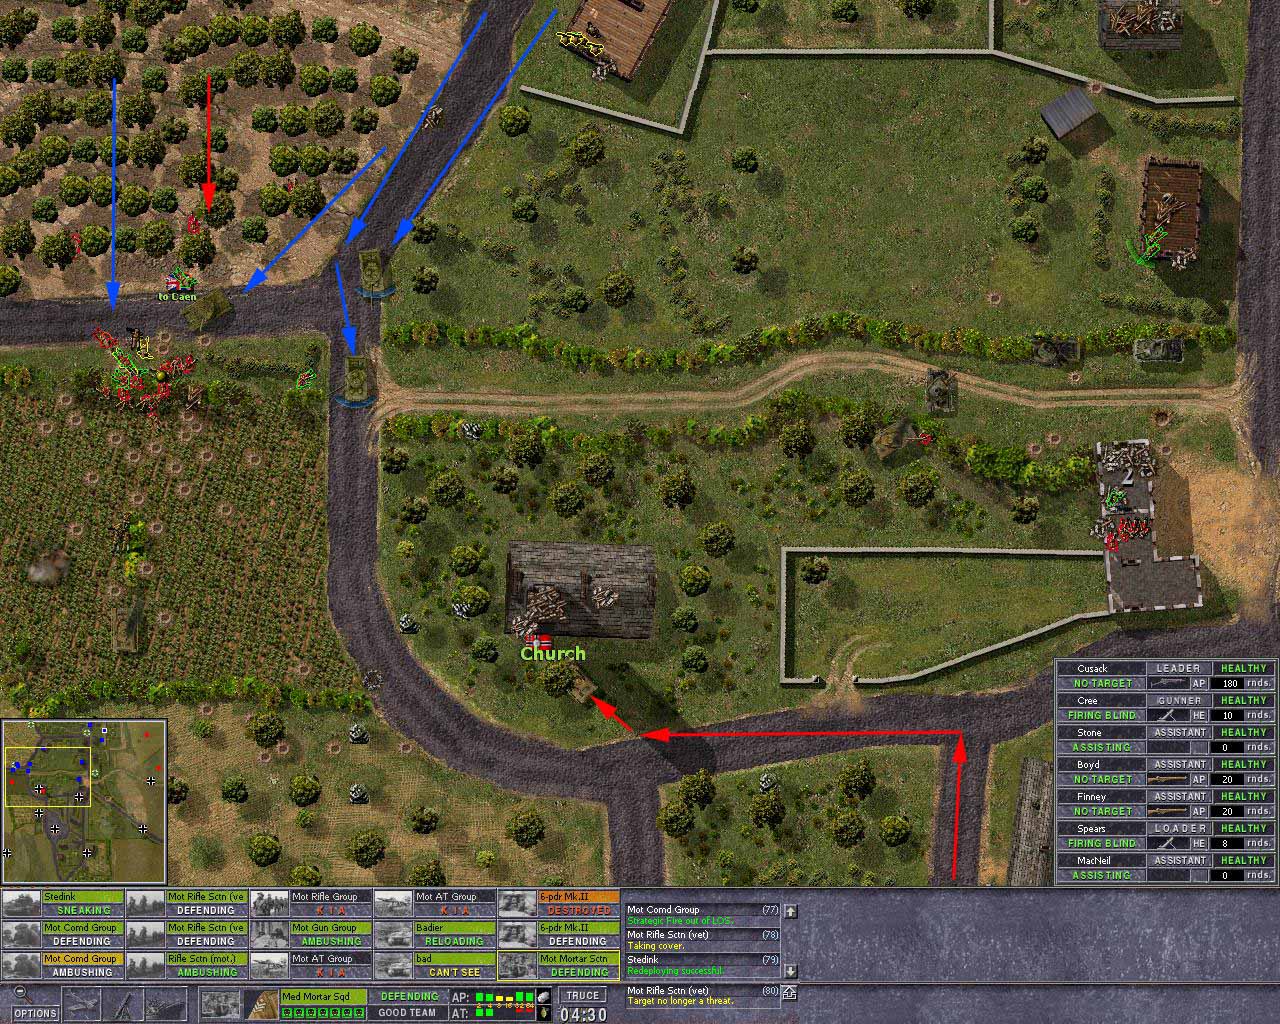
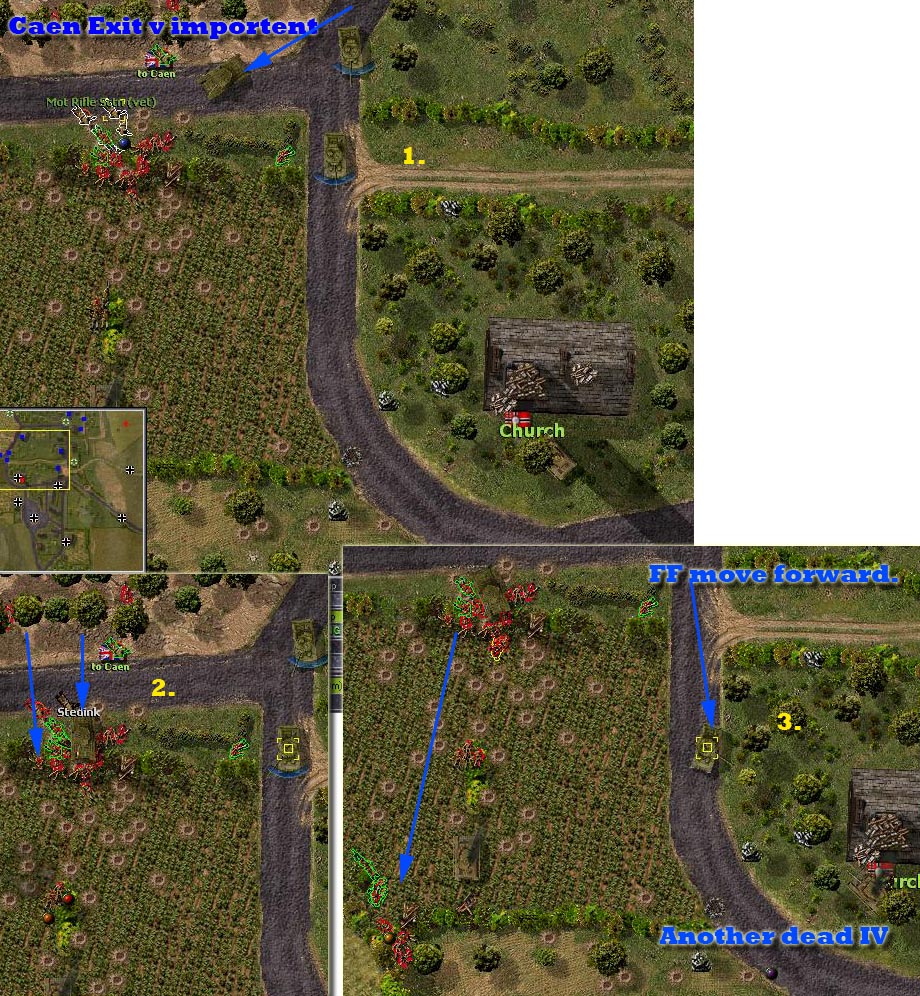
Yes, Dima have kicked me out and kicked the Allies around some times before on this horrible map. This time I come in from Top Right side, that make things a bit more easy.
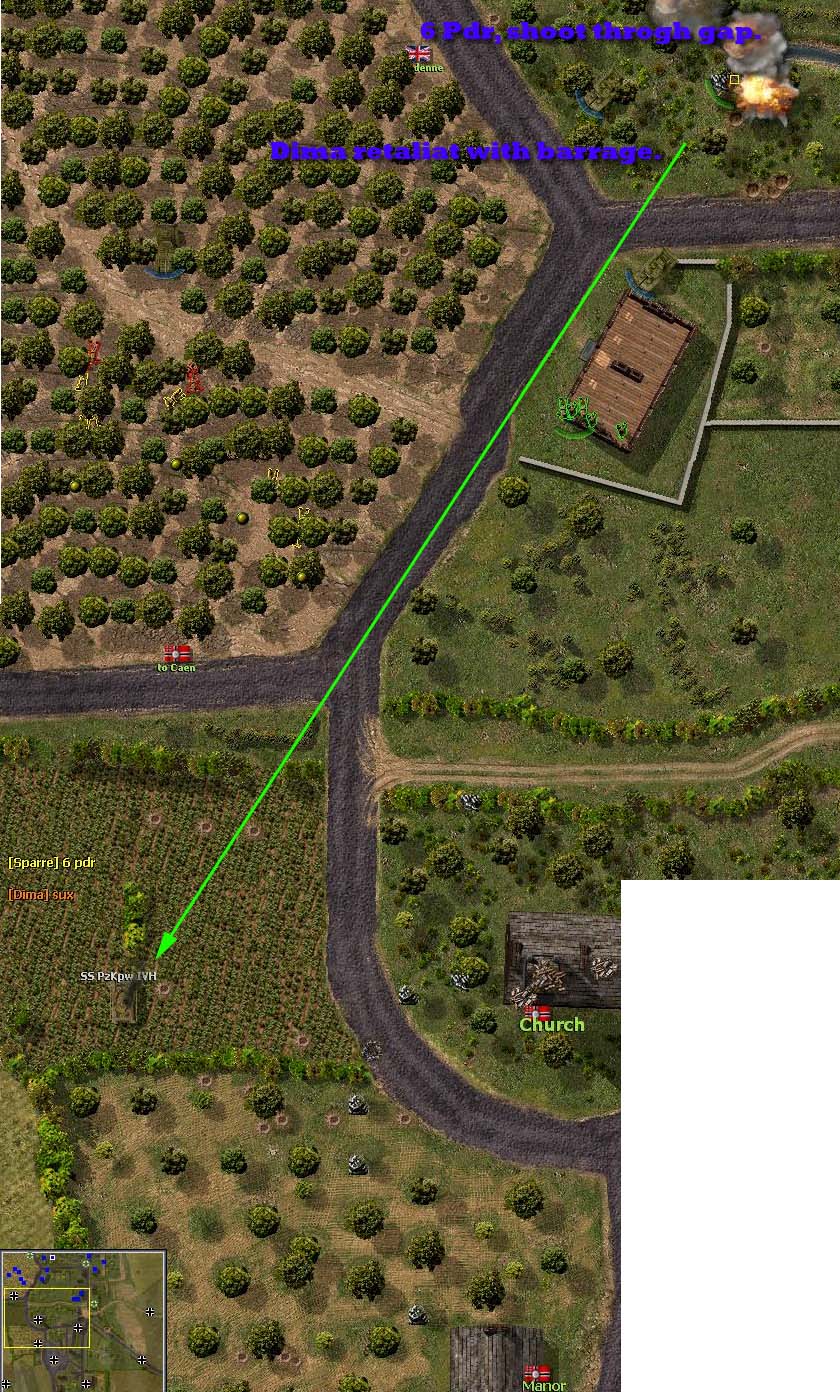
By take the Exit to Caen (Left mid Exit) I deprive the Germans of there supply. This is the ONLY tactical goal in this fight.
But this starts ok, the 6 pdr kill the Mk IV, and Dima then call in the barrage and the poor gun is destroyed.
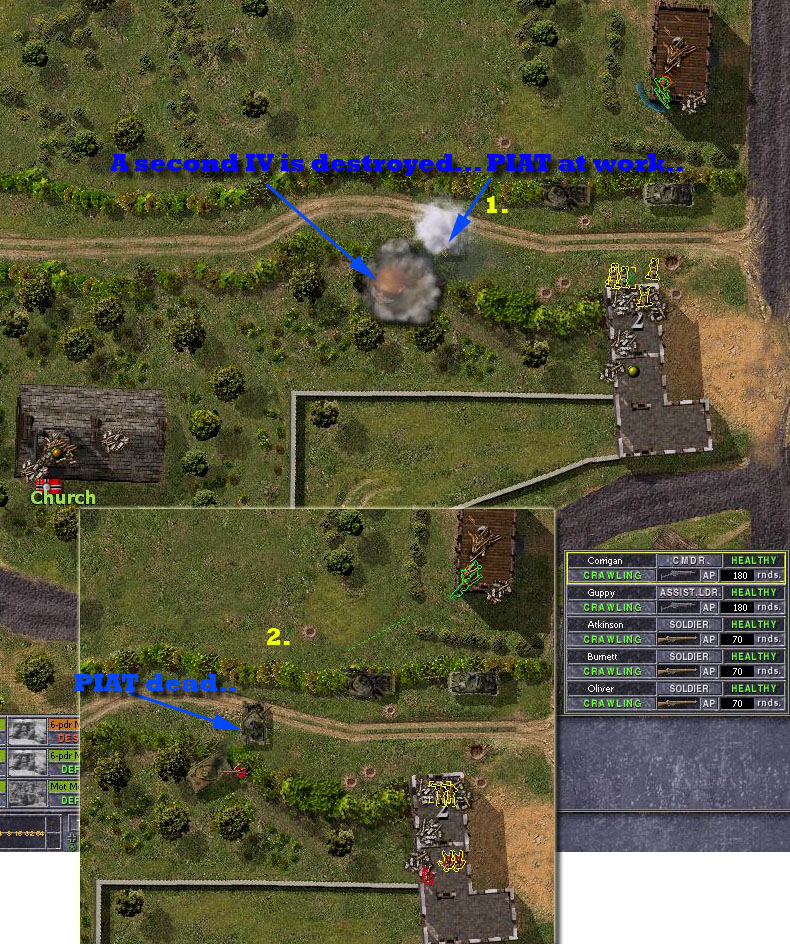
Here I try to get a PIAT to cover the right side of the church,
The Germans spot it, and for some reason send the tank forward, and the PIAT destroys it.
The Germans counter my moves by send in the Top North Right side tanks, probly aiming to derail my focus, and maybe take my supply VL up there?
The fist IV moved forward at high speed, I placed a 6 pdr to guard that VL, and that came handy. 6 pdr kill the IV, and the second IV is sent southwards, probly to go round and help at other side of map at the left side Caen VL, the Second IV is killed by the same 6 pdr.
At the same time in Right side Caen VL:
Dima has a Scheck up in church tower, and he also sent in a new IV standing guard at church.
Now, dimas infantry is desperate, my 95mm howitzer move in, at same time the FF move forward to kill the IV behind the church.
End result, Germans lost 5 tanks model IV, the Caen VL is secure and Germans will have no fuel next battle. Well done men!
The maps north and right side is in UK control, and Germans has a partisan tactic here.
Dima focus on easy pray at low casualty.
What to do? Either assault from North, or from south, but not both at same time..
I decide to try the South aria..
Dima has groped far in, and I can move rather simple, my AC with its canister ammo will make things easy if I approach some enemy inf, the AC cant take a AT gun shot thpough.
As I come a bit more up north, Dima has a Pak 40 wich make life short for my 2 AC,
Dima take light casualty’s, and play partisan really well.
I control the map, and Im rather happy to do that.
Dima has moved in a Panther BG, and that can be painful, for me.
But still the open arias, is threatening even for a panther, as both my 6 pdrs and FF can make more then a dent if hit panther in side, and as I control map, dima expect me to cover map from all sides..
He play safe, and sneak and try get a foot hold in left south aria.
I expected this move, so I placed a flamer there and a command team and a MG.
The germans attempt failed…
Movement.
This is the situation at the end of the 10 th 6 AM.
Maps: Lebissey Woods
Date 10th 2 PM
This map is v imp for the GC, it hold the key to Caen.
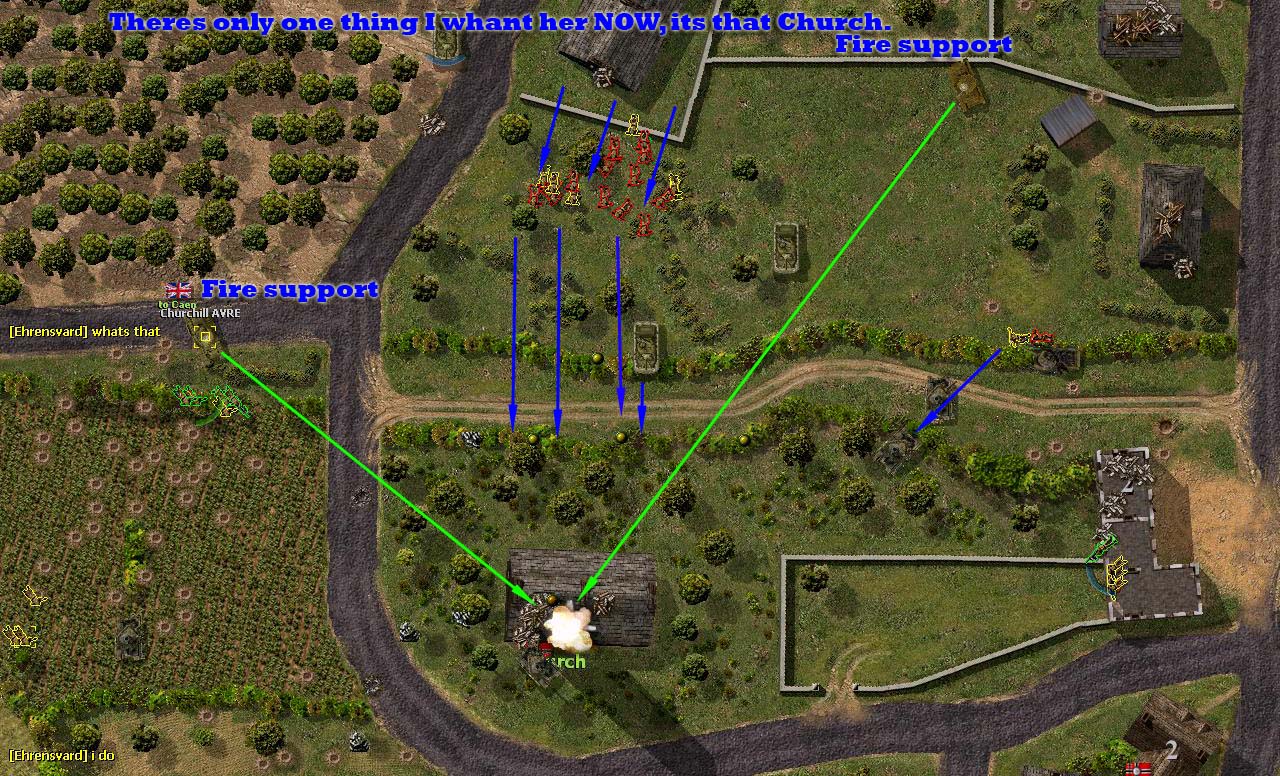
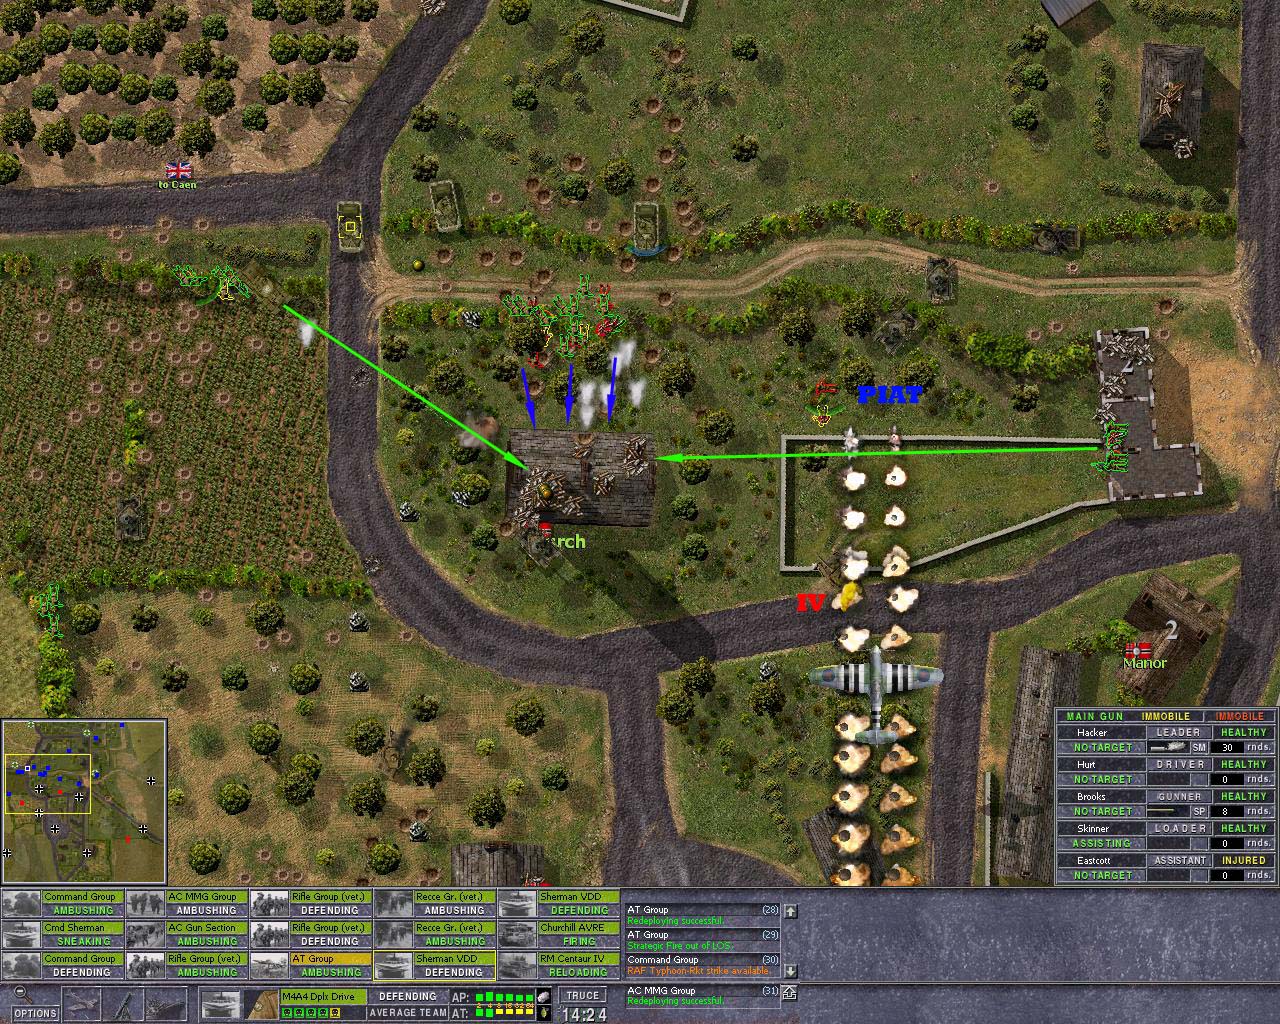
Tactic goal for this round: Get the church no matter what.
Dima probly has some schrecks in there that can pick my tanks of from the tower, so some massive suppression is in order for this to have any chance at all. The Suppression is take care of by 2 95mm howitzer tanks.
The church in it self will be stormed by infantry after the enemy is soften..
The Vickers team at right side provide some extra suppression so the enemy has little place to hide. On the left side a AVRE come in, and a enemy IV tank comes in to massacre my infantry, that IV is bombed by the RAF.
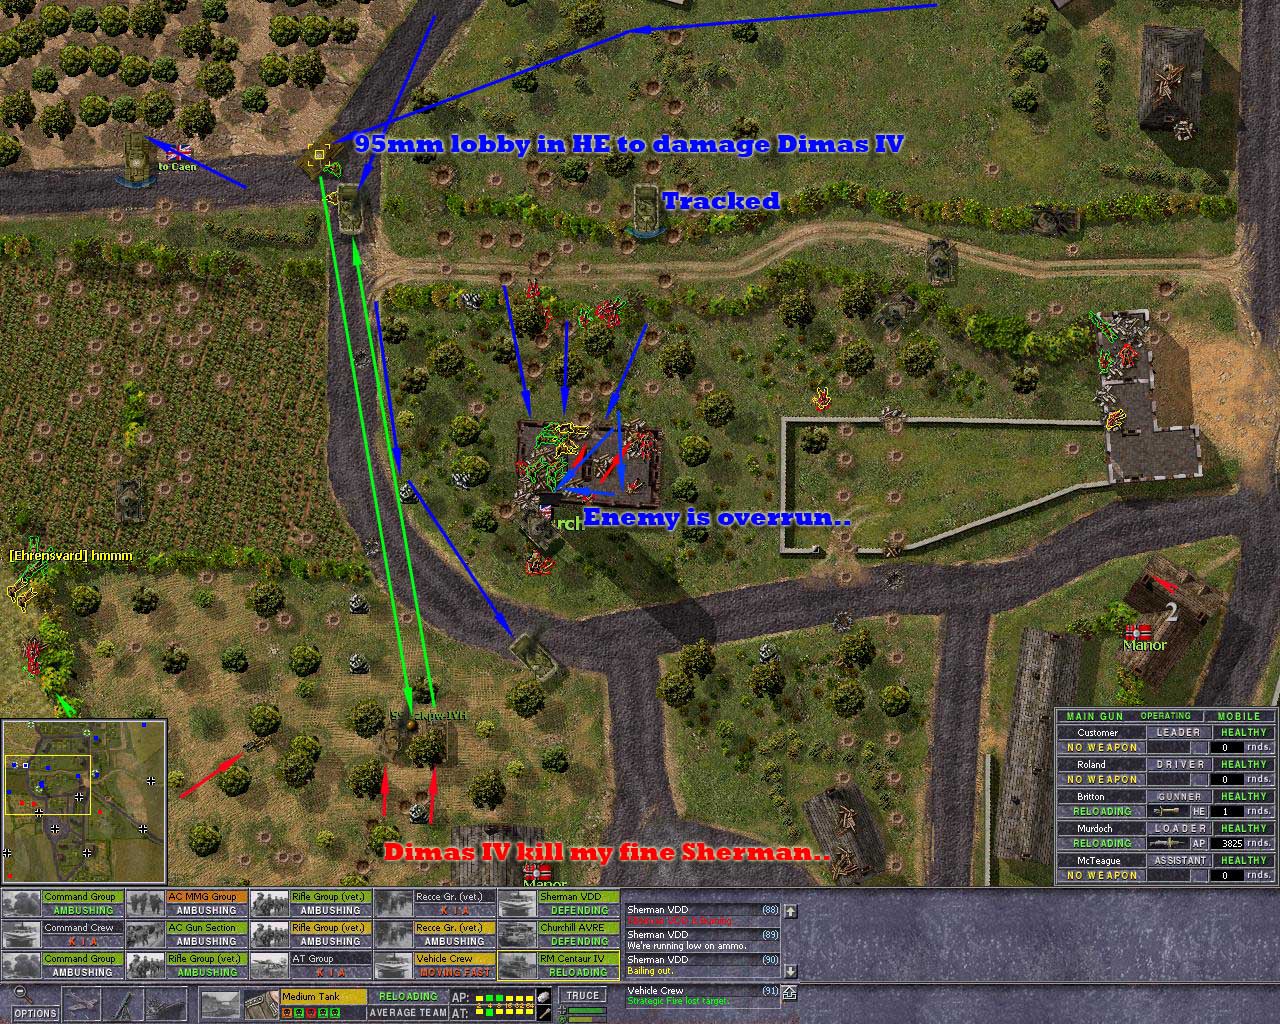
The infantry assult is barraged by Dima, and the tank following em is immobilized.
Dima has rearranged his defence, and the IV now is at left side, RAF dint do there work properly.
The smoking IV got killed by my Sherman, but the other IV then take out that Sherman, and later the 95mm to..
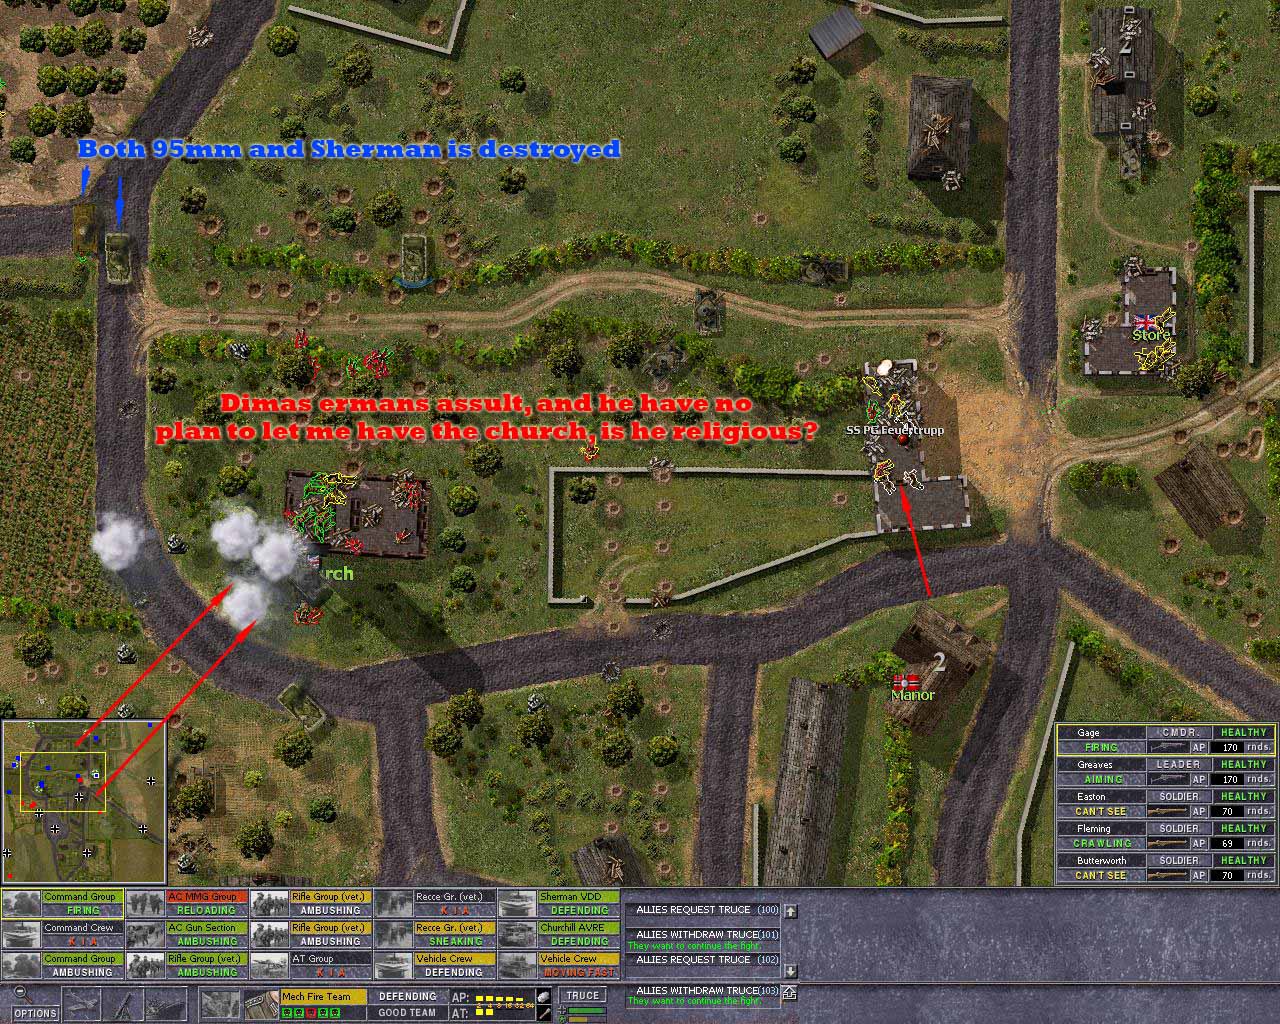
The church is taken by the infantry, but dima will not let this stand, here come his infantry to.
Situation is critical, dima moves in and my morale is really low.
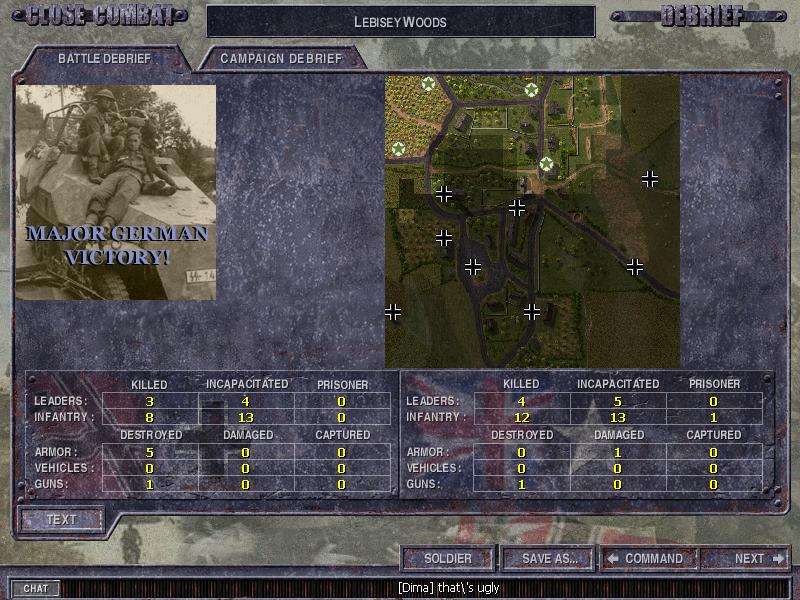
End result.
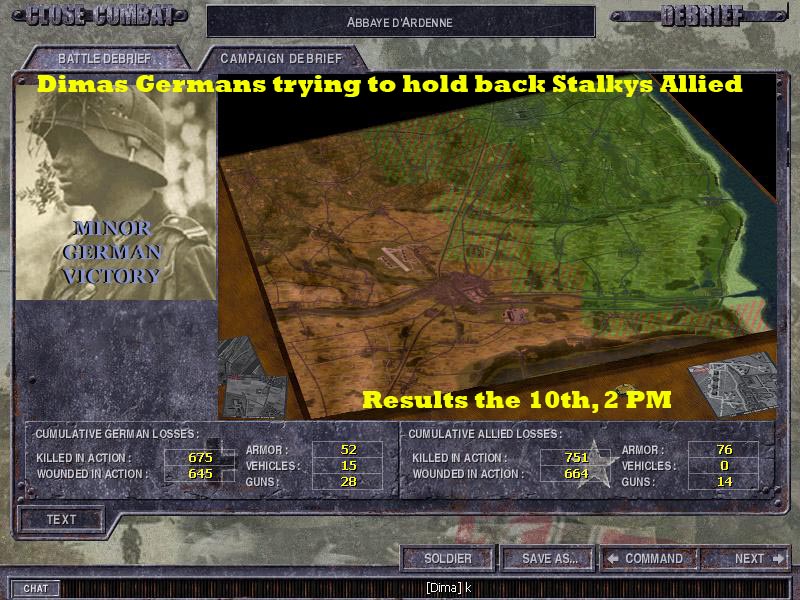
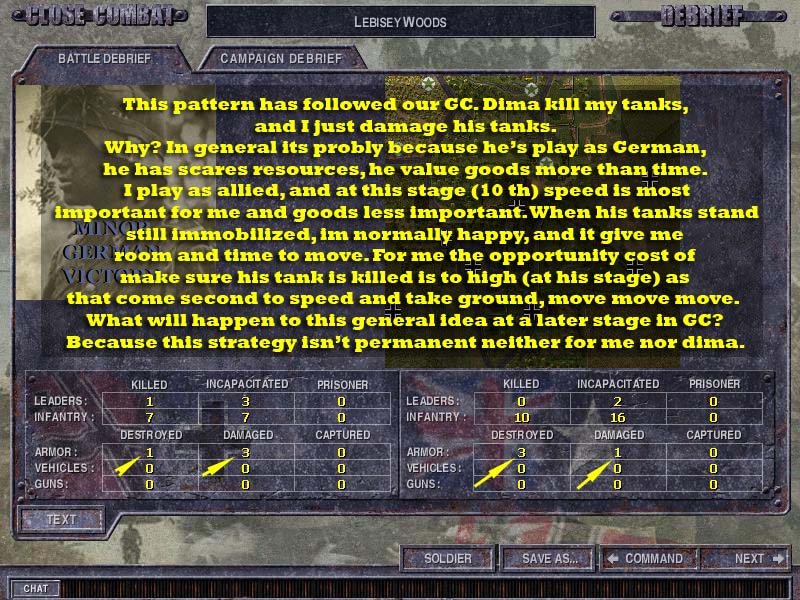
This pattern of destroyed vs damaged tanks has followed us through the this GC and all our GC I can remember.
Im not sure, but its most likely about opportunity cost, its to costly and risky to make sure his tanks is killed, take ground is more imp to me, and then I just hope his tanks isn’t repaired to next round.
Said that was in general, but In some battle, there just isnt any value to risk the last AT resources on the final kill, and ofcose in some battle there just inst any resorces left to use...
Dima has a total other general idea, he make sure my tanks are really dead, its also so he generally takes more deadly shots as he open fire, mostly in side. For me, I just want to stop his tank so any shot may do that, and then I can move.
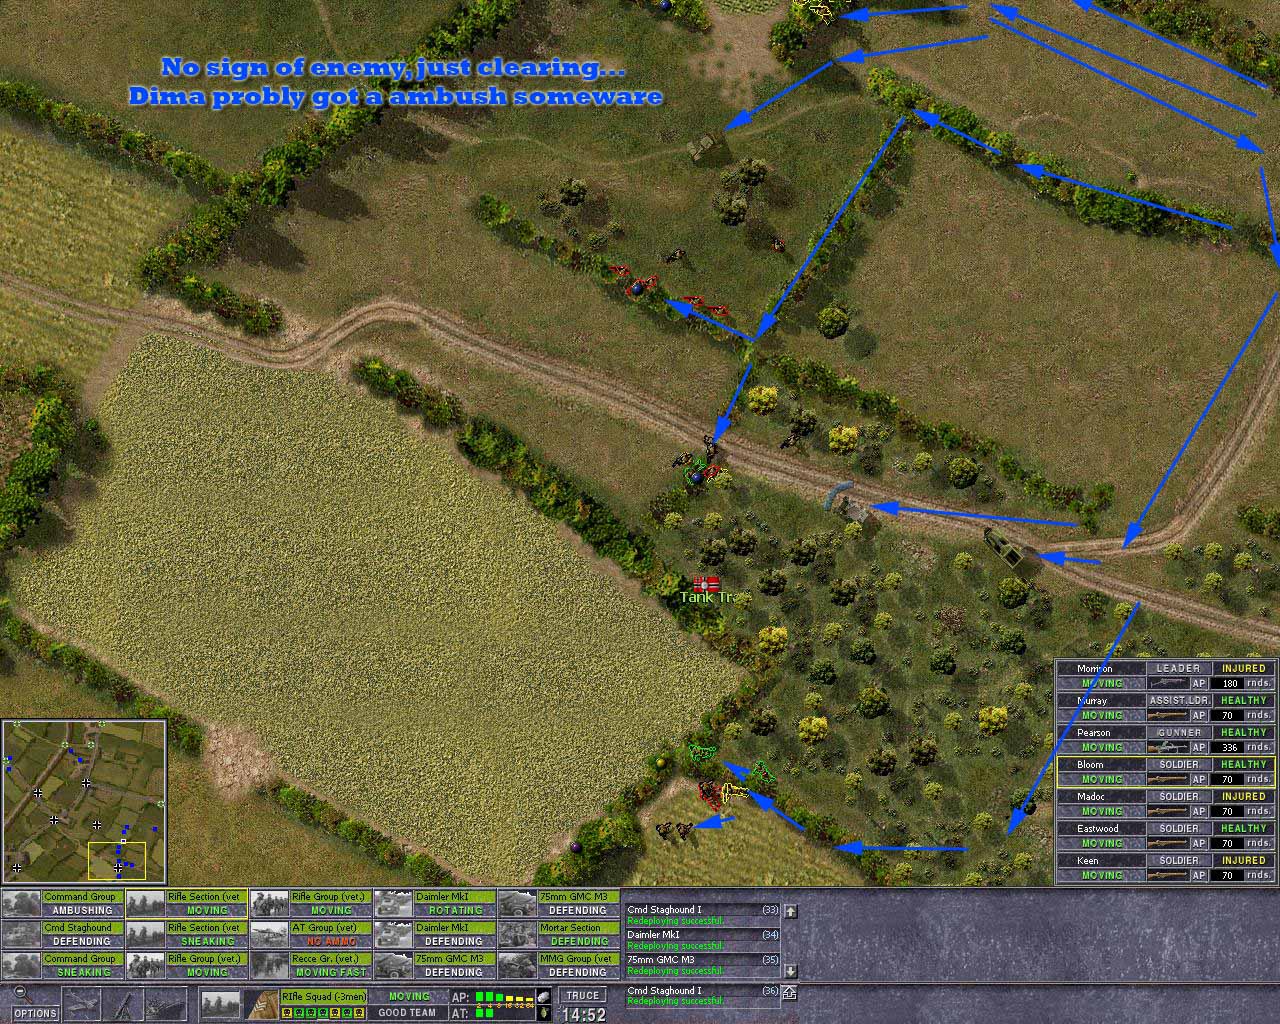
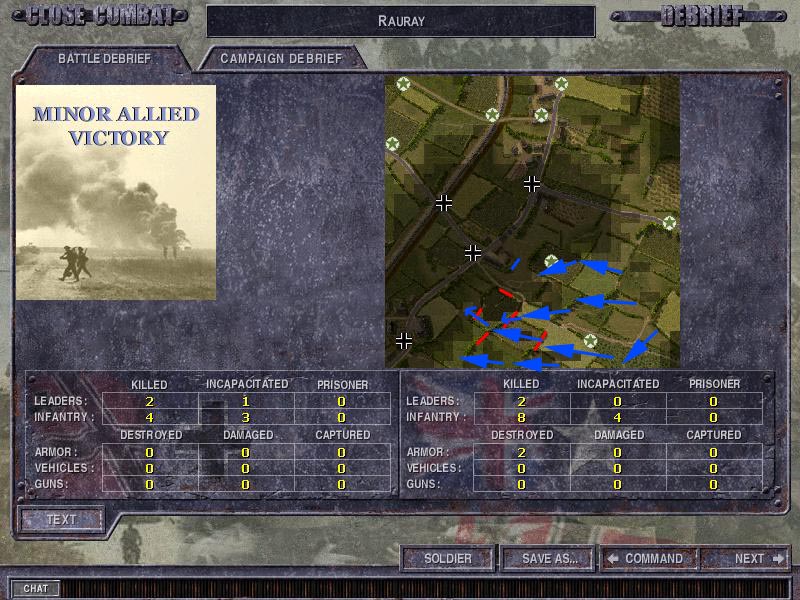
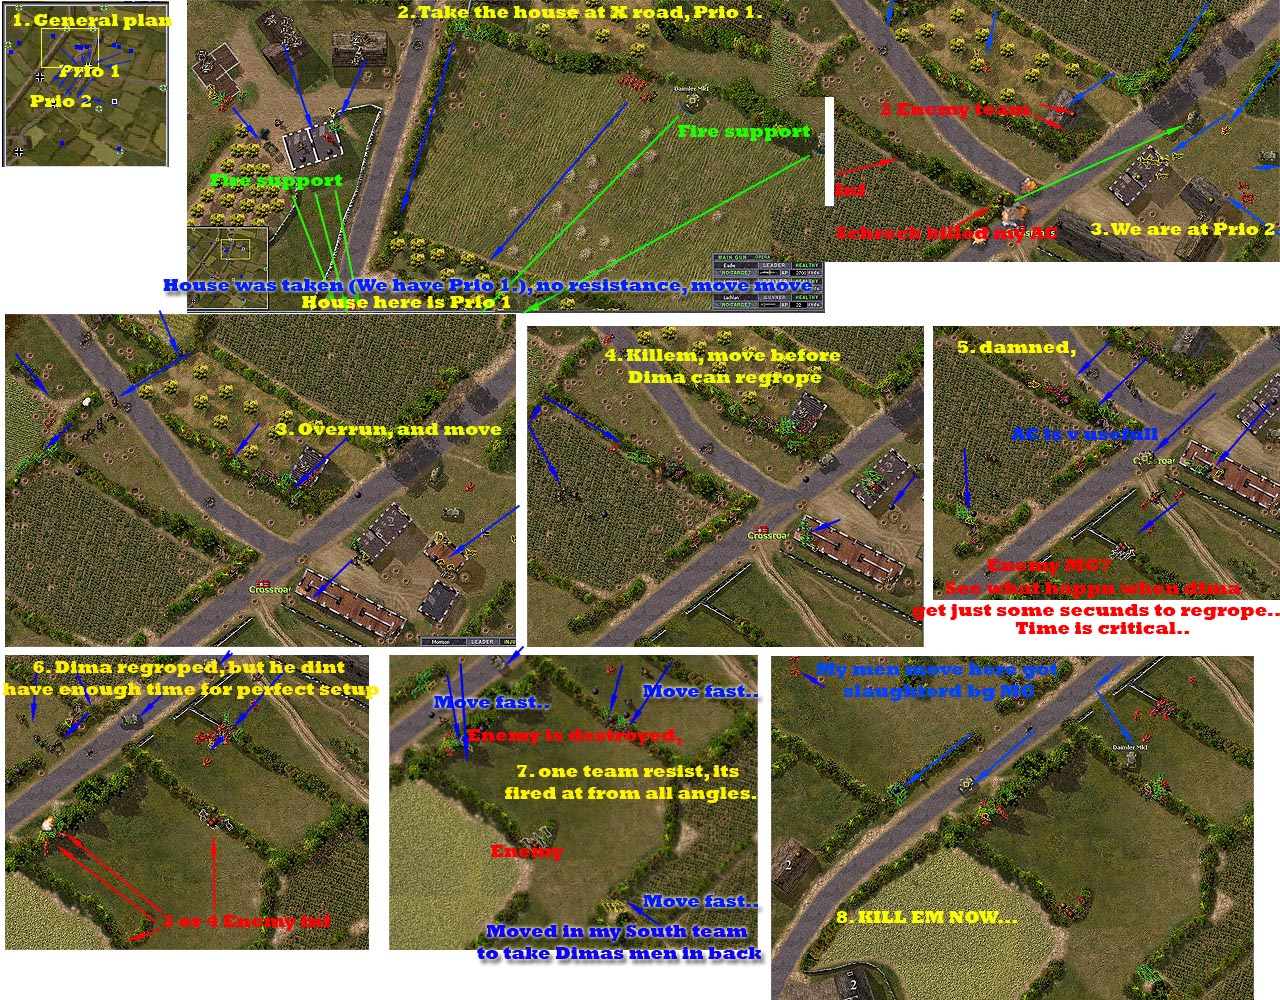
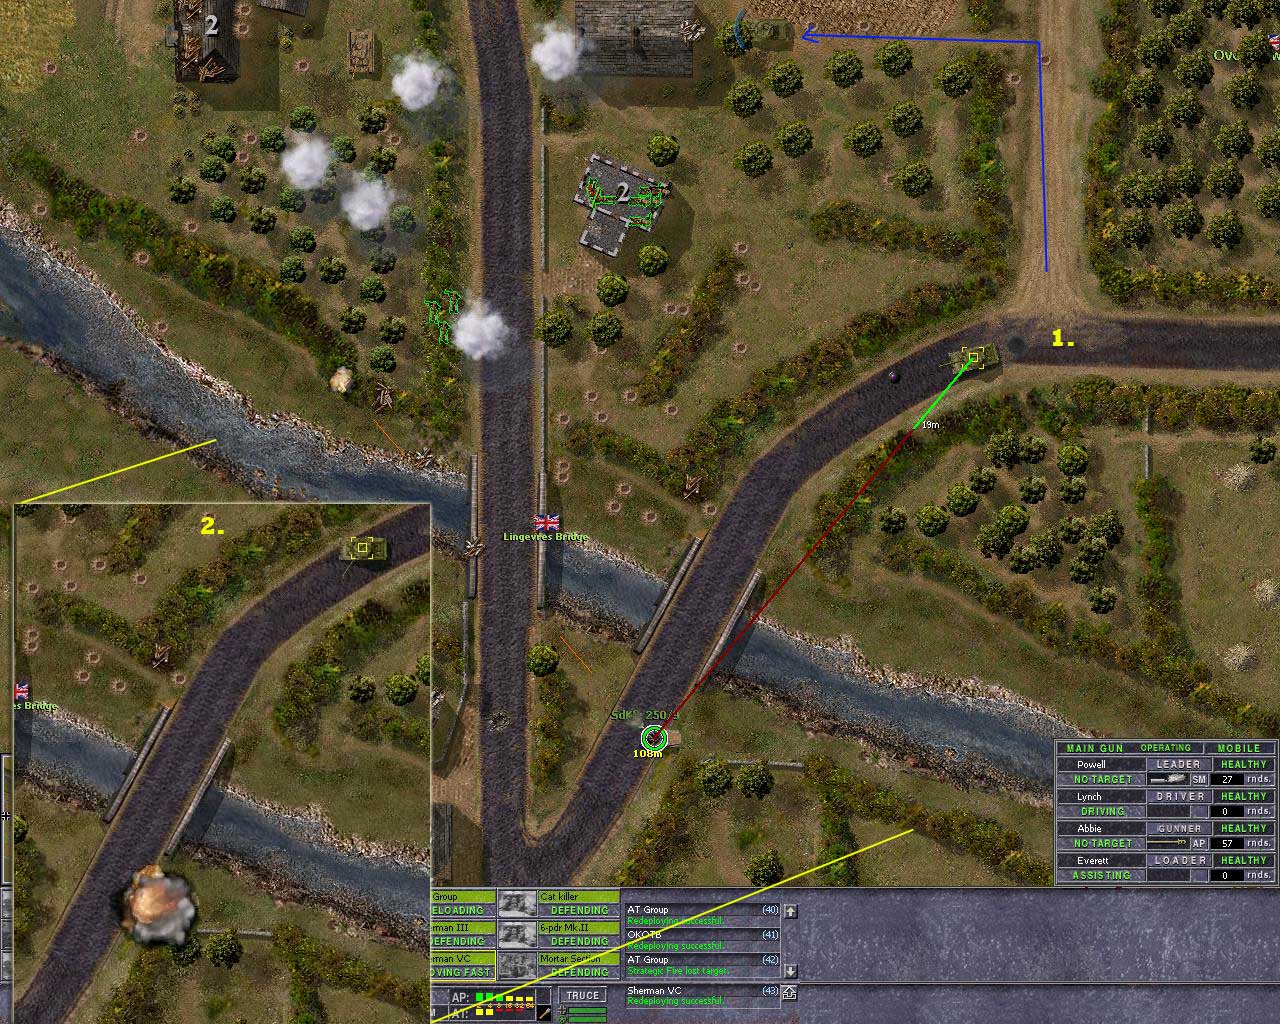
Maps: Rauray
Date 10th 2 PM
General idea, grab the center houses, and move to the X road, and secure that.
at 2) I suspected Dima would have some inf team and maybe a schreck in there, but if he had he removed em as he saw what he was up against. Hes master of the partisan warfare and isn’t that annoying.
At 3) We are moving to Prio 2, the X road and the buildings there. My AC has canisters, and they are really cool for infantry support, as long as they aint hit.. Dima score a Schreck hit on my fine AC, and its burning. I must kill that schreck, mortars pin it down, and I must move in some infantry to kill it.
At 4) The infantry team has flanked him, and his men is dealt with.
At 5) Crap, ambushed, but here the AC is so useful in infantry close support role, it take control of situation fast.
At 6) I move over his men, but there is a 3 rd and 4 th line of partisan ambushes, lucky I held my men close and the ACs near by, the 2 AC make all the difference..
AT 7) well, see what I mean, here he has the 5 th line of ambush… This is dealt with from three sides, as I moved up my South team to fire at the partisans backs.
At In top of map, the enemy MG42 shop my team into small parts, and that’s the danger of moving without cover, but sometimes it pays of, I like that, and its not my life to pay with anyway…
End result, so what’s some life’s for the grater good? I rather take 25 casualty’s in one go, then have to fight here 10 times and just have 10 casualty’s each time. This was fast and kill ratios was ok, and Germans are so boxed in they hardly can’t fight here one more time without suffer major losses.
Last edited by AT_Stalky on Mon Dec 08, 2008 11:48 am; edited 1 time in total
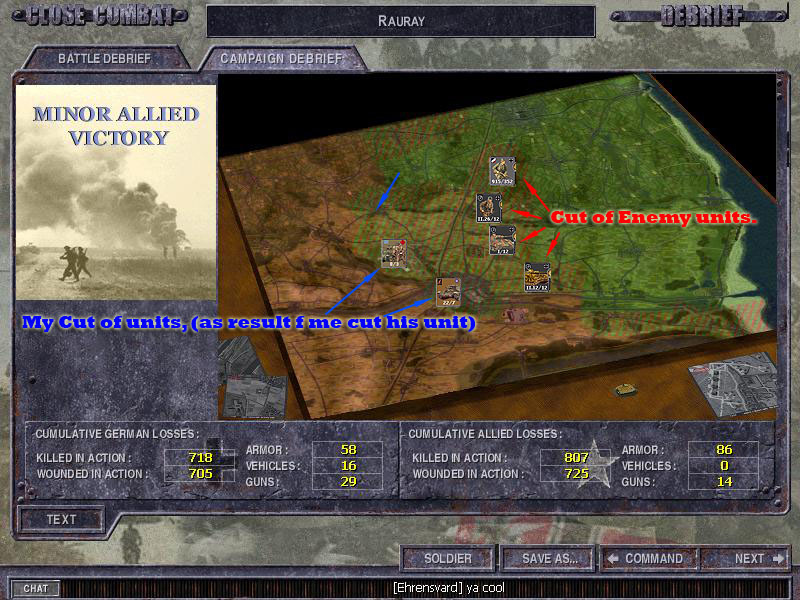
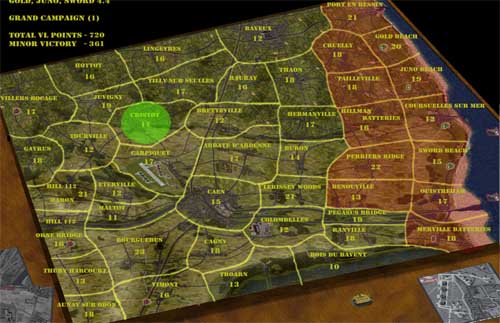
BTW, this is the strategy situation 2 PM 10 June 1944
I have moved in 2 of my units behind his units and cut 4 of his units of from supply.
In general, there’s hardly anything so sad as an immobile Panther and Tiger.
In this way, those units will be much more easy to destroy, and they pose a much more manageable threat.
There isn’t many more room (free maps) for German BG to be in, so disbanding
isn’t really an option either I suppose, they will just que….
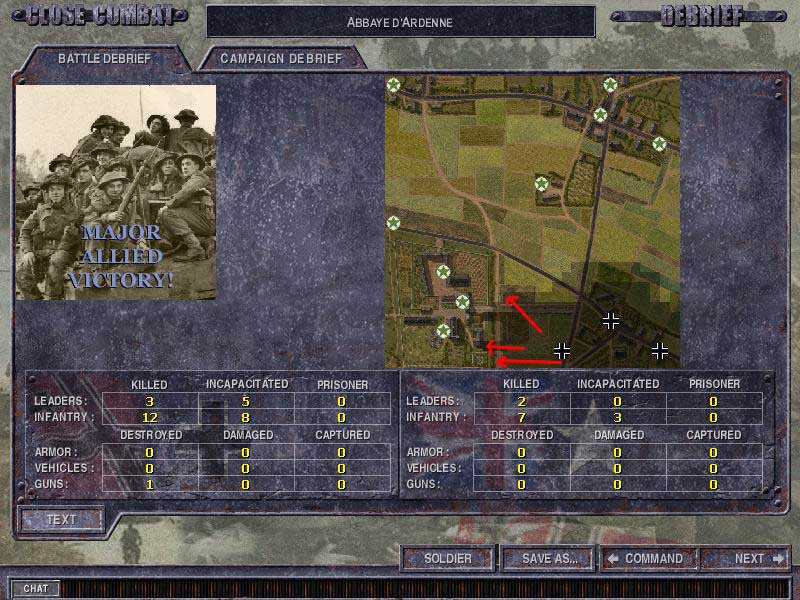
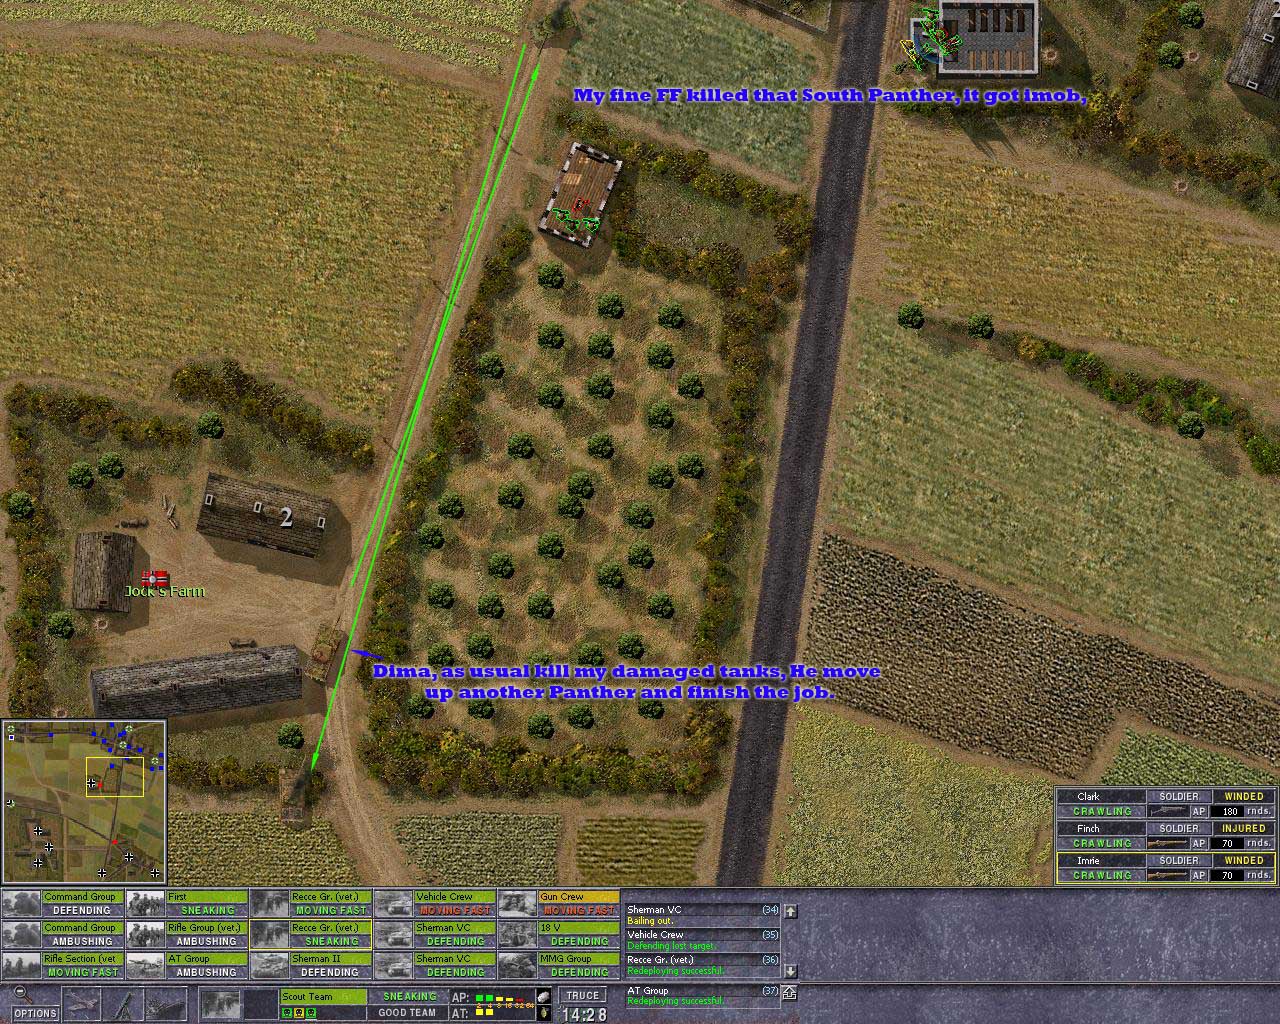
Maps: Abbaye
Date 10th 2 PM
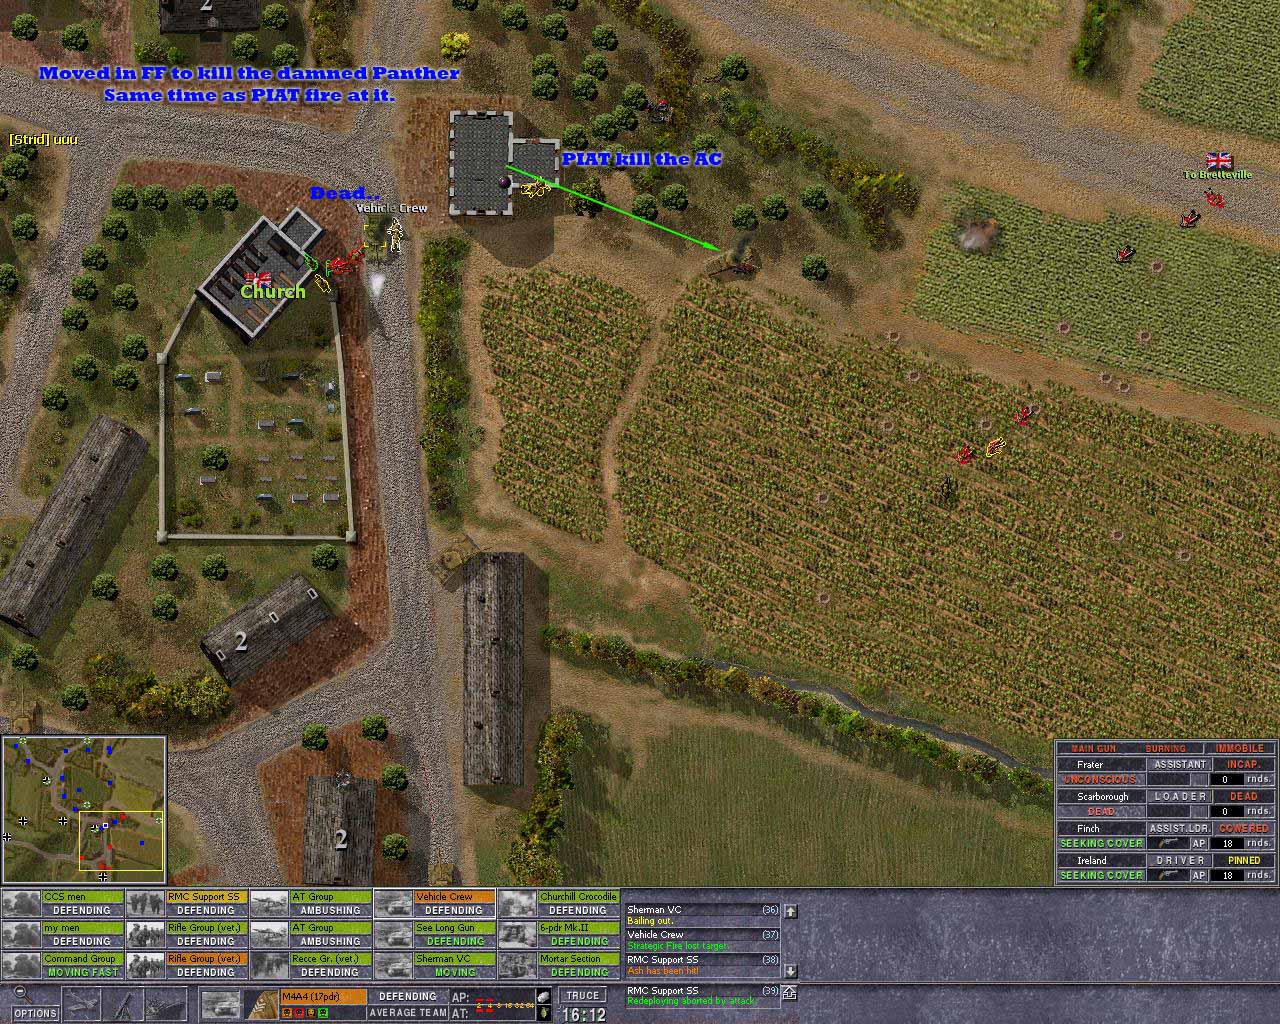
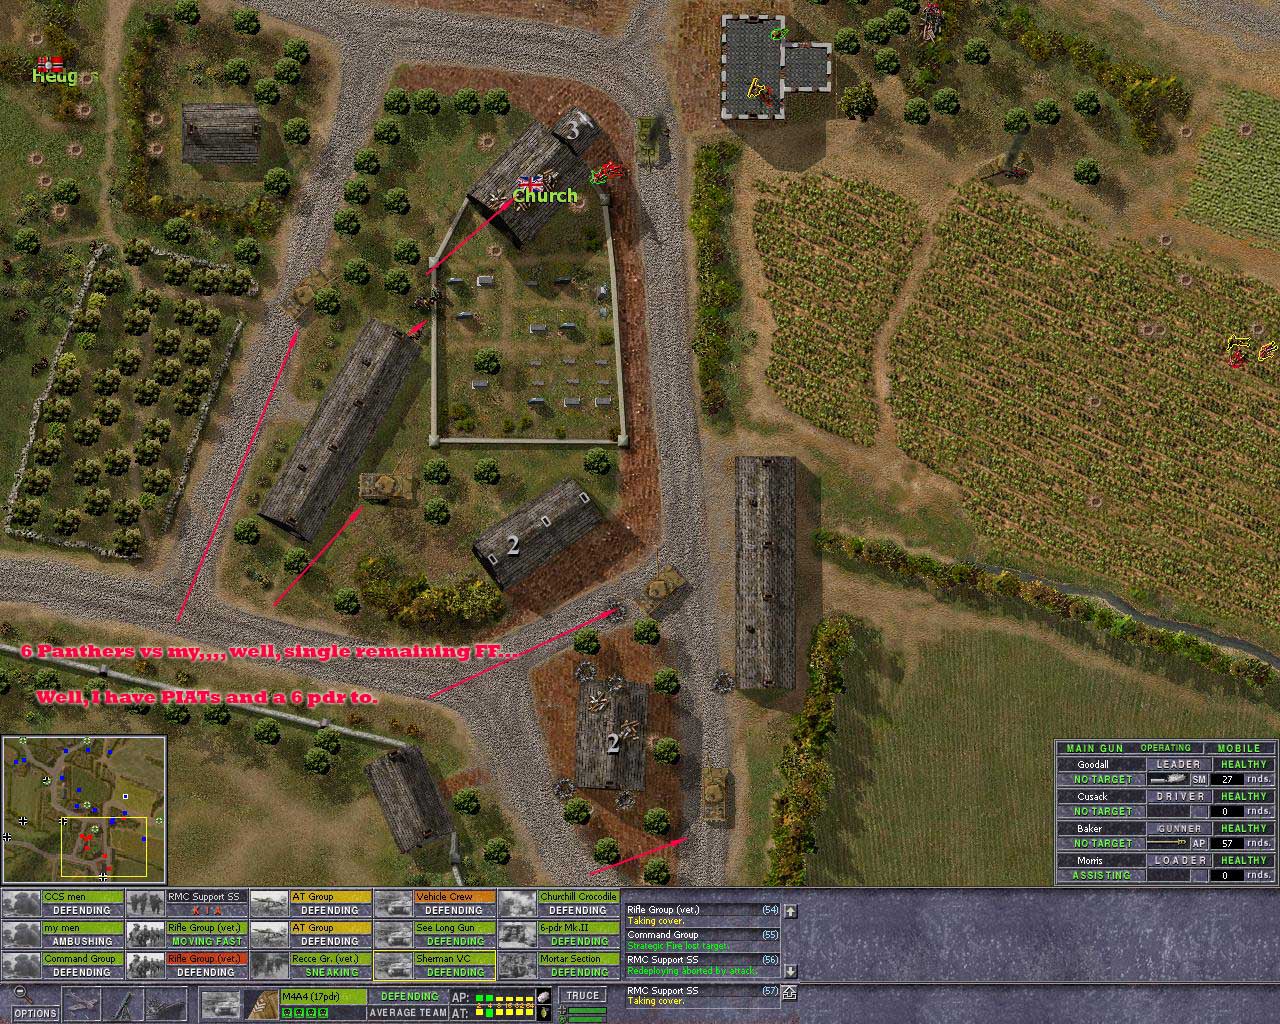
Euuu, Panthers, MY FF stand on guard, and was meant to take a panther in side if it nmoved on the left side of the map,
but dima run it in to the headge and got LOS on my FF, and that may end v bad,
I got immobilized, but the FFs gunner was unhurt and turned the turret and got of a deadly shot at the gun mantle of the Panther,
witch turned into a smoking wreck. Dima is a wolf, probly a Alfa male, thee pack leader,
and he just cant stand a old, damaged or tired pray wobbling about, there his instinct takes over, KILL IT, KILL THAT TANK, I whant it DEAD…
My damaged FF, and its crew sat there satisfied and thought “hey we did grate, shears and soon there will be medals for us all,
cant w8 to be in the papers as a hero.”
so they dint see Dimas 2 nd panther coming at full speed and fired a round that penetrated the lower
hull and started a fire that caused the ammo magazine to blew up. I heard Dima over the radio, “Haha, Good job, Now they just have 2 FF remaining in this BG”….
Yes, wolf or panthers, I don’t know, but everyone knows the Panthers don’t really cause so many death among humans,
the greatest human killer is a fly, malaria etc. This fly, my Fire Fly delivered a deadly shot in the side of that Panther.
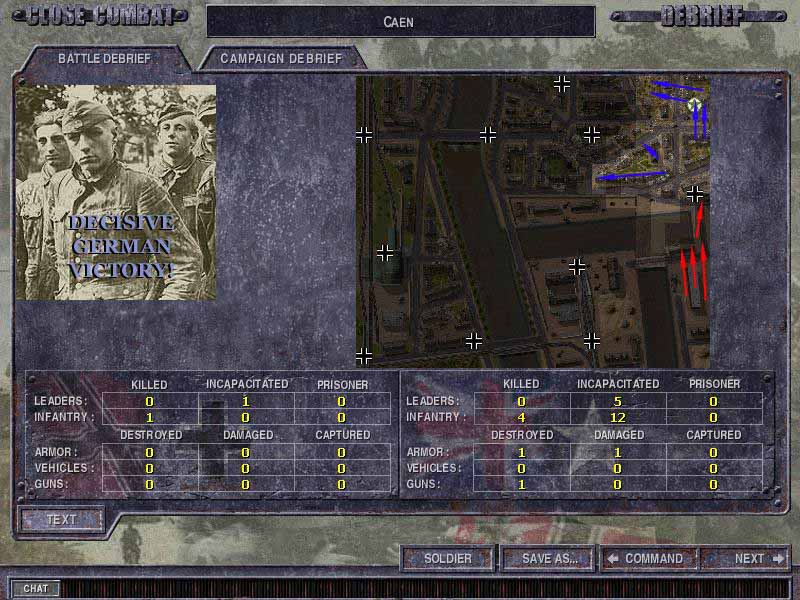
Maps: Caen
Date 10th 2 PM
Tactic goal, only support the grater strategy by being on the map and
blocking supplies to many encircled Germans quality BGs.
Limited tactical goal, expand the deploy zone making it harder for Germans to push us of.
This s confined aria, and Dima have LOS from all sides, and them damned Schrecks and MG42s cause casualties.
My PIATs don’t have the range (only 85 meters) so dima know exact how to get the rounds of still stay safe.
When my men reach the top left buildings he brought in a JPZ, and well… That hurts..
End Result, Germans got one VL and I got a new VL. Im cornered, and need some serious glue to stay on the map.
Notice Dimas casualtys, this type of battles he really dominates.
And I supose the few cassulatys he had here, was caused by his own friendly fire, for I dont belive I killed a single German here.
Last edited by AT_Stalky on Sat Dec 06, 2008 11:55 am; edited 3 times in total
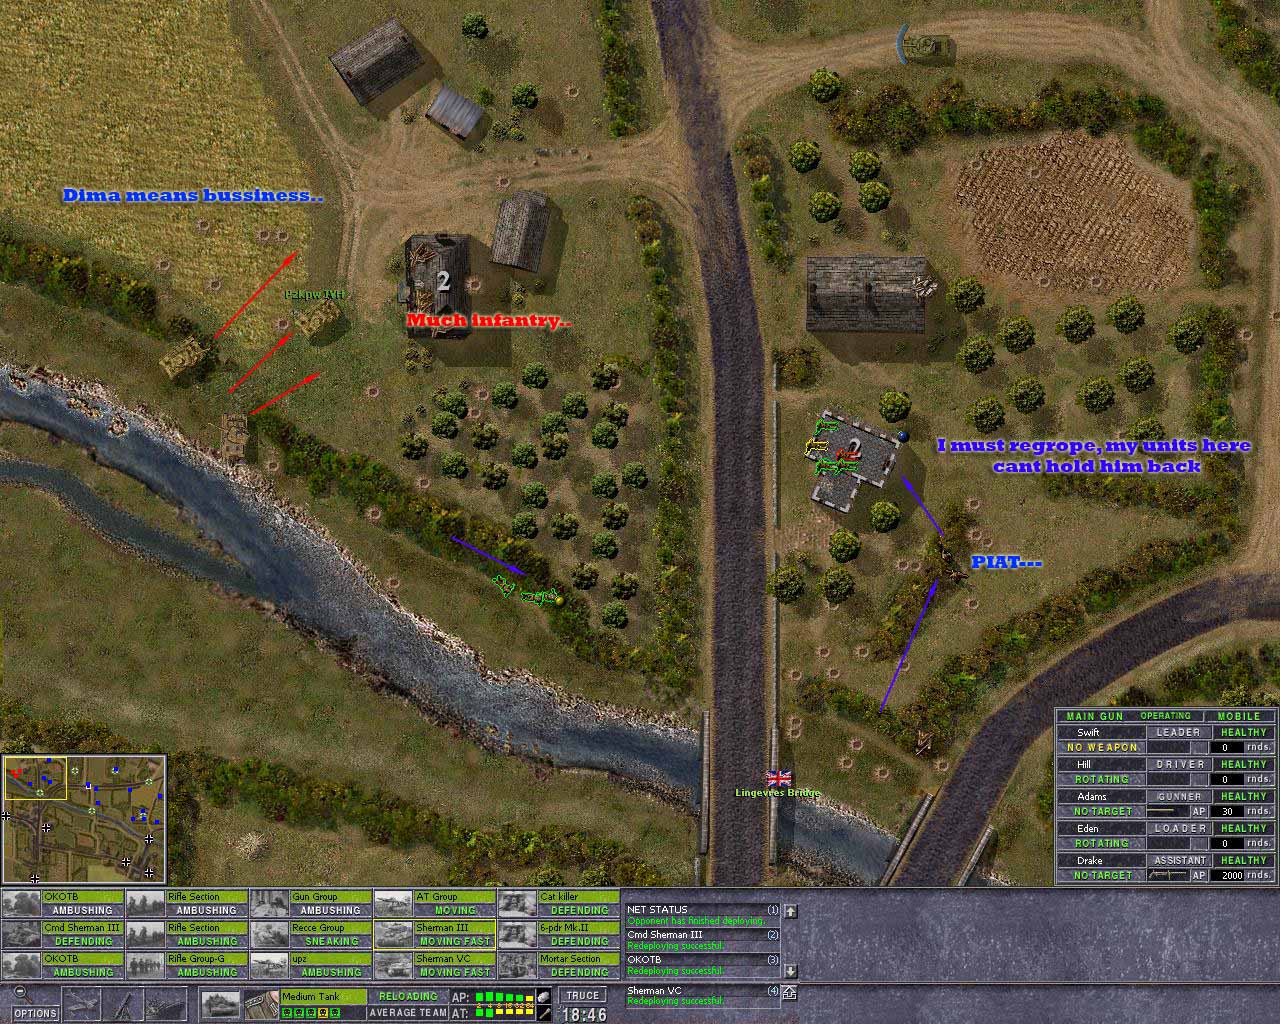
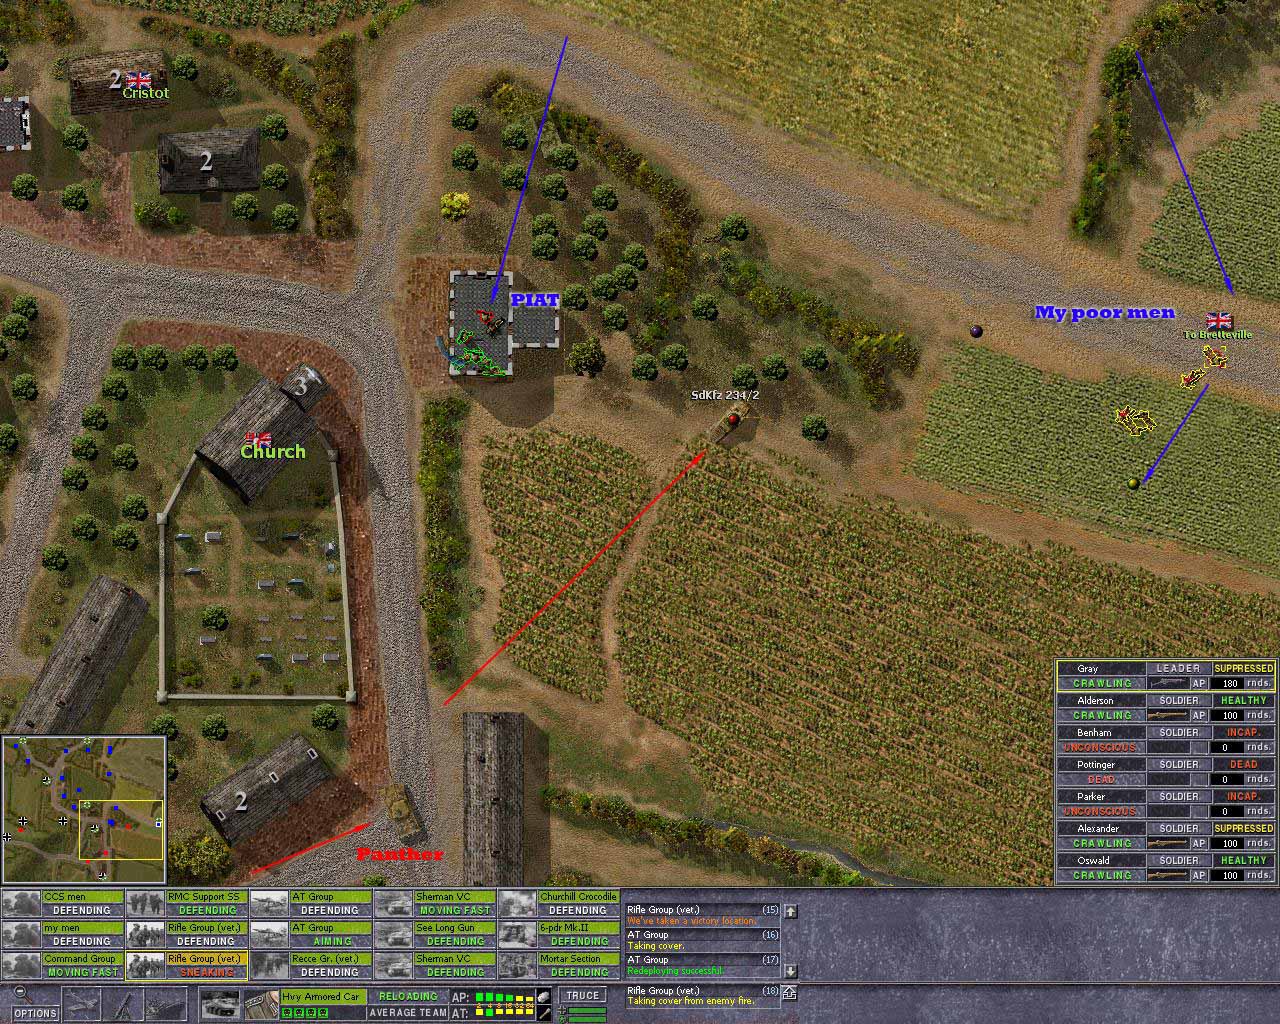
Its one of these wonderful afternoons, the chefs finally delivered a descent meal. The sun shines and Im thinking of my next tactical goals and the grater strategy, just relaxing in the shadows.
Nopz, its not meant that one can have a half day off the job, here come the Germans.
In the North –left of the corner the Germans mustered 3 tanks and numerous infantry units.
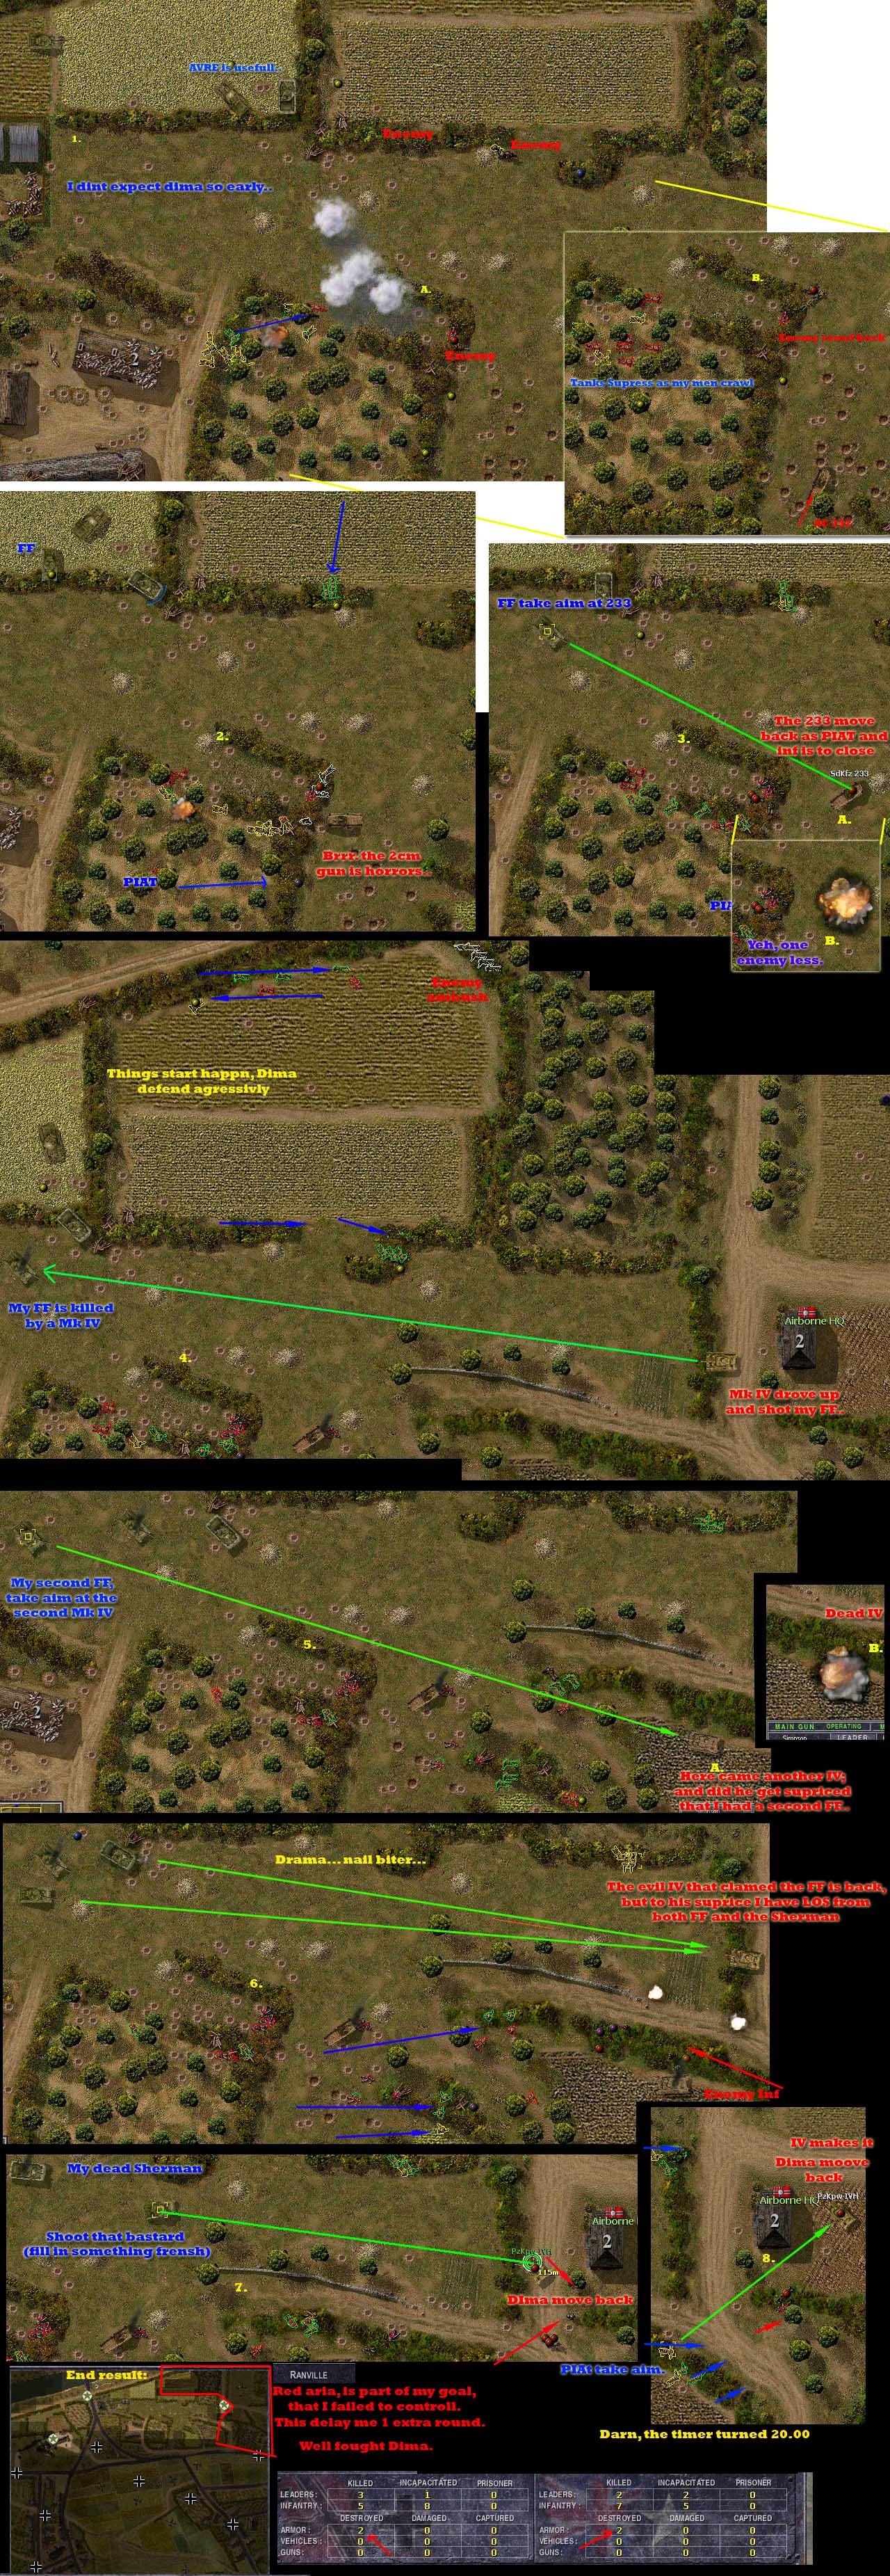
This is gona be serious, I expected them to assault over the bridge in South Right side.
No time to lose, we must reorganize our men.
The only troops available in North Left is a Command unit and a PIAT and a reg Sherman, they will have to fight extra hard until reinforce is brought up, I also have a scout team, that was almost overrun by the tanks, but manage so sneak away trembling in fear.. .
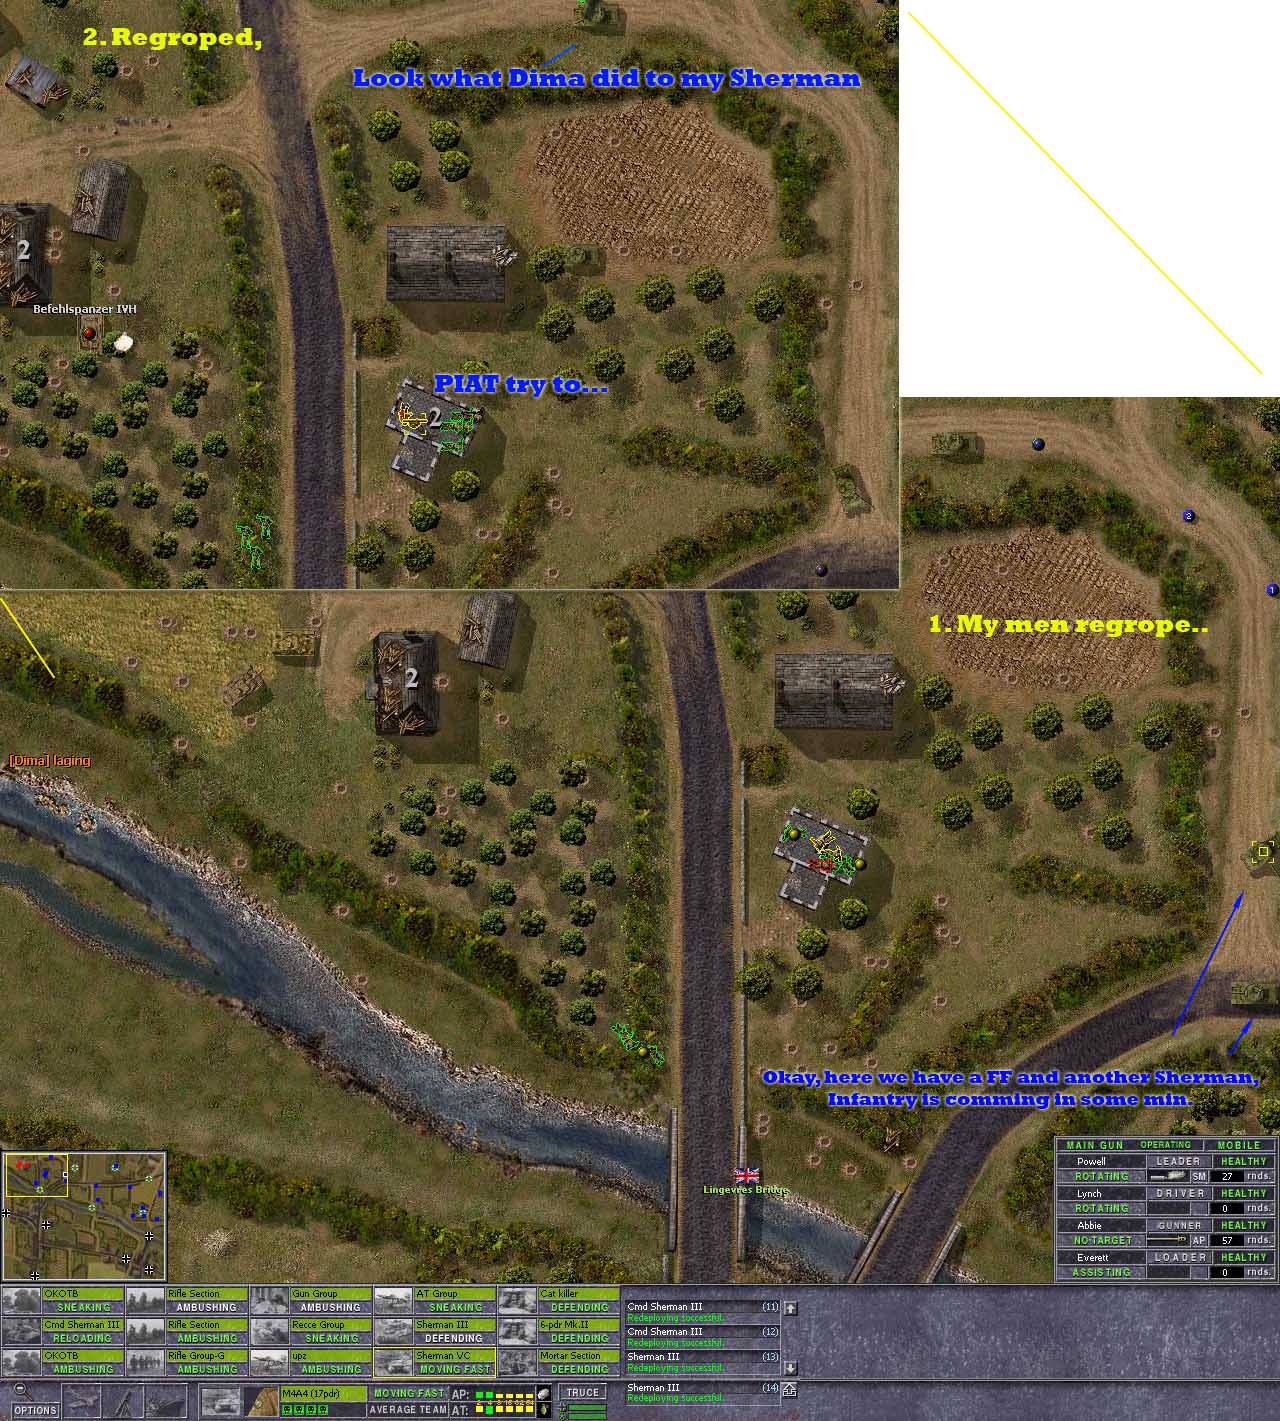
Yes, now we have PIAT ready, and we see a FF and another reg Sherman have come to help out, and boy do that have a calming factor on the scared men. .
The top Sherman got killed by a Mk IV, now it’s a serious road block.
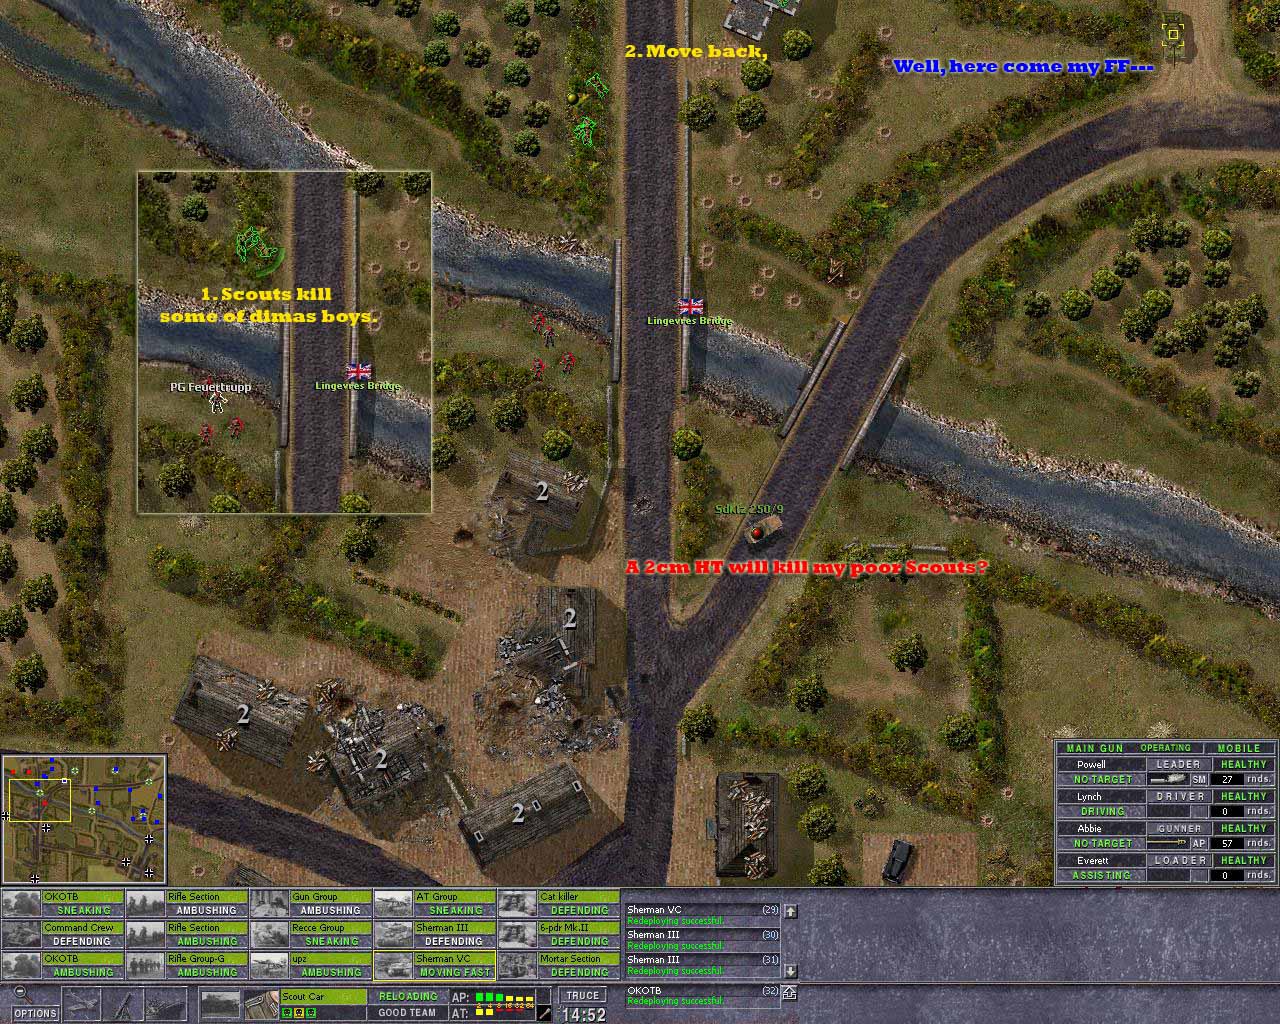
In south dima bring in some more infantry, he probly though that I had no units in north of bridge, but there was my scouts. They stopped the enemy and tried to crawl away.
That was to much for dima, he bring in a 2cm HT, and that has some serious firepower.
Im sort of happy about that, for that HT will be a nice kill for my FF, that starts to move to get LOS on that HT.
Dima search for my men and spray the hedge, and he dint see my FF.
The second Sherman got behind the house and did some grate damage control as it killed of the enemy infantry that had taken the North house.
The 3 IV all drove up to the hedge at the same time, and I placed the barrage at em, and then the RAF boys made some more damage, they all got immobilized.
End result, was that all? It felt like the battle was so bloody, but possibly it was the stress that caused that feeling. I scratch my head..
Last edited by AT_Stalky on Sun Dec 07, 2008 10:15 am; edited 1 time in total
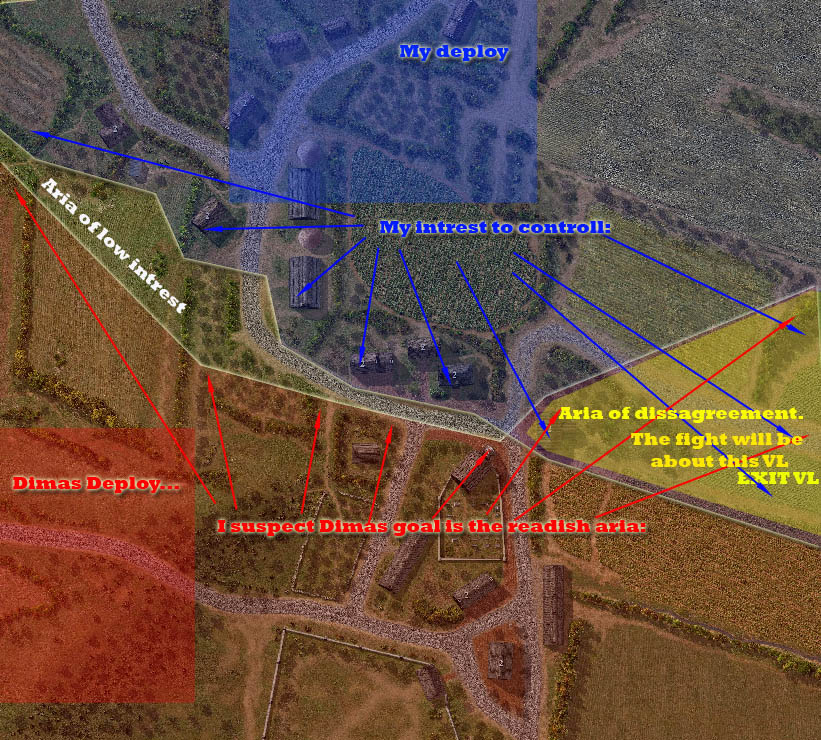
This is a way to small map for some serious tactical game.
I try to put my thoughts into a tactical base plan.
What do I want out of this map?
What does dima want?
The image below is my guesses, the only aria we will not agree this first battle ought to be the Right side exit.
The battle begins
Yes, we are at the right side exit, and here he come with a Puma, and I got a PIAT ready for him. My men is shot by the Puma, damned can I reach him with my PIAT?
Yeh, my PIAT got the Puma. And I moved in a FF to take the Panther in side, I belive it did some damage BUT, Dima moved in another Panther (down the road only half visible) and got a deadly shot in the FFs front.
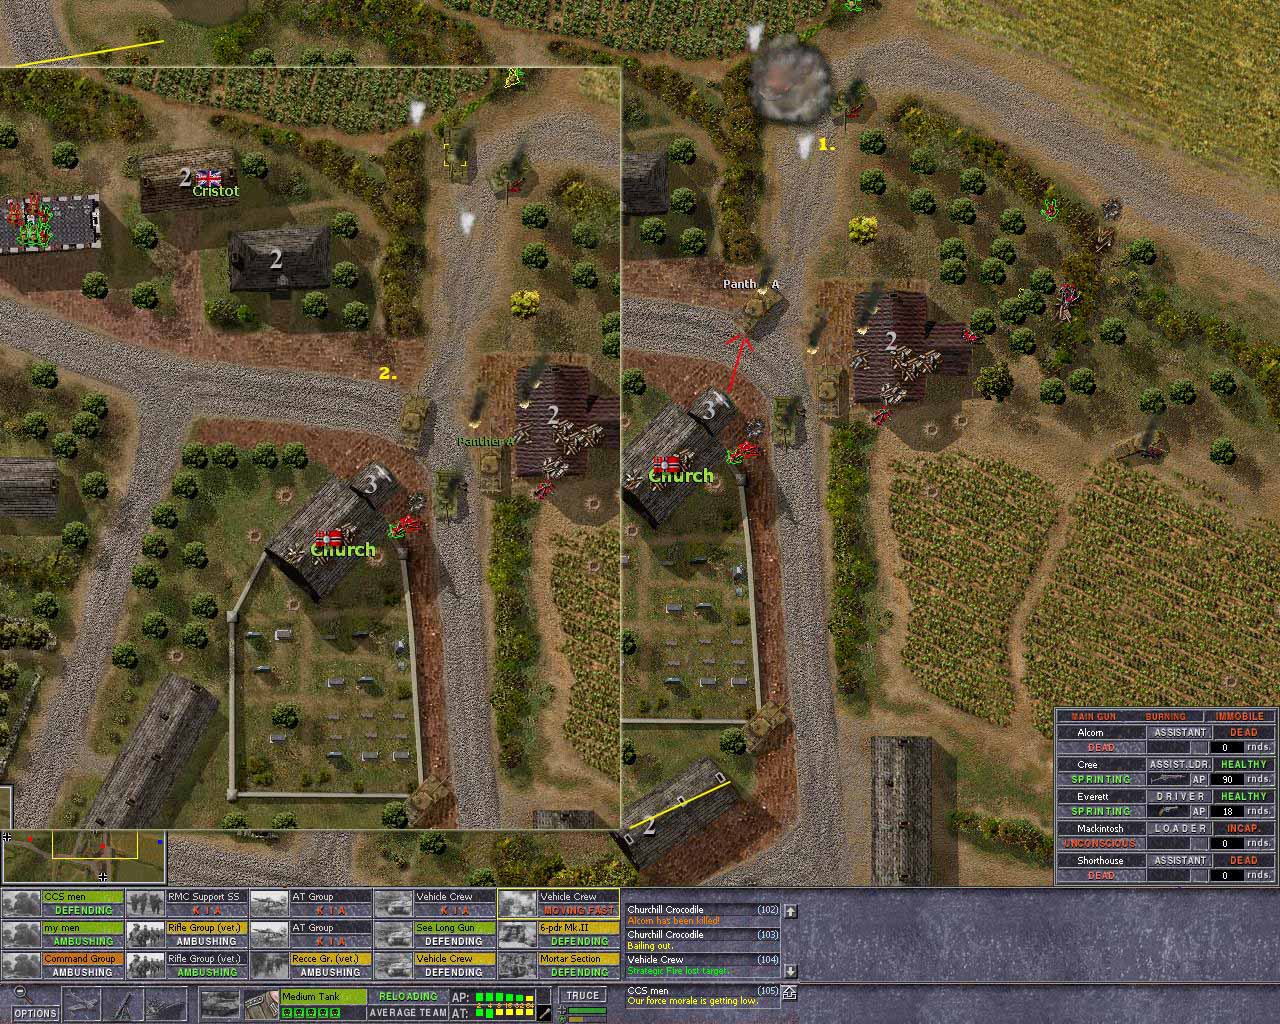
Stupid, for some reason I move my command team into the church, this is not in the plan. Dima move in 4 Panthers here and some infantry..
Dima get his men from church over to the house where I had the PIAT, and… kill my men..
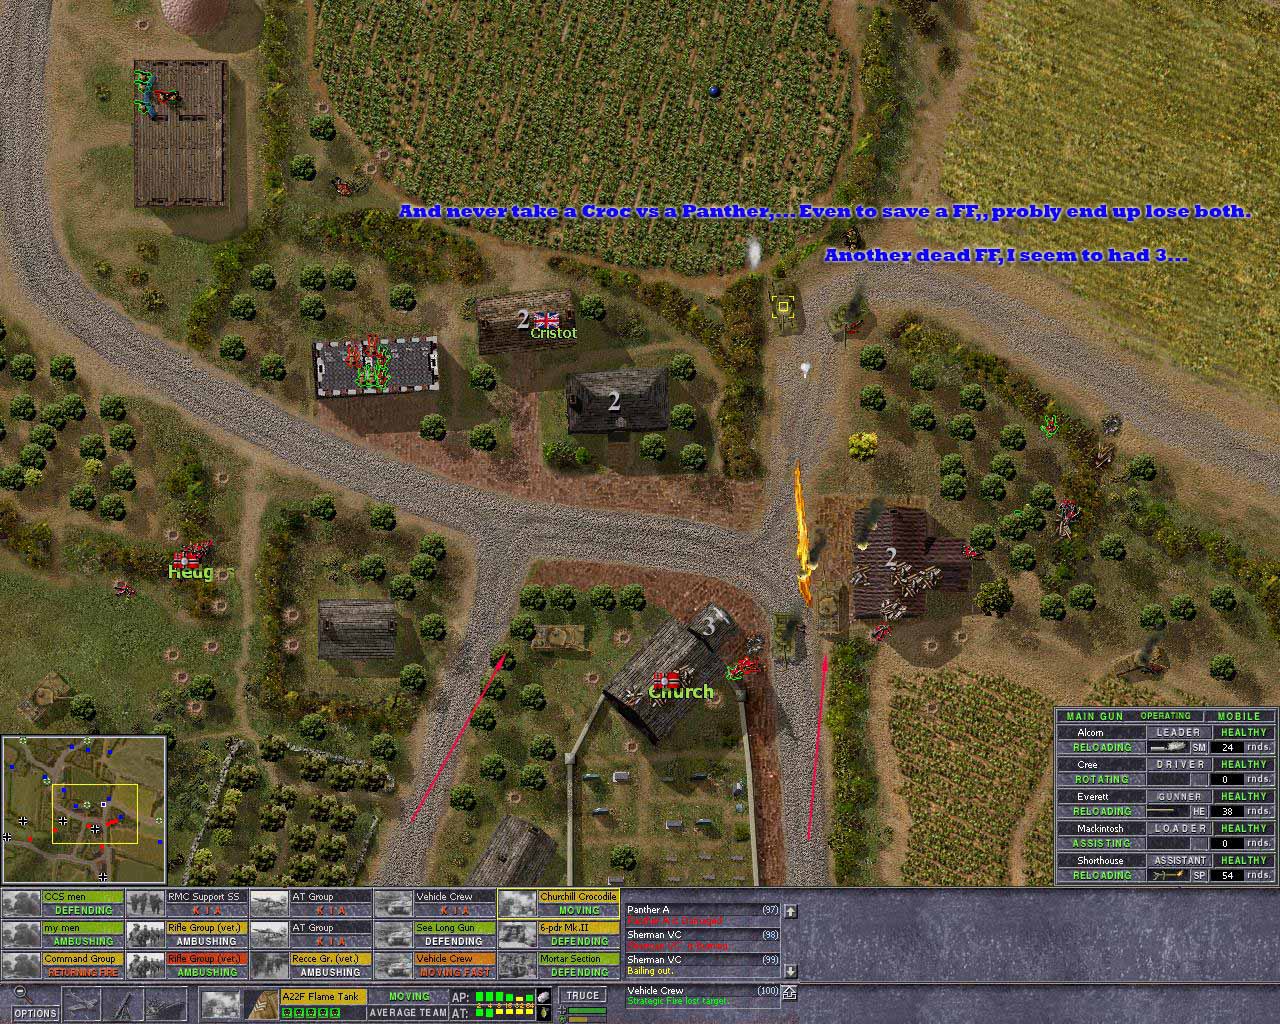
I have a Croc and it is moved in to just flame that house so my command team can enter from the back, and its out of LOS behind the knocked out FF, but dima ove at high speed and get LOS on my Croc. I lose another FF vs a Panther.
The panther by the house is damaged by the croc, but the second Panther move up and as my Croc is moving back into safety, BANG, its killed…
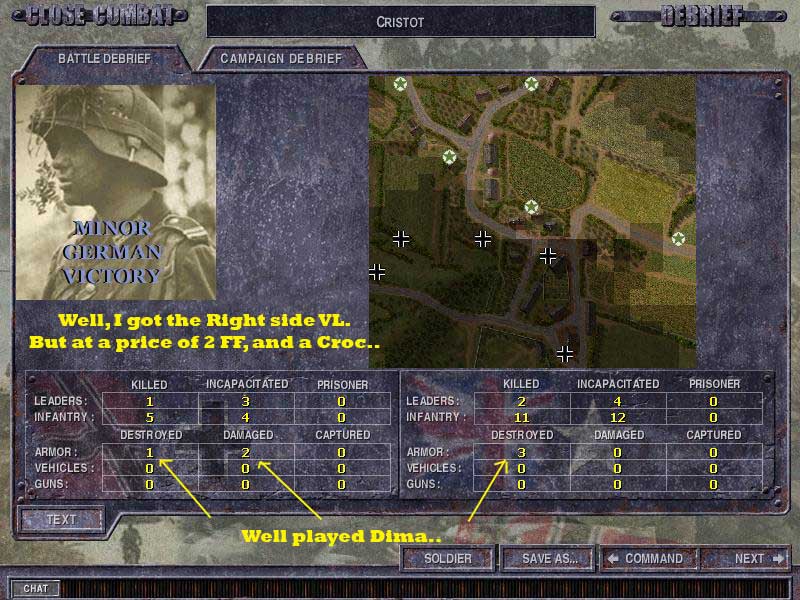
End result. Tactical goal is reached, but it was a Pyrrhic victory.
Map: Carpiquet
Date 10th 2 PM
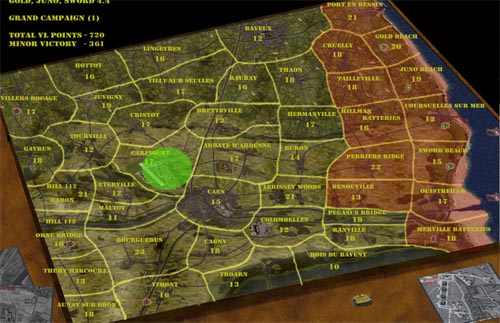
We are here:
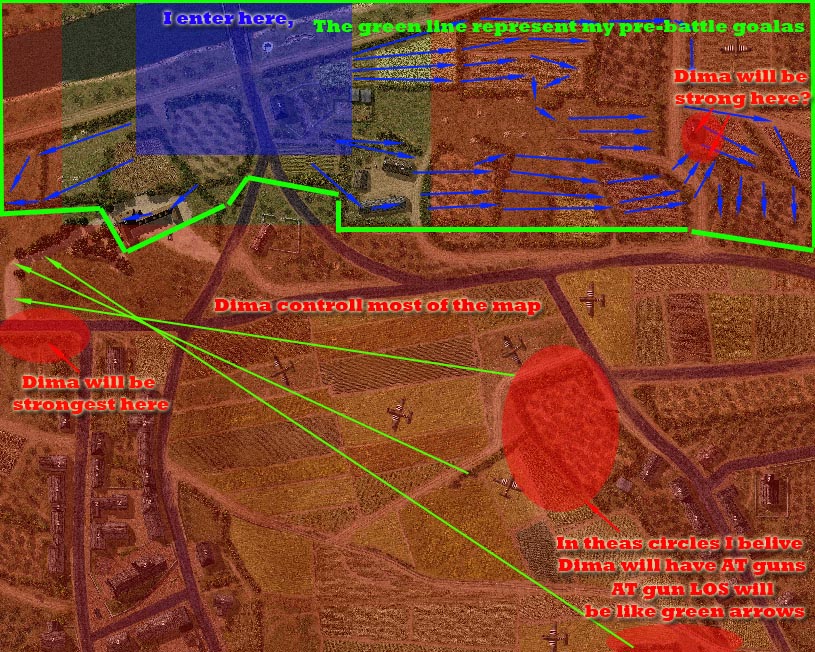
I enter in the right side, dima control all map. I will be pout of fuel the next round so the plans must be v aggressive, losses of men and goods is of no importance, only ground will matter.
When Im out of supply next time, Dima will come after me and try to push me of the map, so quantity of ground is key.
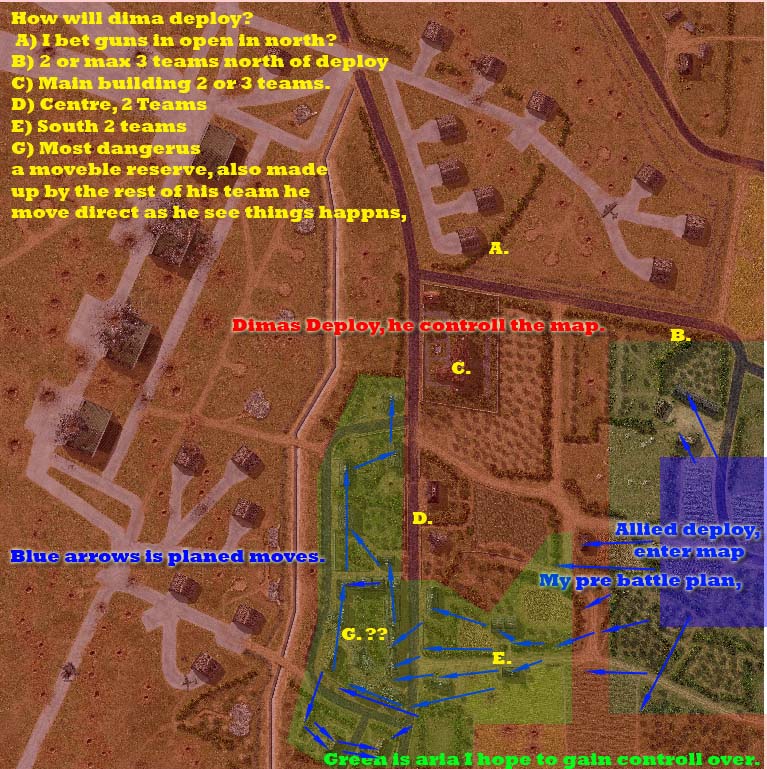
My basic tactic plan and evaluation of Dima possible setup was guessed according to image below. The south will be focus point of the allied attack, and then as the local defence crumble its just speed that matters, so Dima cant regroup his Germans.
The battle was hard and intensive:
End result at the right side.
The AL units has been fighting the Germans here for a long time basically just holding the map fought defensive delaying battles.
Now this Tank BG has moved in, and this is gona be anything BUT defensive battles from the UK side.
Its time to go forward in the South, I have the BG to spare and AL is getting v tired.
This is one of the best maps in GJS (recoded), and it offers so much tactical gameplay at high level.
The way the VL is set, is superb, the left side VL is V imp for the germans soon that will be the ONLY way
to get supply ammo and fuel for this BG, and Dima is well aware of this, he know the strategy-tactical integration really well.
The risk he always face is that I will go for that left side VL, so he must always prepare his defence or attack with that in mind.
For the allies, that VL is now a magnet, get it and he stand still next time, but what will the cost be?
Will it even be feasible to take it and HOLD it? Hm, he will have mobile AT as the pre battle tactical plan below suggest,
he will also see when the threat diminish to that left VL and use that resources to fight me where im heavy.
1) Go right in this is a better plan as I can then have AT guns blocking some movement of the
big fields and limit Dimas reinforce moves.
2) And then it will be possible to go along side the right side of map and in 2 nd or 3 rd battle
control the South Right village and its hedges, and in that way deprive dima of the AT deployment that threaten the main goal, as in the left side VL.. So this is a long multi battle plan..
3) What will dima do? well, I believe he grope as pointed out in map below.
The battle begins, and it’s a hard battle:
End result, c
I know this is a really, really stupid question but here goes -
Do you first install GJS 4.4 and THEN install TRSMv.097 on top of that?
Or do you just install TRSM by itself?
Each time I install TRSM on top of GJS, something happens and I have
to reinstall the entire CC5 game after I tried to uninstall one or the other.
I also had the RWA installed, so that might have been the problem, not sure anymore, really confused. Help.
A) The TRSM pln is as I can see error free.
B) The problem u have is the RAW sub mod, i have now shecked it and it has as far as I can tell errors in it that cause the pln file folder to be emtied as its unistalled, thats fatal for CC5 and reinstall i needed.. I have mailed the maker of the RAW sub mod, so he can sheck this him self, and conferm this, and possible fix that.
The RAW sub mod is really cool, but problem must be fixed ofcose. Awoid install RAW untill it is fixed plz.
Since several turn reports were lost due to enemy treachery , I have some
questions on the missing reports. If you can remember:
How did you move your Para's in the first day moves?
What was the German response to these moves?
Did the Germans withdraw from the beaches after the first (am) battles?
If not, how long did they hold out on the beach sectors?
Was Naval Fire effective for the Allies?
What units (brigades/divisions) have been the toughest for the Germans?
Which units have been the most effective for the Allies?
More when I think of them.
*I know this mod is mostly for h2h, but I play alot of single player and have noticed the AI will move the paras all over the place in the first turn. I'm not sure of an effective counter to this as the Germans. Also the AI will not use Naval Fire on my beach units ... but occaisionally will use Air Attacks. As the Allies I am unsure as to whether to move my Beach (am) Assault Units
after the first battles to allow more reinforcements for the (pm) battles, or leave them to disband the German beach units and move on June 7th. What are your strategies regarding this? Thanks in advance for your tips.
Since several turn reports were lost due to enemy treachery , I have some
questions on the missing reports. If you can remember:
How did you move your Para's in the first day moves?
PPL can play the GC with out without rules ofcose.
But the GCs me and Dima have played, we have always started the first round as its preset in TRSM GC, so we don’t allow any moved the first ROUND, that how they landed and the Germans as confused and redraw was not on the table. After that we pretend Hitler / Churchill had no say and we are in total control.
Quote:
1)What was the German response to these moves?
2)Did the Germans withdraw from the beaches after the first (am) battles?
3)If not, how long did they hold out on the beach sectors?
4)Was Naval Fire effective for the Allies?
5)What units (brigades/divisions) have been the toughest for the Germans?
Which units have been the most effective for the Allies?
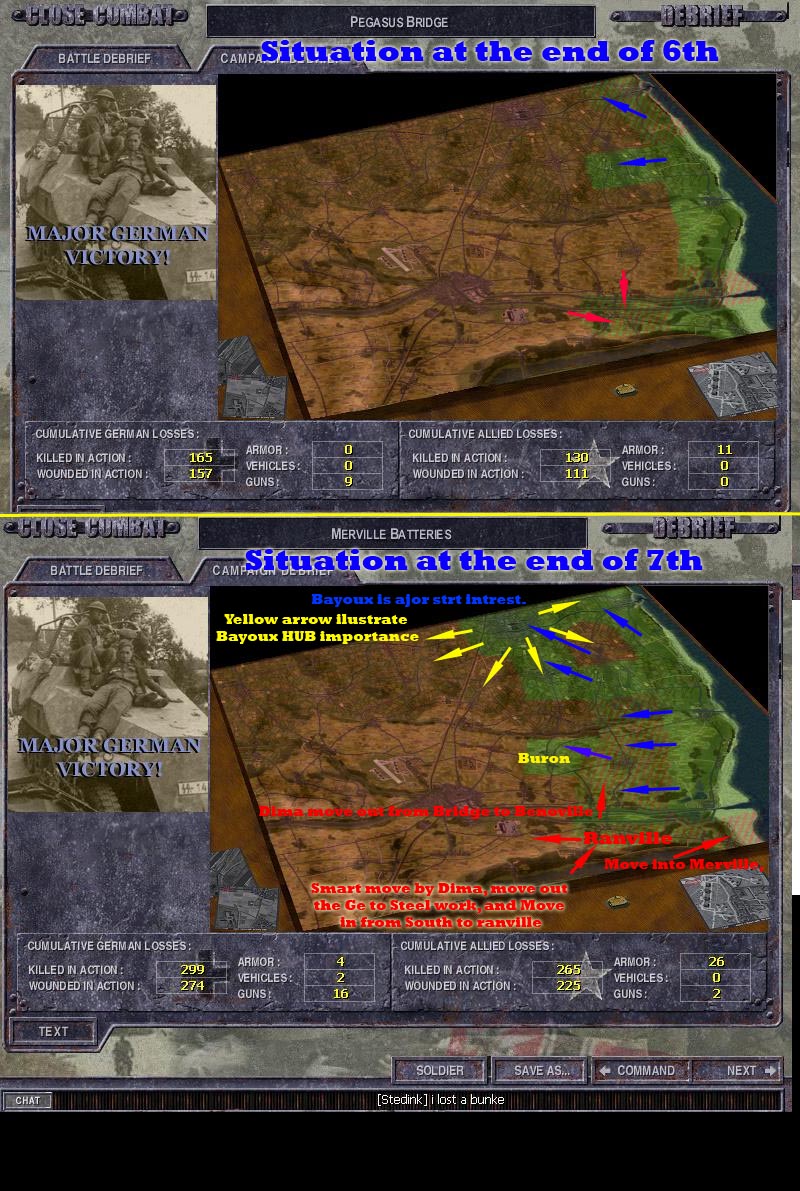
1)On first page you can fined some clew on that, but its not that illustrated, I have taken the end situation at 6 th and 7 th, and tried to my best memory draw in the moves done in the two rounds for each day illustrated in the images attached. (forgive my memory if it failed)
2)Ge Was kicked of Juno?, Ge was made impossible in PEB redraw, I believed they moved from Gold to cruelly, and situation was impossible at Oiste and moved to Benouville. (if my memory…)
3)At the end of 8 th all Beaches was cleared.
4)Much…
5) Hu, only Dima can answer that,
6)In TRSM all the BGs with funnies are sledgehammers. AB/AL is tough in another way, I don’t assault with em and normally defend, they do that v well..
Quote:
More when I think of them.
*I know this mod is mostly for h2h, but I play alot of single player and have noticed the AI will move the paras all over the place in the first turn. I'm not sure of an effective counter to this as the Germans. Also the AI will not use Naval Fire on my beach units ... but occaisionally will use Air Attacks. As the Allies I am unsure as to whether to move my Beach (am) Assault Units
after the first battles to allow more reinforcements for the (pm) battles, or leave them to disband the German beach units and move on June 7th. What are your strategies regarding this? Thanks in advance for your tips.
The TRSM UK units at 6th is stronger then in reg GJS, the germans are weeker. I belive the way FP is in TRSM alowes for the first "historical" progress to be more accurate to real progress.
The only time u get reinforce is at 6 AM, so IMO move of the Beachhead in 6 th 2 PM move if possible, the quantity of units is IMO v important. Use em to try grab the most important maps with minimum enemy strength if any on them, no fun come into any of em maps and there are either Lehr or 12 SS who may be at Bayoux, Benoville and Buron at 8 th 6 AM, move with speed and beat em to it.
Much good reading (and learning) for me with your post.
*I guess for solo play I will just have to make due with what the AI does
in the 6th am moves, since it will not stay put. Still good to know your strategies, and counterstrategies. Cheers.
You cannot post new topics in this forum You cannot reply to topics in this forum You cannot edit your posts in this forum You cannot delete your posts in this forum You cannot vote in polls in this forum You cannot attach files in this forum You can download files in this forum
In August of 2004, Zappi, Homba, Bambam887, RedScorpion and MOOXE all pitched
in to create this Close Combat site. I would to thank all the people who have visited
and found this site to thier liking. I hope you had time to check out some
of the great Close Combat mods and our forums. I'd also like to thank
all the members of our volunteer staff that have helped over
the years, and all our users that contributed to this site!