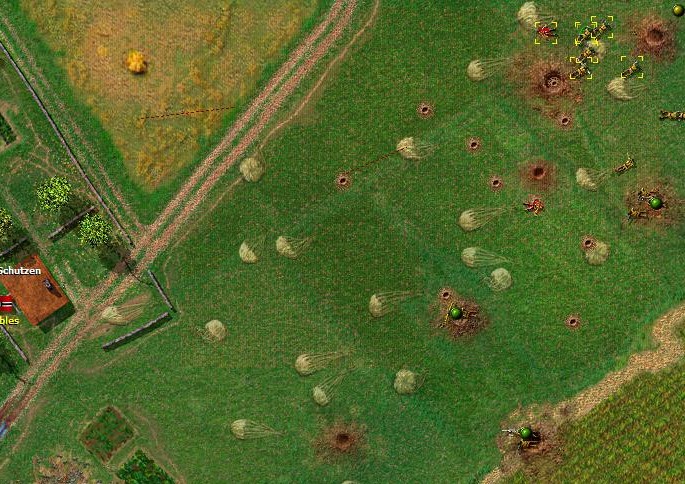
Posted: Thu Sep 09, 2010 12:42 am Post subject: Groesbeek LZ- Feinting withdrawal
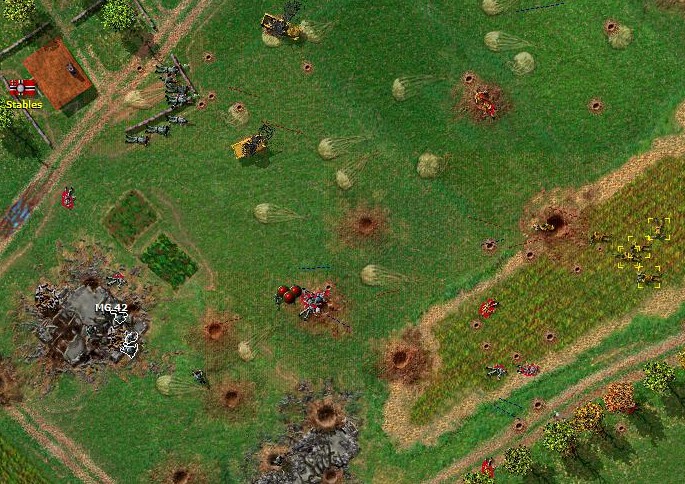
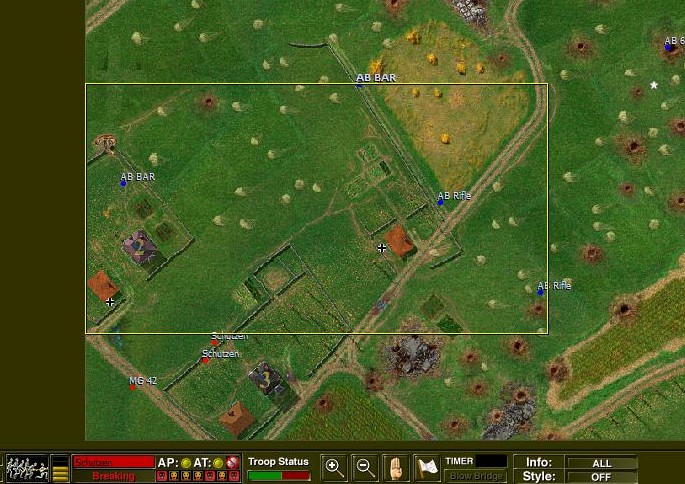
There wasn't many options available. Either stay put and die or pull back and find new positions. We opted for the latter and shifted our teams in the centre of the line backwards.
So far, none of our other units have needlessly revealed themselves yet. We'll try and stick to the original plan and hit them when they come closer. Especially note the Bazooka team in the shellhole in the middle of the screenie
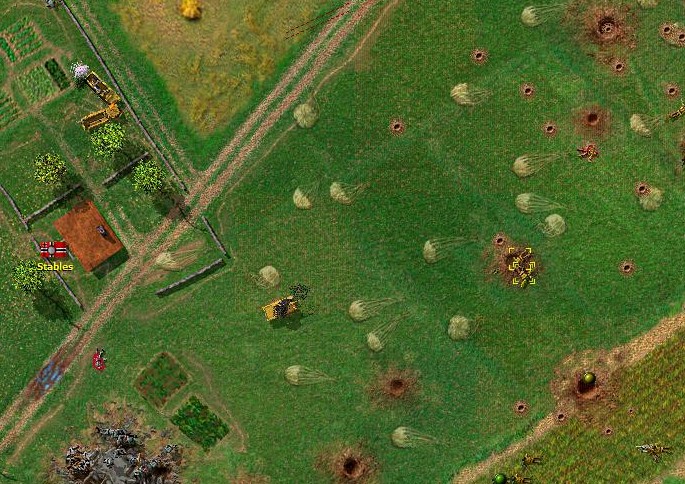
Posted: Thu Sep 09, 2010 12:51 am Post subject: Groesbeek LZ- SPG destroyed
All down the line, our resistance was slight and we kept peddling our teams backwards. Scenting that he could punch through our token defence, the German commander press his line forward.
And whilst our main line is pulling back, we have left our Bazooka teams and some Rifle teams in ambush points that are still in perfect enfilade positions.
Here, the enemy SPG moves ahead of his supporting infantry (suppressed by our .30 cal MG at the bottom right corner), and has exposed himself to our Bazooka team. 1 shot 1 kill. Time for the Bazooka to shift to new positions.
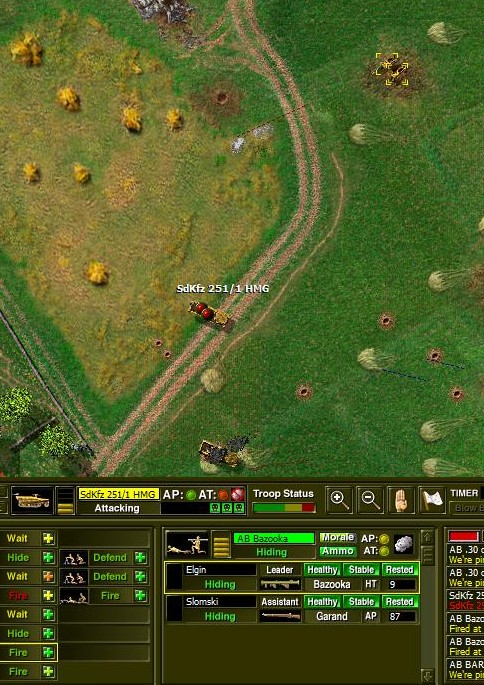
Posted: Thu Sep 09, 2010 12:56 am Post subject: Groesbeek LZ- Destroying all enemy HTs
The HTs continue to advance and from the other flank, another Bazooka team takes aim at the HT that has advanced ahead of its accompanying infantry screen.
You may also note that though our losses are slight at this point, quite a bit of the teams have been under stressful suppressive fire for much of the battle. Probably lost 1/6 of men so far, but our morale metre has fallen by half.
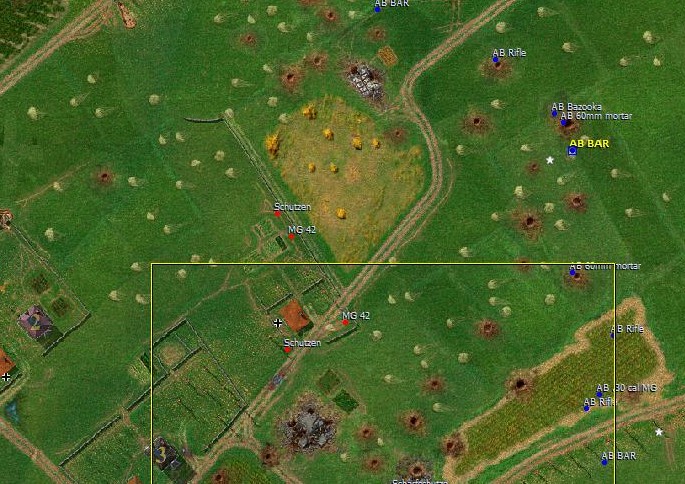
Posted: Thu Sep 09, 2010 1:04 am Post subject: Groesbeek LZ- Enemy highwater mark
After knocking out the last HT, the enemy advance has been stifled for the time being. They've all reached the wall line and established a strong position across the centre of the map.
On their right most flank, it looks the most vulnerable at the moment, with only a lone Scharfschutze (at the very bottom cratered area) posted as flank guard. And their left flank is in the air.
We'll try and push our Left flank in first, with the cover of the treeline. If all they have is a Scharfschutze team, we should be able to overwhelm them pretty easily. We'll still need to occupy their centre while this takes place. The MG and Schutzen team in the Stables VL is a particularly dangerous threat as we move down the left.
Posted: Thu Sep 09, 2010 1:12 am Post subject: Groesbeek LZ- Left attack crumbles
We'll push the BAR team down the treeline, the Rifle team down crops and the .30 cal MG team into a cover position in the crater.
Once our MG team is in dominant fire position, our Rifle and BAR teams will work down further and take the ruins to the bottom, working their way up towards the Stables VL.
Having set off with this general plan, we found our attack quickly opposed by a MG 42 team. An additional MG 42 team is quickly observed to be moving to support their fight against our Left attack. There's no way we can dominate firefight against 2 MG 42 teams with our current set-up. Our Left attack rapidly crumbles and lost both the .30 cal MG and the BAR team to heavier enemy fire.
We pull out the Rifle team before it's all used up and post them further back in the treeline. They're pretty much exhausted by the effort.
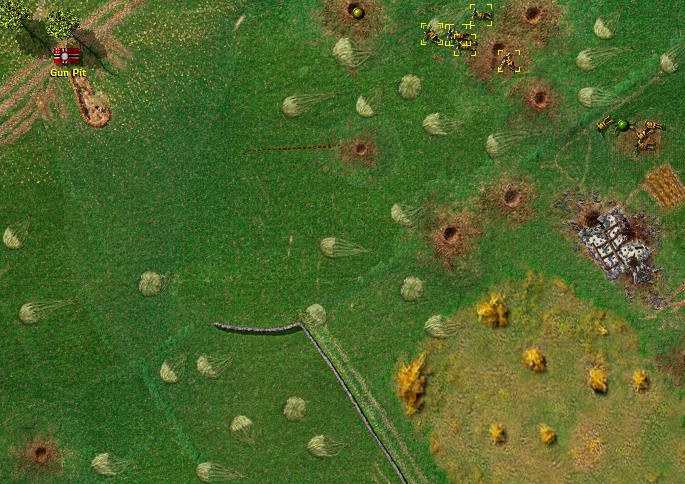
Posted: Thu Sep 09, 2010 2:34 am Post subject: Groesbeek LZ- Swing Right
With our left jab blunted, it's time to swing over to the right flank and find out if there's opportunities to exploit.
Here our BAR team edge along the top of the map, towards the Gun Pit VL. Supporting them is a Rifle team heading towards the wall. LTA Spears and his BAR team are pushing up (off-screen) from their centre to the Right as well.
The enemy soon spotted our movement and engaged from distance (off-screen) to the side of Gun Pit VL. If we hurry, we may be able to reach the wall before the enemy is re-aligned to face our movement.
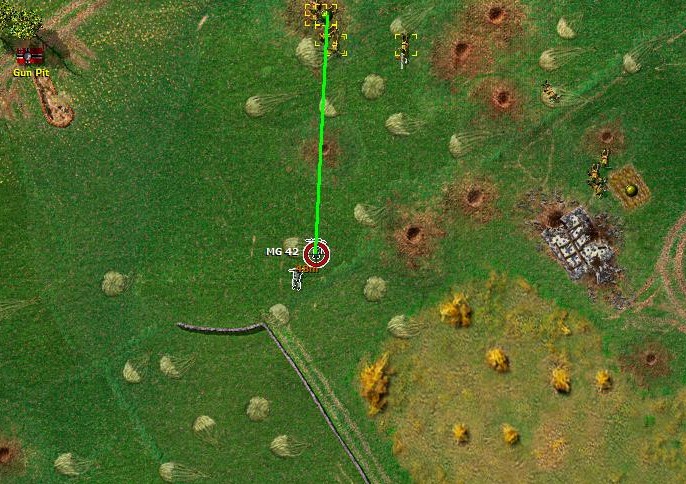
Posted: Thu Sep 09, 2010 2:37 am Post subject: Groesbeek LZ- Applying pressure
Unfortunately, the enemy reacted much faster that we anticipated and had placed a MG 42 team as their flank guard.
Now it's important to keep them off-balance by moving both BAR and Rifle teams in tandem, conducting a fire and movement advance. With the command BAR team not too far back, there should be enough impetus to break this side of the flank.
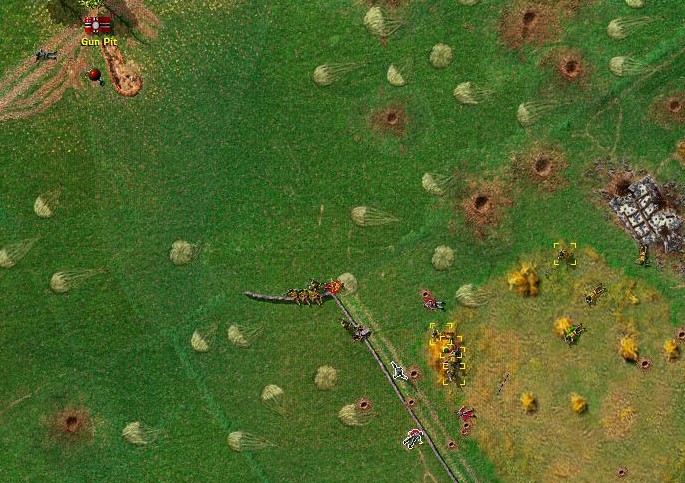
Posted: Thu Sep 09, 2010 2:52 am Post subject: Groesbeek LZ- Enemy hande hoch!
Unable to keep up with our momentum, the MG 42 falls back and ultimately surrenders once it realises that there's nowhere to run.
A new threat appears in the form of a Granatwerfer team at the Gun Pit VL. We organise a new hasty attack with the Rifle team while the BAR team supports with covering fire.
Once the Rifle team closes, the Granatwerfer team turns and flees.
We have carved right into the enemy flank. It's time to exploit this further and collapse into their centre and rear.
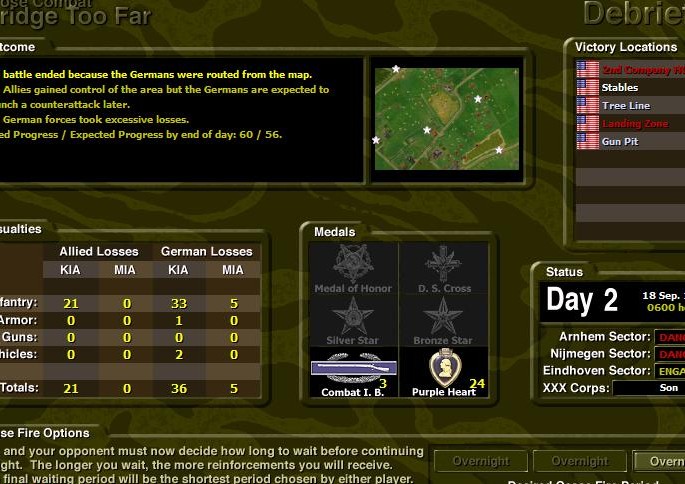
Posted: Thu Sep 09, 2010 2:55 am Post subject: Groesbeek LZ- Final Sitrep
We push into the enemy rear positions, capturing the 2nd Company HQ VL on the left map edge. A general advance moves our line forward and precipitates the enemy retreat.
Posted: Thu Sep 09, 2010 3:15 am Post subject: Groesbeek LZ Re-captured! LZ remains open
A very strong enemy attack formed with 5 MG 42, 3 Schutzen, 2 Panzerschreck, 1 Scharfschutze, 1 Granatwerfer, 2 HT and 1 SPG.
The enemy initially advanced steadily with their HT and SPG providing heavy suppressive fire. In feinting a general withdrawal down the centre, we encouraged their reckless advance and had excellent ambush opportunities. Till the time we destroyed their vehicles, we suffered minimal losses.
However, the enemy infantry continued to fight on and it was our counterattack along the Left flank that took the heaviest amount of casualties. On reflection, it also pinned enemy attention away from our attack that went right in on the opposite flank.
Posted: Thu Sep 09, 2010 7:22 am Post subject: Re: CC2 ABTF GC
Excellent, really good AAR and very tense battle, I had my doubts on this setup even when facing only light armor and half-tracks but you fought very well.
Posted: Thu Sep 09, 2010 9:30 am Post subject: Re: CC2 ABTF GC
Yes it was very tense and sustained.
I'm considering the next time I set up for this battle, I'll try and hit them hard and fast from the get-go. Change things a little and push forward into the villa and the Stables VL.
I'm getting 40+ req. points the next time we fight this again, so I should get lotsa firepower to go toe-to-toe against the Germans.
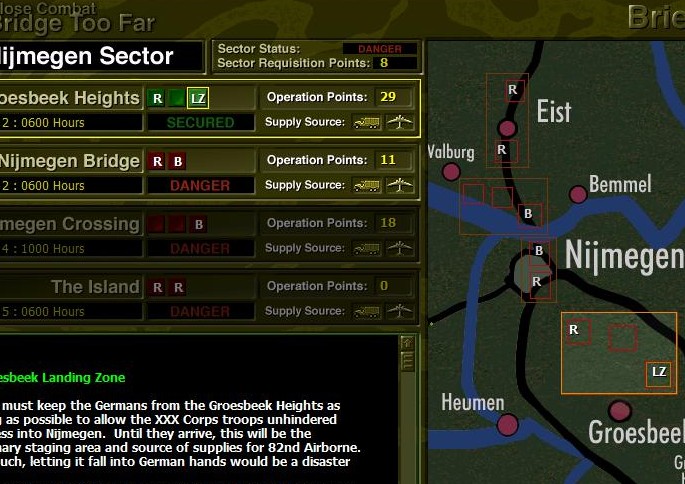
Posted: Thu Sep 09, 2010 9:52 am Post subject: Nijmegen Sector 2nd Day
Should have posted this ahead of the Groesbeek LZ action.
2nd Day along the Nijmegen Sector. There are 2 Ops that will occur, with a defensive action in Groesbeek Heights and another town-bridge attack at Nijmegen Bridge.
Nijmegen Bridge Op. Both maps in the Op are critical, with 1 Road and 1 Bridge to be captured. It'll be city fighting with lots of emphasis on infantry tactics. Even if XXX Corps reaches Nijmegen Bridge, armour will have limited impact on the close range fighting. Anyway, as of the 2nd day, this Op does not have as high a priority as Groesbeek Heights. Note the difference in req. points.
Posted: Sat Sep 11, 2010 4:04 pm Post subject: Re: CC2 ABTF GC
Quote:
I'll try and hit them hard and fast from the get-go.
It's also a risky gambit. If you get it wrong, you can get hammered (as I have found from personal experience ), but it can be a good way to change the battle dynamics quickly as long as the objective is worth the risk. On the whole, I am an excruciatingly cautious player. I don't like my Teams getting whacked, so I tend not to be very ambitious. Just try and plod my way through carefully. Not everyone's style, but I like to see my soldiers survive from battle to battle if I can.
However, if there is some important feature which I think will put the odds in my favour by grabbing it quickly, I will sometimes go for it, but as I said, it also sometimes comes with a heavy price if the AI is waiting for you, so I also try to saturate the key areas with fires and smoke from the get go, in the hopes of suppressing anything that might be in waiting...
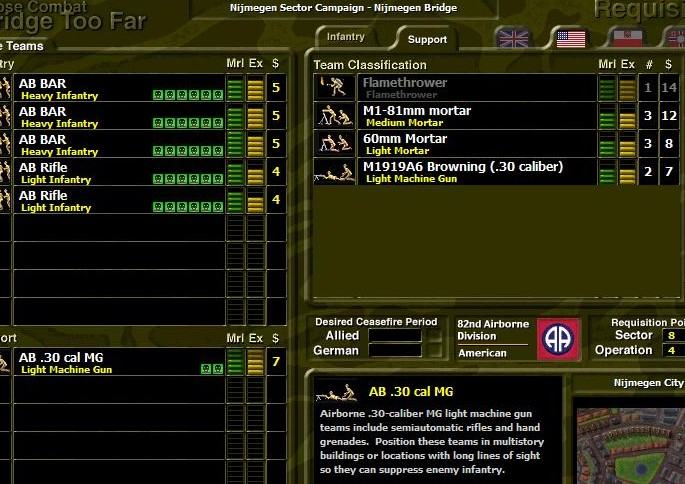
Posted: Mon Sep 13, 2010 12:08 pm Post subject: Nijmegen Bridge Team List
We move over to the Nijmegen Bridge Op in the selfsame Sector.
It's a very small BG, considering the amount of terrain that needs to be captured. The Allied effort can be helped if there were more req. pts available for more infantry teams. We only add 1 .30 cal MG team, saving some for subsequent fights.
Posted: Mon Sep 13, 2010 12:41 pm Post subject: Nijmegen City Map Assessment and Planning
Assessment
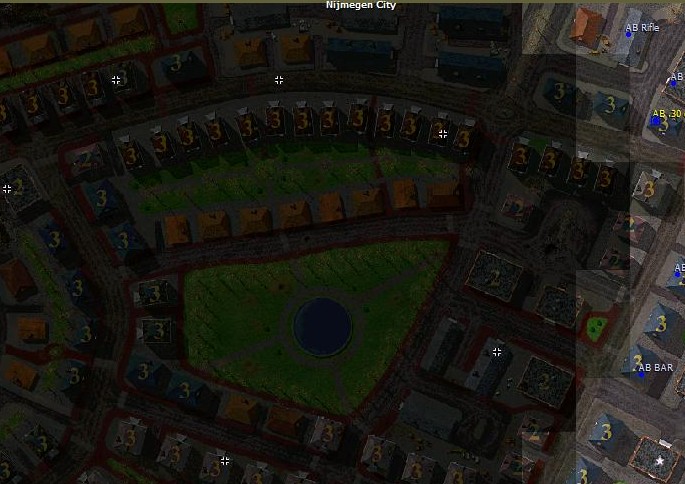
Nijmegen City is a big and crowded map. There are rows and rows of 3 storey buildings, ranging from concrete and stone to wooden structures. Other than the open fountain area in the middle, everywhere else is a concentration of build-up area and potential enemy strong house.
Our start line is pretty well covered, with a wide street separating our line from the enemy controlled buildings on the other side. Additionally, there are 2 relatively straight streets ranging across the map, from right to left. One in the upper edge and the other in the lower edge.
Along the upper street, the VLs are named from left to right, die Niedermeyer VL, Apothecary VL, Terwindtstraat VL, Neeter Haus VL and the To Groesbeek VL (off screen to the right of AB .30).
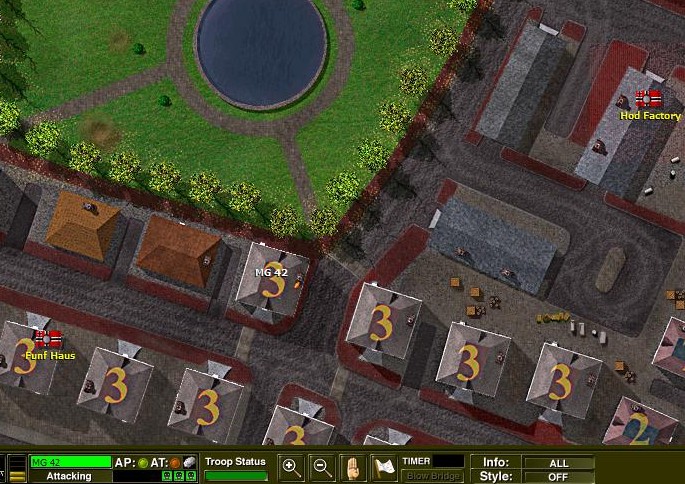
Along the lower street, the VLs are named from left to right, Funf Haus VL, Hod Factory VL and the To Grave VL
Plan
Enemy resistance is expected to be slight. 24hrs ago before the airdrop, Bn intel indicated only weak 2nd grade garrison troops. There's no reason to think that the enemy has been reinforced throughout the night.
We can't afford to get bogged down in this map. The enemy has excellent opportunities to delay, harass and occupy us. We need to bring the fight to them and move on to Nijmegen Bridge.
Our main effort will be aimed along the upper street, it's known as Terwindtstraat (Dutch names are funky to spell). We task 2 BAR (Command) 1 Rifle and 1 .30 cal MG team to push down this line of approach.
Our flank will be covered by our remaining BAR and Rifle team.
Division has already gotten word that the other 2 Airborne Divs have already captured their bridges, let's make sure we get ours too!
Even as our first teams step off the start line, enemy MG fire rang out from its hideout in the lower street. This team would only be able to hinder but not block our advance along the upper street.
Enemy mortar bombs also began to land haphazardly across our start line, searching for careless troopers.
Posted: Mon Sep 13, 2010 2:34 pm Post subject: Nijmegen City- Moving our main force down the line of street
With the .30 cal MG team overlooking the street, the BAR and Rifle teams worked together to move from building to building along the street.
We keep to moving in the buildings. Any movement at the street level is heavily suppressed.
Immediate objective is Neeter Haus VL. If it's inhabited by enemy teams, we'll send the Rifle team on a flanking mission via the factory buildings above the street.
3 Taking the upper approach.jpg
Description:
Note the effects of mortar and suppressive fire- clue the red highlighted squares along the street
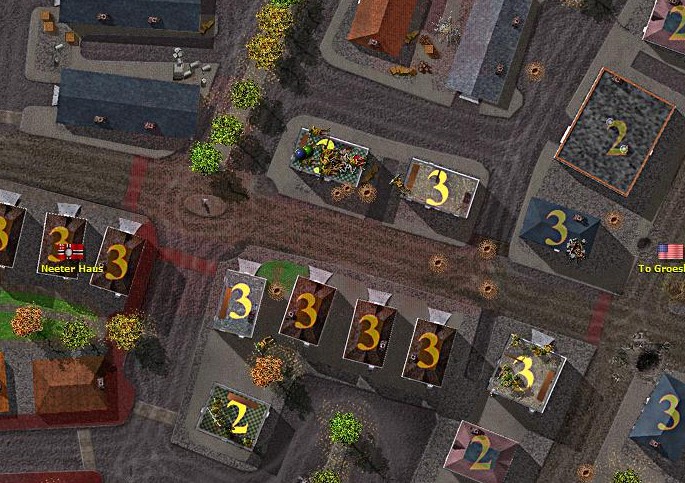
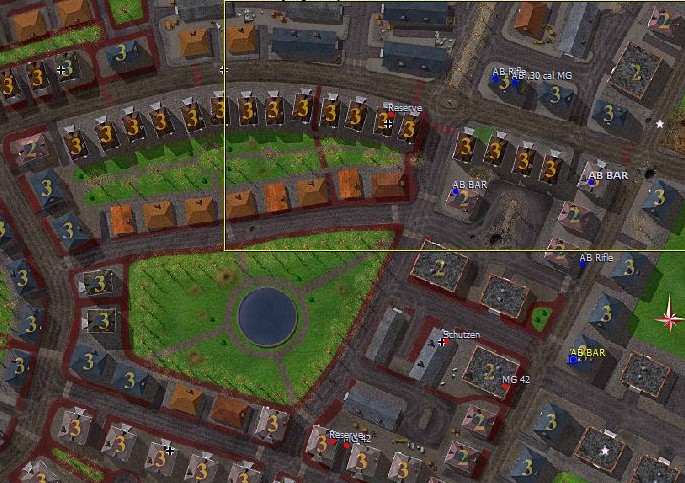
Posted: Mon Sep 13, 2010 2:42 pm Post subject: Nijmegen City- Attack the right, watch our left
Here we have a better overview of how the dynamics of the battle occurred.
Even as we began our thrust along the upper street, the enemy took control of the lower and have already moved their forces to concentrate on breaking our left.
1 of our flank security teams, AB Rifle, can be seen hurrying to occupy positions to better cover our main force. Ultimately, in the fighting for the Hod Factory VL (Schutzen team), the AB Rifle surrendered to the enemy after heavy suppressive fires. However by a strange twist of luck, they were released and fled the field, leaving combat altogether. Our force was heavily weakened altogether.
4 Enemy Concentration.jpg
Description:
The battle is swinging in a counter-clockwise motion.
You cannot post new topics in this forum You cannot reply to topics in this forum You cannot edit your posts in this forum You cannot delete your posts in this forum You cannot vote in polls in this forum You cannot attach files in this forum You can download files in this forum
In August of 2004, Zappi, Homba, Bambam887, RedScorpion and MOOXE all pitched
in to create this Close Combat site. I would to thank all the people who have visited
and found this site to thier liking. I hope you had time to check out some
of the great Close Combat mods and our forums. I'd also like to thank
all the members of our volunteer staff that have helped over
the years, and all our users that contributed to this site!