Posted: Mon Sep 13, 2010 2:48 pm Post subject: Nijmegen City- Taking our first VL
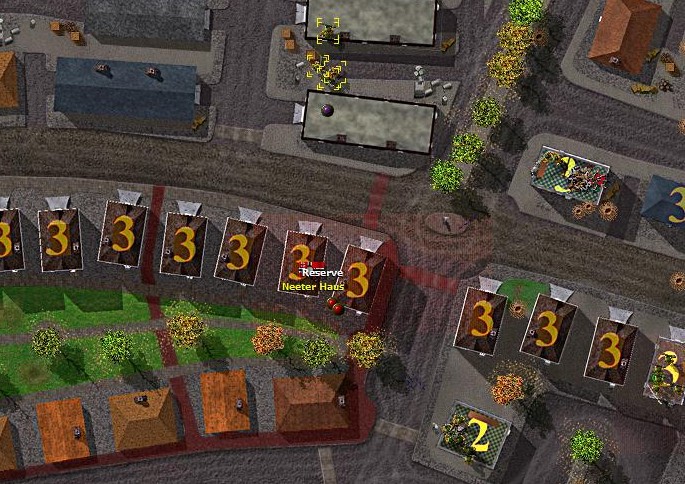
Here we have a textbook rendition of quick attack via flanking movement.
Having detected enemy opposition (Reserve) in the Neeter Haus VL, the BAR (bottom right) and MG (upper right) teams take up frontal covering fire positions and paste the enemy vicinity with sustained fires.
Our Rifle team loops out of contact, hooks up and through the un-occupied factory buildings and will come right on top of the enemy team for close combat.
Our violence of action will shatter the enemy will to fight
Posted: Mon Sep 13, 2010 2:55 pm Post subject: Nijmegen City- Our left stabilises
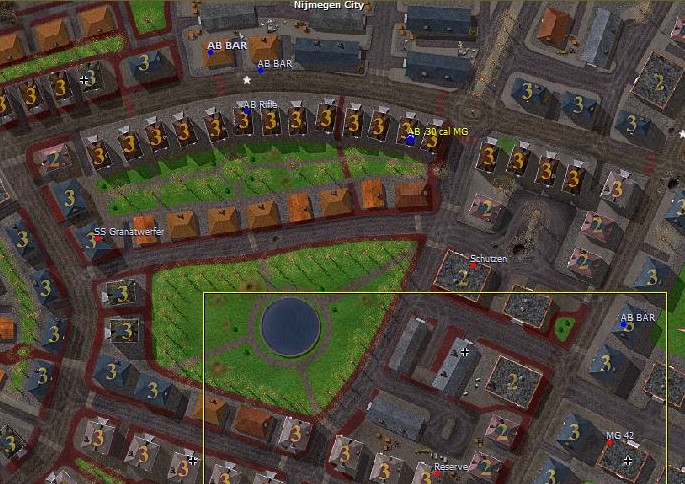
After destroying the Reserve team, our main force moves quickly to occupy the Terwindtstraat VL and push hard. Their next enemy team is the SS Granatwerfer team covering the rear of the German line. Strange, what's a SS team doing in a 2nd grade town garrison?
With our 2 BAR (Command team is denoted in bold), and 1 Rifle team, we quickly establish local fire superiority over the SS Granatwefer team and capture the entire upper street.
On our left, we pull our BAR team back off the line and drop the .30 cal MG at the Neeter Haus VL to backstop the line. Enemy advance can only continue over open ground covered by both teams. The enemy commander decides not to press his luck.
Our BAR team on tail end charlie duty is close to being surrounded by enemy MG teams. With the low ammo counts, we can't sustain a firefight. And against enemy MG 42, we're surely at the losing end.
Having achieved our local objective of controlling the upper street, we seek ceasefire terms.
Posted: Mon Sep 13, 2010 3:10 pm Post subject: Nijmgen City Ceasefire!
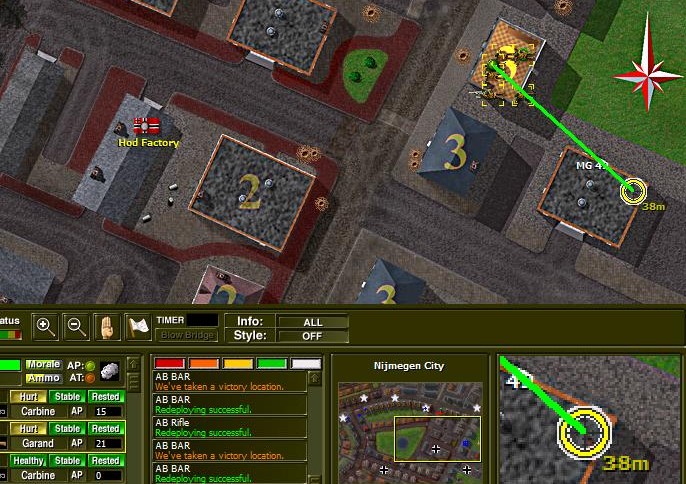
We could have pressed our advantage further but at the possible risk of taking further losses and losing all the advantages of having controlled the upper street VLs. Most of the teams were low on ammo and certainly we'll require ammo if we were to cover the other half of close terrain.
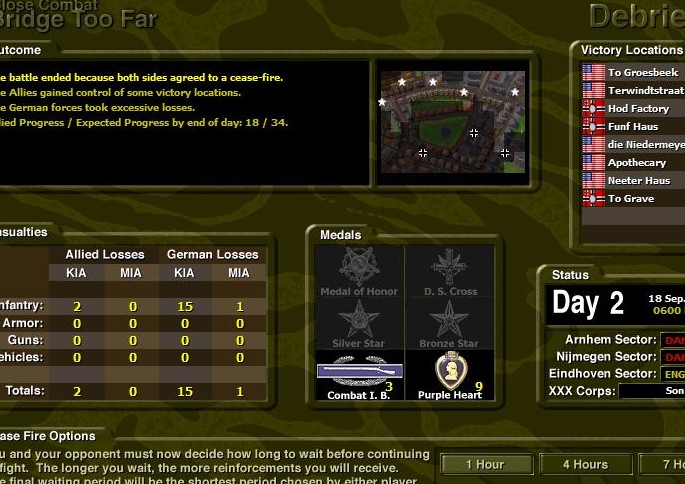
Enemy was surprisingly up for the fight. Elements of SS were also found in the battle. Initial interrogations indicate that the SS teams only reached Nijmegen Bridge Op last evening. If Division had designated the Nijmegen Bridge a priority over Groesbeek Heights in the 1st day, we might have very well captured Nijmegen City in our first forceful thrust. As it is, we're still in a good shape to push hard for the next fight in Nijmegen City. Hopefully, we won't face sterner SS opposition there.
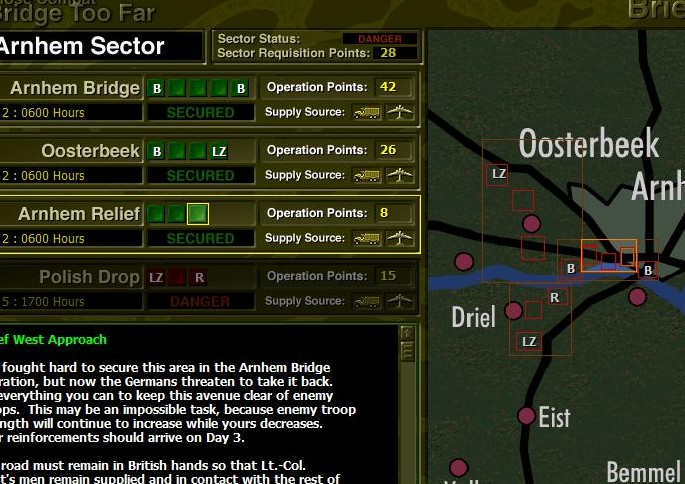
Posted: Mon Sep 13, 2010 3:26 pm Post subject: Arnhem Sector 2nd Day
We quickly move over to Arnhem Sector.
Arnhem Bridge having been captured by Col. Frost and 2nd Para awaits the inevitable enemy counterattack. Since last light yesterday evening, the growl of armour can be heard moving in the adjacent streets towards our defense positions. First light will likely bring a forceful clash of arms. Fortunately, 1st Brigade continues to stream in to support 2nd Para. If the enemy should come, they'll find us in fine spirits and numbers.
Oosterbeek Op will be a challenging fight to continue. Yesterday, the enemy made their attacks with infantry. We can expect them to move today with combined arms effort. Dutch underground talks about how the Germans have a tank modified to shoot tongues of fire. It'll be a very dangerous enemy to encounter today.
Arnhem Relief. How has the enemy managed to infiltrate our lines of communications with 2nd Para? If we cannot knock the enemy off Arnhem Relief, Col. Frost stands alone without any friendly support. Currently, 1st Brigade is limited in its ability to support this fight. We hardly have more than a Platoon to throw into this. Hopefully, it holds up long enough for 4th Brigade. They are supposed to drop today, but over the BBC, they said that England is fogged in today. Have they been able to get airborne...
Posted: Tue Sep 14, 2010 3:24 pm Post subject: Arnhem West Approach Map Assessment and Planning
Assessment
Defending the map from the right. Due to the nature of the urban streets and how they tend to merge towards the centre, Roermonds Plein VL, that will be the centre of gravity for the map. Control of the buildings around this point easily leads to control of the rest of the map.
Plan
The Vickers team will defend the centre, and control the approach of the main street. It may impede but likely not stop the enemy advance.
The remaining Rifle teams cover the upper flank of the Vickers. Once the enemy encounters our MG, they'll shift to the flanks and try to work their way around. This creates the perfect killing ground for our Rifle teams.
Don't you face armor on this map using this mod? I see you still have 27 sector points, and the main arnhem force weren't that battered for what I saw in previous posts, so why don't req a PIAT at least? just in case or an additional Bren group if only infantry is expected, assuming you have any of course.
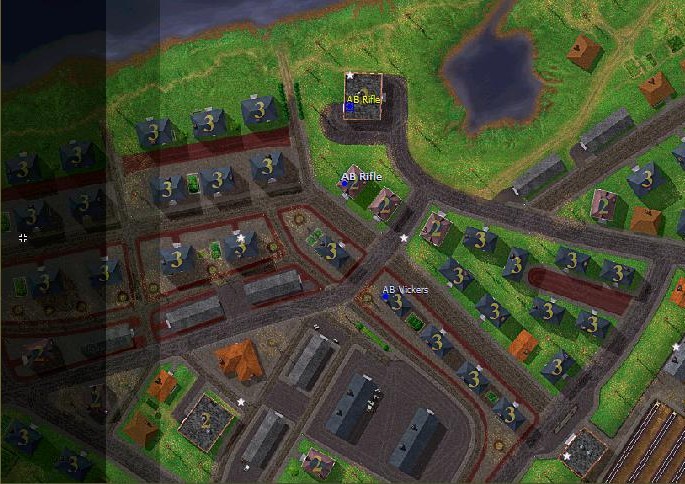
Posted: Wed Sep 15, 2010 2:51 am Post subject: Arnhem West Approach- MG front and centre!
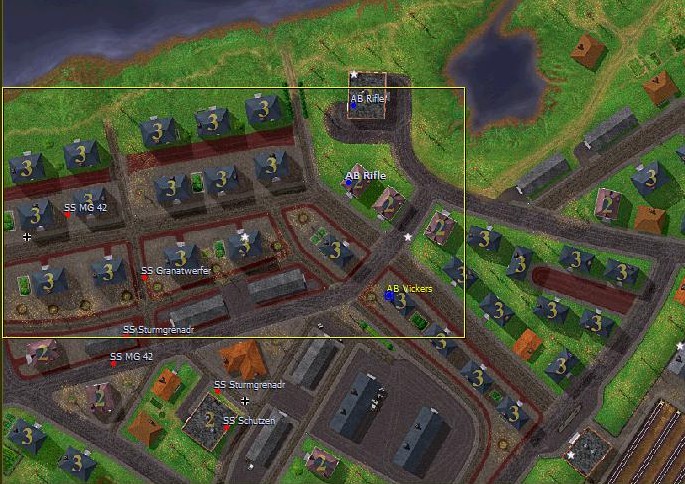
Immediately as we begin, signs of enemy movement can be spotted in the distance. We call up the Vickers MG to pour deadly automatic fire into the streets.
Yelps are heard and bodies fall. The enemy scramble for immediate cover, away from the open streets.
We begin the isolate the enemy teams to 2 halves by dominating this street. No German dared showed their heads carelessly for fear of attracting the attention of our Vickers.
@ Pzt_Kanov
I'm trying to conserve the Sector Req. Pts. as Divisional level reserves. If there's enemy armour, I can always fall back to the next map and use the pts.
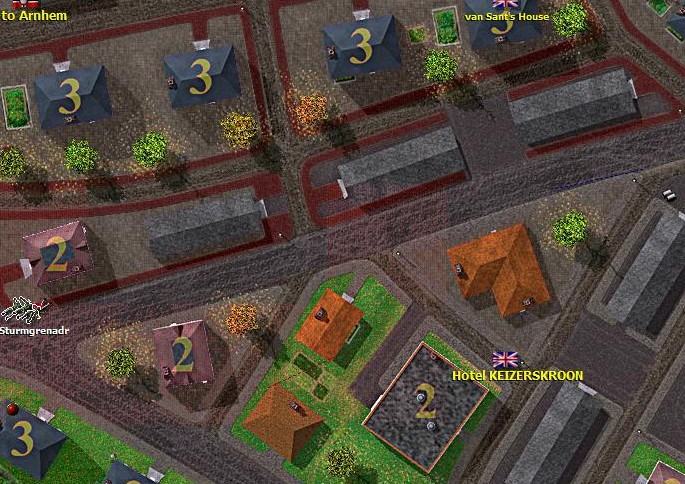
Posted: Wed Sep 15, 2010 2:58 am Post subject: Arnhem West Approach- Enemy captures Hotel KEIZERSKROON VL!
Since we didn't set up any outposts, the immediate enemy advance was only impeded by our MG.
Here, the enemy has captured the Hotel KEIZERSKROON VL at the bottom of the screen, with an advancing duo of Sturmgrenadr and Schutzen teams. However, once they reach the Hotel area, they'll generally be unable to advance further into our flank as the Vickers also dominate the low roof factory buildings.
Strange that their Granatwerfer team is pushing up along with the rest of the infantry. We need to be careful about these guys when they stop to set up.
Posted: Wed Sep 15, 2010 3:01 am Post subject: Arnhem West Approach- Enemy captures van Sant's House VL
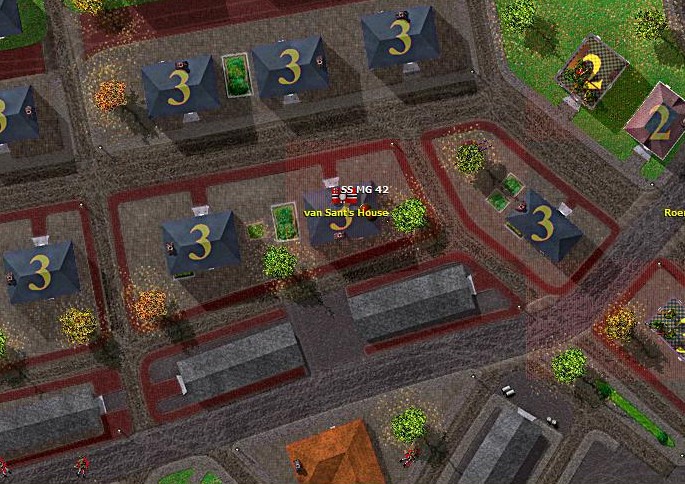
Unable to move down the lower flank, the German commander adjust his lines a little and pushes teams into the upper flank, gaining the van Sant's House VL.
Our Command Rifle team, in the top right corner, reacts to this move by peppering the house with rifle fire.
Posted: Wed Sep 15, 2010 3:05 am Post subject: Arnhem West Approach- Pulling into secondary positions
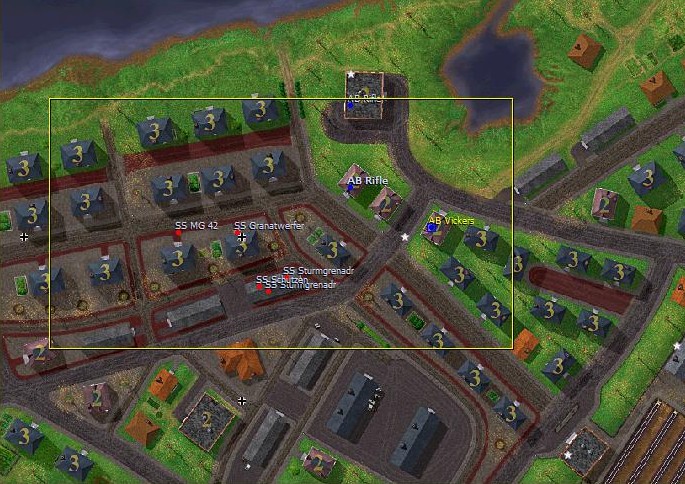
The enemy seeks to overpower us by sheer volume of fire and maneuvre. Rather than risk close combat, we pull our the main line into secondary positions.
The final unrevealed Rifle team, in the Orphanage VL (2 storey building at the upper right edge), covers the move backwards, killing the MG42 team in van Sant's House VL.
Posted: Wed Sep 15, 2010 3:10 am Post subject: Arnhem West Approach- End phase
The enemy appears exhausted at this point. They have almost reached our main line only to discover that our teams have melted back to a secondary position, that appears as intimidating as the original.
They gather in the vicinity of the van Sant's House VL and rest.
Sensing that we've been riding on our luck long enough, we seek ceasefire terms.
Posted: Wed Sep 15, 2010 3:31 am Post subject: Ceasefire in Arnhem West Approach
The dawn fight was between 1 depleted platoon against 2 platoons of SS troopers. They had 2 Sturmgrenadr, 2 MG42, 1 Schutzen, 1 Aufklarer, 1 Granatwerfer and 1 Panzerschreck.
Our Vickers team did very well in this encounter. Conversely, the enemy struggled very poorly, unable to spot and return accurate fire on us. The Granatwerfer failed to even launch a single mortar bomb at our MG strongpoint.
Posted: Wed Sep 15, 2010 3:34 am Post subject: Arnhem Bridge Team List
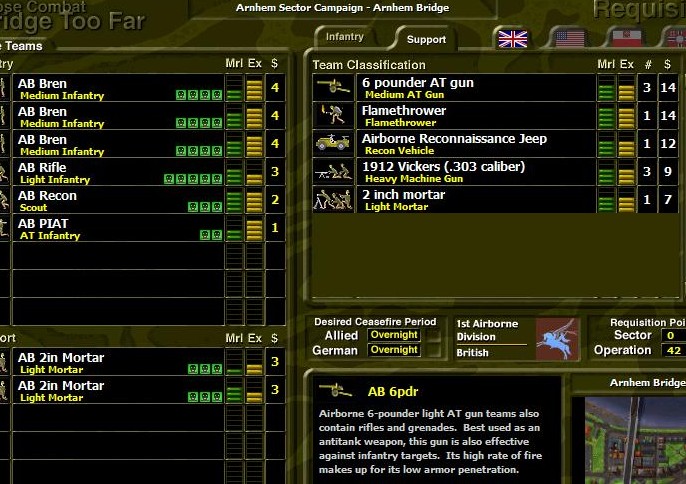
Yesterday, we fought through 5 maps with this line up and we were more than happy to head into the morning skirmish with the same line. Note that since we didn't manage to knock the Germans off Arnhem Relief, the Arnhem Bridge Op is unable to draw on Arnhem Sector Req. Pts.
OOB1.jpg
Description:
Nothing added, we'll figure out if we need to bolster anything later.
Posted: Wed Sep 15, 2010 3:51 am Post subject: Arnhem Bridge Map Assessment and Planning
Assessment
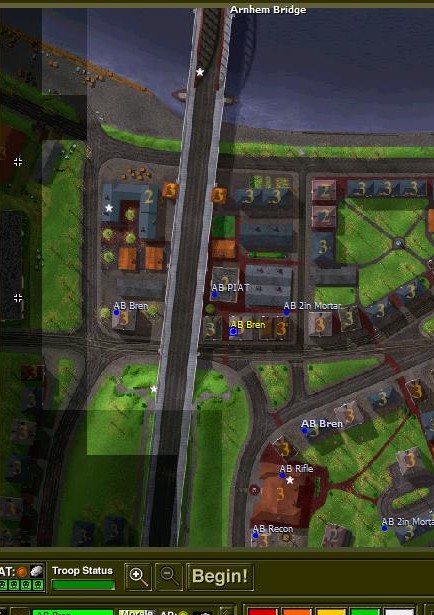
Due to the wide boulevard cutting across the map from left to right and the bridge superstructure cutting from top to bottom across the map, this map can be seen as 4 relative quadrants.
Control of the top left quadrant will start off disputed between Allies and Germans. They have 2 VLs, whereas we hold 1 in the same area.
Over at the bottom left, the enemy startline has the advantage of stepping off from cover along the left edge, with the row of 3 storey buildings. However, once they do so, they'll have to scramble across around 200 metres of open terrain to reach cover (3 storey brown building at the bottom edge, Public Works VL) on the other side of the bridge. It is more likely that they'll be placed right at the edge of the start line so as to shorten their exposure and cross approx. 80 metres of open ground to gain the Public Works VL.
Armour can be expected but due to the relative nature of environment, restricted to dominating the bridge area only.
Plan
We expect the enemy to test our resolve with a strong frontal attack from the area of the bridge at the bottom of the map. Therefore, we organise our teams into 2 command areas. One in the upper half and the other the lower, with 4 teams each.
The Bren teams in the upper half are sited to cover the open areas. They'll be able to fire directly into the flanks of the advancing Germans. Our PIAT will be our reserve here, and threaten any armour that intends to attack the bridge directly.
Of the lower half teams, only the Recon team is upfront to spot enemy targets. We pack our Bren and Rifle teams slightly behind to take advantage of cover and they will only rush forward if the enemy comes closer than 50 metres from the Public Works VL.
Posted: Thu Sep 16, 2010 2:21 am Post subject: Arnhem Bridge- Knocking out the Command HT
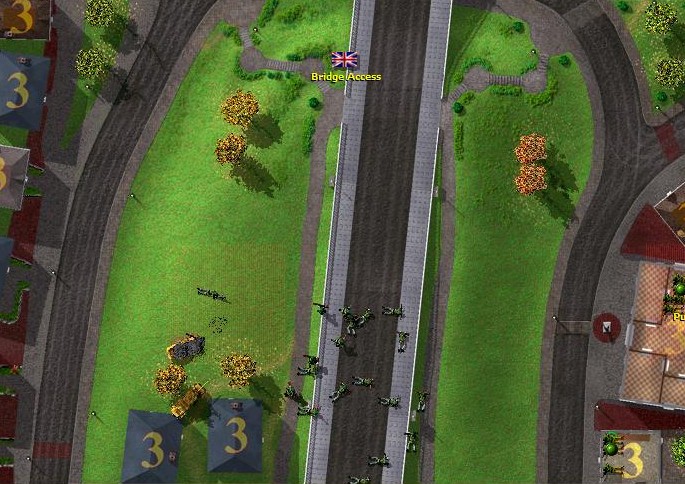
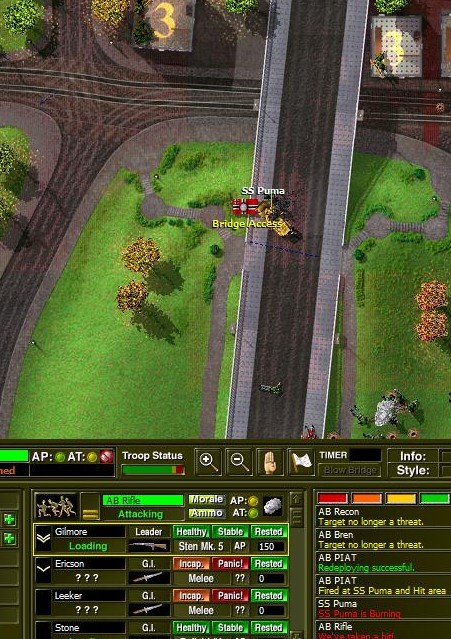
Once the curtain raises, we found enemy HT and Puma Armoured Car (AC) in plain view, near the entrance to the bridge.
We ordered the Mortars to start firing, with the intent to destroy the HT. This was achieved within the first 3-4 rounds and left the HT smoking. It appeared that this was the Command HT, since the enemy's attacks was very disjointed after the HT was destroyed.
We also got the Bren teams to keep up heavy fire on the flanks of the German teams as they tried to advance towards the Public Works VL. It promptly drew the attention of the Puma, which drove almost on top of us to keep up a steady volume of fire.
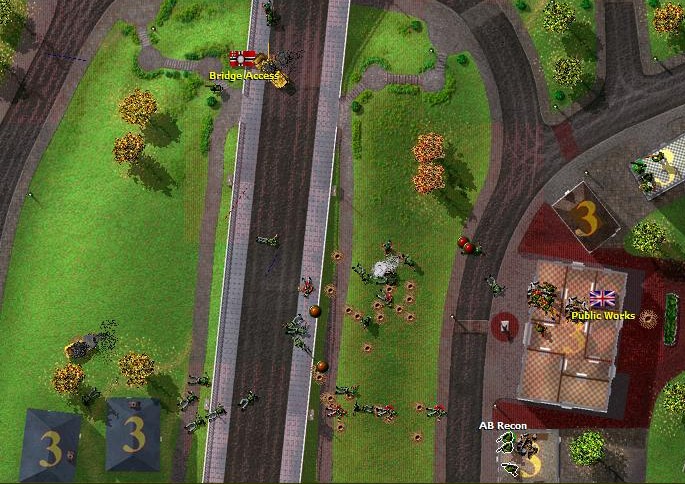
Posted: Thu Sep 16, 2010 2:29 am Post subject: Arnhem Bridge- Holding the Public Works VL
We made sure to cut off the initial advance by having our Mortars lay a heavy barrage just behind the front elements. The Rifle team has rushed to the front of the Public Works VL and boy, were there easy pickings. The enemy has been cowed by the shock of heavy fire and loss of command leadership.
The enemy advance petered out in the face of our stout defence. Wrecked SS teams either died or fled the field.
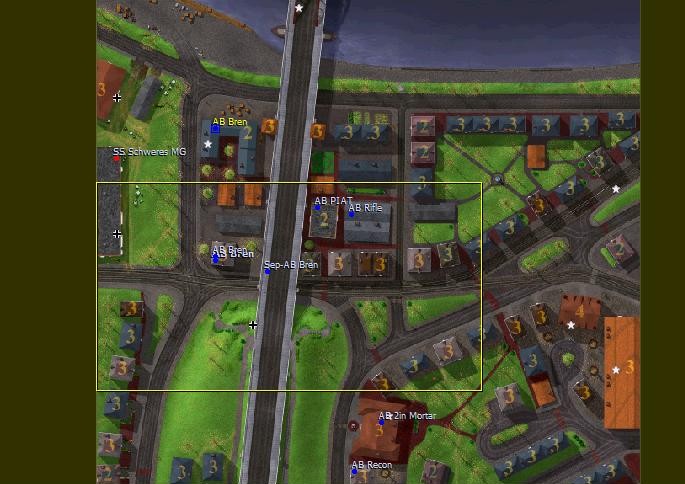
Posted: Thu Sep 16, 2010 2:35 am Post subject: Arnhem Bridge- End phase
After we've successfully cleared the enemy advance, we begin to plan our counterattack towards the enemy upper flank. Afterall, we need to secure the bridge and that cannot be achieved unless we have full control of the area around the Power Station VL (3 storey brown building) at the top left corner.
Perhaps sensing our intention, the German commander throws his final reserve, Schweres MG, to cover that position.
Here, we have swung our teams upwards, and consolidated 3 Bren and 1 Rifle team for the attack towards the Power Station VL.
5 Counter attacking.jpg
Description:
Our Mortars are out of bombs and take up front line positions.
You cannot post new topics in this forum You cannot reply to topics in this forum You cannot edit your posts in this forum You cannot delete your posts in this forum You cannot vote in polls in this forum You cannot attach files in this forum You can download files in this forum
In August of 2004, Zappi, Homba, Bambam887, RedScorpion and MOOXE all pitched
in to create this Close Combat site. I would to thank all the people who have visited
and found this site to thier liking. I hope you had time to check out some
of the great Close Combat mods and our forums. I'd also like to thank
all the members of our volunteer staff that have helped over
the years, and all our users that contributed to this site!