sigeena

Rep: 14.2  
votes: 1
|
 Posted: Tue Aug 24, 2010 4:34 am Post subject: Arnhem Suburbs- Spotting Posted: Tue Aug 24, 2010 4:34 am Post subject: Arnhem Suburbs- Spotting |
 |
|
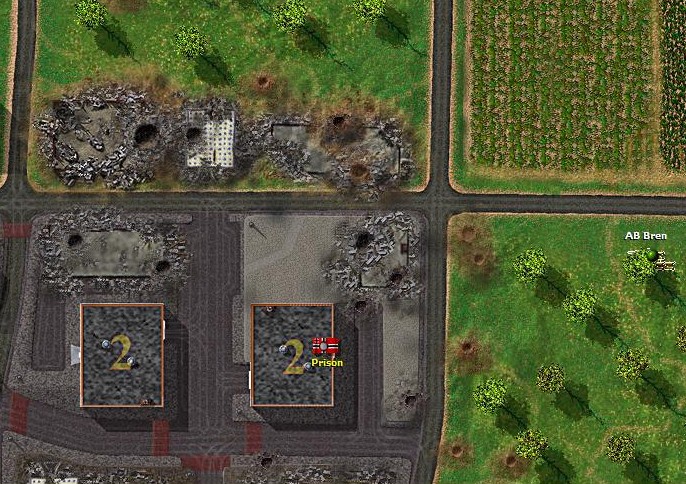
1 Bren team was left to observe targets in the Prison VL. Once the enemy reacts to the flank, they will usually move out from this buildings, and in doing so, this Bren team will then rush forward to gain control of the VL, as well as hem in the enemy teams.
| Description: |
| Bren team watching out for movement in the Prison VL |
|
| Filesize: |
167.56 KB |
| Viewed: |
9129 Time(s) |
|
|
|
|
| Back to top |
|
| |
|
|
sigeena
Rep: 14.2
votes: 1
|
| Posted: Tue Aug 24, 2010 5:03 am Post subject: Arnhem Suburbs- Entering the 1st building |
|
|
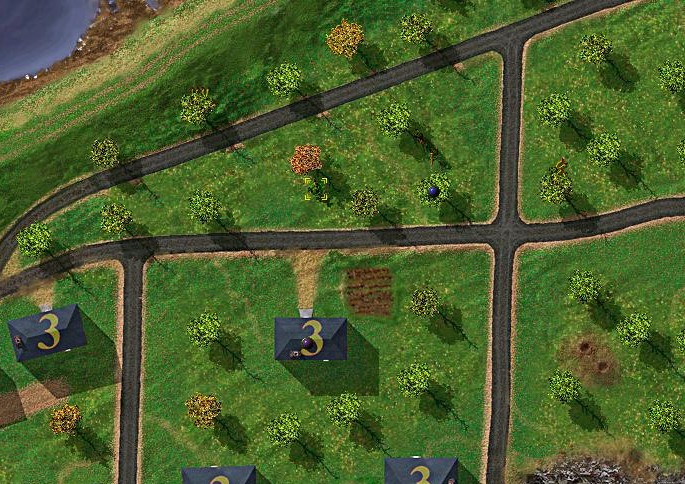
The flanking was uneventful. The Bren and Rifle teams are deployed to provide covering fire as the Recon team rushes to claim the 1st 3 storey building.
| Description: |
| Here the Recon team prepares to clear the building |
|
| Filesize: |
164.28 KB |
| Viewed: |
9126 Time(s) |
|
|
|
|
| Back to top |
|
| |
sigeena
Rep: 14.2
votes: 1
|
| Posted: Tue Aug 24, 2010 5:08 am Post subject: Arnhem Suburbs- Contacted! |
|
|
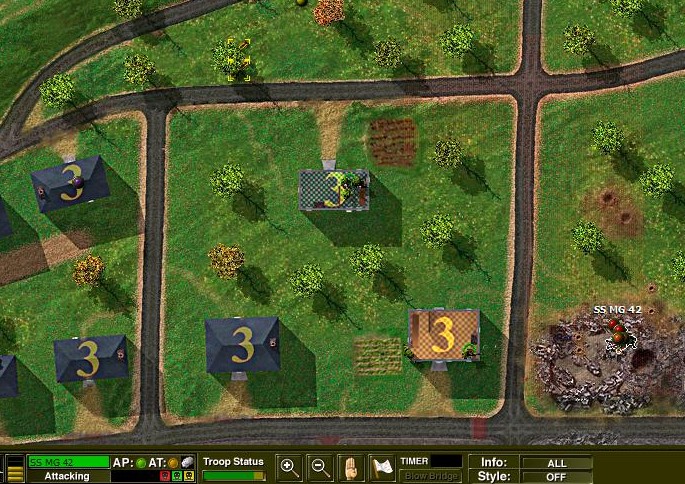
Shortly after entering the buildings, the MG 42 team reacted by targeting the Recon team. Mortars quickly responded and pinned down the MG while the rest of the teams moved to take up covering positions.
In the uneven contest, the MG 42 was destroyed and the teams moved on.
| Description: |
| Enemy MG hiding in the rubble, fixed and destroyed |
|
| Filesize: |
167.19 KB |
| Viewed: |
9125 Time(s) |
|
|
|
|
| Back to top |
|
| |
sigeena
Rep: 14.2
votes: 1
|
| Posted: Tue Aug 24, 2010 5:13 am Post subject: Arnhem Suburbs- End of battle |
|
|
In the subsequent actions that followed, I forgot to take screenies.
There were some hairy moments as a Schutzen team revealed itself in the vicinity of the Prison VL. As expected, this team tried to realign itself to cover our probe to the flank and rear. As it rushed into the open. More mortar bombs claimed casualties and the covering fire from Bren teams did the rest. At the end of battle, some 2-3 of them escaped capture.
Allies Germans
Soldiers 19 14
Losses 1 8
Remaining 18 6
1 hr ceasefire was chosen. The 2nd Para is mounting a pursuit.
| Description: |
|
| Filesize: |
118.57 KB |
| Viewed: |
9124 Time(s) |
|
|
|
|
| Back to top |
|
| |
Pzt_Kanov

Rep: 14.2
votes: 9
|
| Posted: Tue Aug 24, 2010 4:54 pm Post subject: Re: CC2 ABTF GC |
|
|
| Great reports!
|
|
|
| Back to top |
|
| |
sigeena
Rep: 14.2
votes: 1
|
| Posted: Thu Aug 26, 2010 1:36 pm Post subject: Son Team List |
|
|
Next map to battle is continuation of Son Op in Eindhoven Sector.
If you're not familiar with Operation Market Garden, it can get confusing and seem disjointed to be fighting battles simultaneously across different operations at the same time. Imagine if you were the Germans reacting to an Airborne attack, the first 6 hours are always the most confusing as you think hard about what the enemy objectives really are.
So back to Son Op and here we're about to attack the 1st bridge that matters to XXX Corps linking up with airborne carpet.
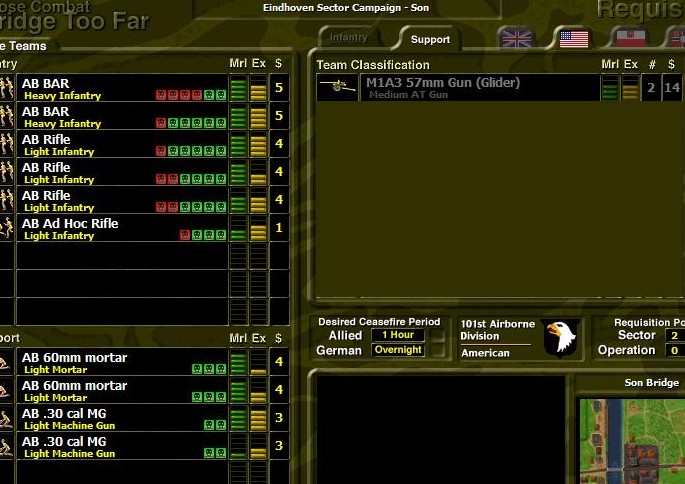
A refresher from the earlier Son Town battle. We had captured and inflicted lots of damage on the German teams and had pursued with only 1 hr ceasefire. From experience, 1 hr ceasefire will mean that most teams (both sides) will not have time to refit themselves and whatever losses incurred will be carried forward, i.e., if the BAR team that started out with 6 men had lost 4 men, it'll have to make do with the remaining 2 men for the next battle, which was what happened to my leading BAR team here.
The leading BAR team was the remnant of my LTA team and not wanting to discard the command team, I kept it in there.
With enough maneuvre teams, I decided to add on more covering firepower by req. 2 teams of .30 Cal MG. These teams are comparable to the German MG42 teams in terms of firepower and often their lower rate of fire means they last longer in the duration of a firefight.
| Description: |
| Team List- .30 Cal MG 2 teams added |
|
| Filesize: |
103.56 KB |
| Viewed: |
9063 Time(s) |
|
|
|
|
| Back to top |
|
| |
sigeena
Rep: 14.2
votes: 1
|
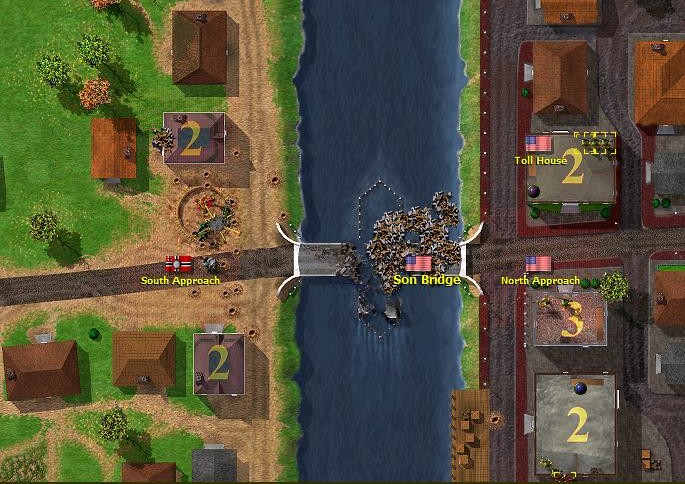
| Posted: Thu Aug 26, 2010 1:57 pm Post subject: Son Bridge Map Assessment and Planning |
|
|
Map Assessment
The main objective is the Son Bridge VL with it's North Approach VL (near side) and South Approach VL (far side). Again, to fully secure the bridge from being blown, it is necessary to capture all 3 VLs.
The main road leading to the bridge is too open to be used. Intel has revealed that there are at least 2 Flak guns covering the bridge. There's no doubt that the main road has been prepared to meet crossfire from the Flak guns.
The enemy can defend adequately if they occupy the high storey buildings facing open ground that has to be traversed by the Allies. Additionally, they may also also cede control of the North Approach VL and all buildings on the near side and defend stoutly from the buildings on the far side, since the only access route to clear them would be frontally via the Son Bridge VL.
The bridge is typically rigged to blow within 3-4 minutes. The Allies have to move vigourously and aggressively.
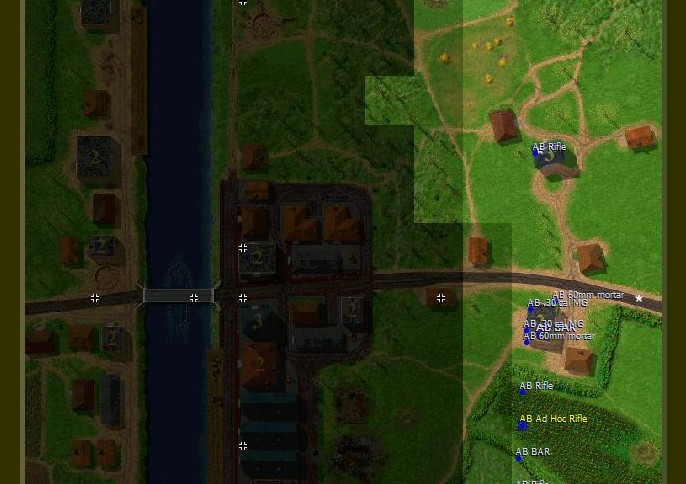
Plan
This is the climax for Son Op. Capture this bridge and XXX Corps will be able to clear onwards to Nijmegen. Historically, the bridge was blown before 101st could secure it and the entire operation's timetable was delayed by a further 14 hrs for the engineers to build a Bailey bridge.
Since a frontal approach is already likely to be covered by enemy Flak guns, the remaining choices aren't too obvious as well. Here, we've decided to site the covering teams (.30 Cal MG and 60mm Mortar ) in and around the 2 storey building near the main road. The rest of the infantry teams will move along the bottom half of the map towards the Warehouses VL. Then they can possibly move under cover of buildings towards the Son Bridge.
A small AB Rifle team is left to cover the line's right flank from enemy infiltration and expected to move aggressively once the bridge is captured to secure the forested area to its front.
| Description: |
| Shows initial deployment of teams prior to kickoff |
|
| Filesize: |
93.86 KB |
| Viewed: |
9061 Time(s) |
|
|
|
|
| Back to top |
|
| |
sigeena
Rep: 14.2
votes: 1
|
| Posted: Thu Aug 26, 2010 2:03 pm Post subject: Son Bridge- Possible Flak Gun position |
|
|
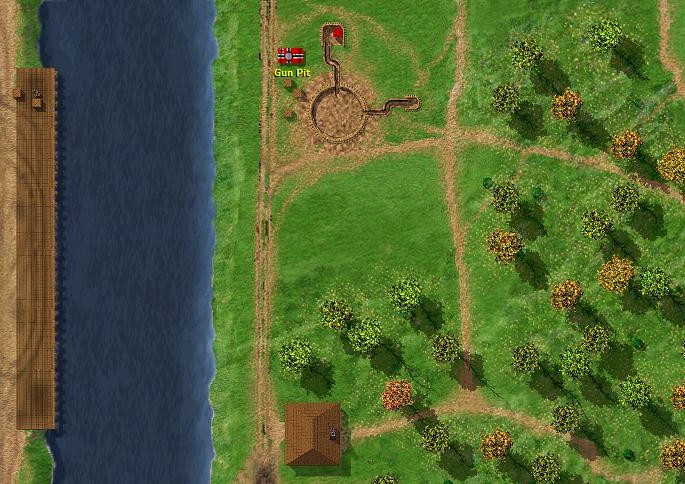
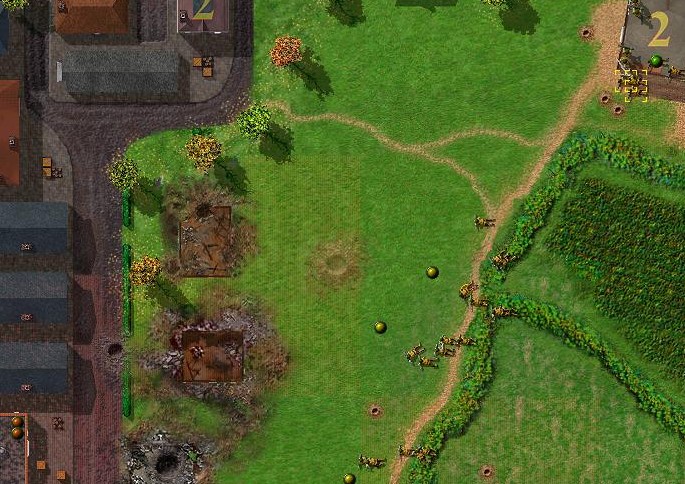
Once the battle kicks off, we review some of the likely positions of the enemy Flak gun.
Since this VL to the top half of the map is literally called Gun Pit, it has to be the most likely Flak gun position. Since it has not revealed itself, no point in mortaring and wasting valuable HE rounds.
The infantry teams are moving along the bottom half and would be shielded from its deadly aim for now.
| Description: |
| Could the enemy Flak gun be here? |
|
| Filesize: |
125.87 KB |
| Viewed: |
9059 Time(s) |
|
|
|
|
| Back to top |
|
| |
sigeena
Rep: 14.2
votes: 1
|
| Posted: Thu Aug 26, 2010 2:09 pm Post subject: Son Bridge- Moving up |
|
|
The infantry teams move off in a line towards the buildings. Enemy Schutzen was quickly spotted from the area of the Warehouses VL to the bottom left corner of this screen. Our mortars immediately responded to suppress their accurate fire. The .30 Cal MG also opened up in covering fire.
Text book fire and movement.
| Description: |
|
| Filesize: |
144.49 KB |
| Viewed: |
9058 Time(s) |
|
|
|
|
| Back to top |
|
| |
sigeena
Rep: 14.2
votes: 1
|
| Posted: Thu Aug 26, 2010 2:14 pm Post subject: Son Bridge- Flak and priority VLs |
|
|
Once the infantry teams have destroyed the Schutzen team and enter the Warehouses VL, they were immediately brought under fire by a Flak gun across the bridge in the vicinity of the South Approach VL.
This Flak gun has to be suppressed to enable the infantry teams to move up towards the North Approach VL and Toll House VL. Again the Mortar teams worked feverishly to bring down heavy fire.
The initial movement against the Schutzen team had taken considerable time and the guys will really have to hustle up.
| Description: |
|
| Filesize: |
134.82 KB |
| Viewed: |
9057 Time(s) |
|
|
|
|
| Back to top |
|
| |
sigeena
Rep: 14.2
votes: 1
|
| Posted: Thu Aug 26, 2010 2:20 pm Post subject: Son Bridge- Setting up covering fire |
|
|
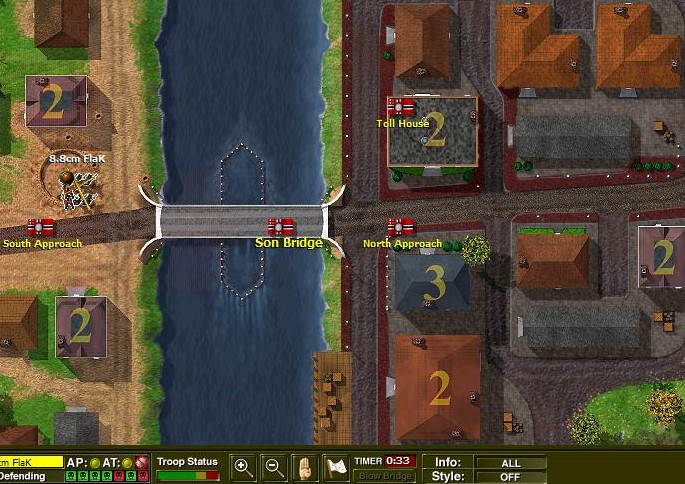
The infantry teams quickly occupy the multi-storey buildings facing the river, capturing the North Approach VL. At this moment, the timer is already gone and the bridge can be blown by the Germans anytime. Now we have to take our chances and send 1 team across to destroy the Flak gun as well as capture the Son Bridge VL and South Approach VL.
| Description: |
| 2 teams provide covering fire, 1 team rush |
|
| Filesize: |
138.62 KB |
| Viewed: |
8990 Time(s) |
|
|
|
|
| Back to top |
|
| |
sigeena
Rep: 14.2
votes: 1
|
| Posted: Thu Aug 26, 2010 2:24 pm Post subject: Son Bridge- Son Bridge Captured! |
|
|
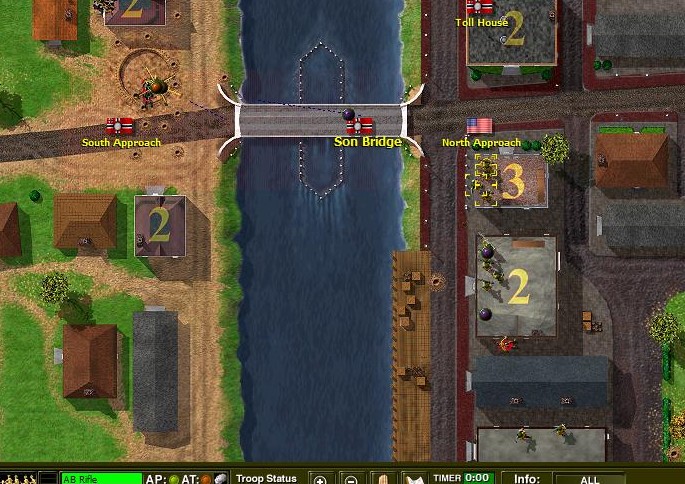
The team that moves across achieves all its objectives and claims both Son Bridge VL and South Approach VL. However, once across, it suddenly encounters heavy Flak gun fire from the near side of the bridge again, coming from the Gun Pit VL.
Surely, the battle is as good as over. The 101st just needs to mop up.
| Description: |
|
| Filesize: |
139.82 KB |
| Viewed: |
8989 Time(s) |
|
|
Last edited by sigeena on Thu Aug 26, 2010 2:35 pm; edited 1 time in total |
|
| Back to top |
|
| |
sigeena
Rep: 14.2
votes: 1
|
| Posted: Thu Aug 26, 2010 2:34 pm Post subject: Son Bridge- Bridge blown |
|
|
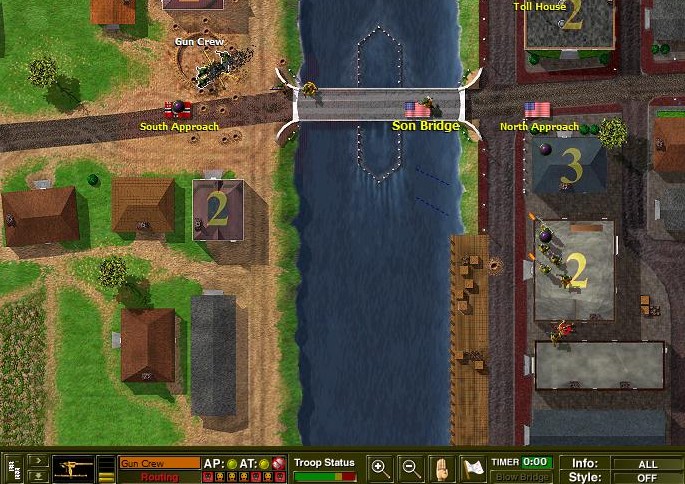
The Allied teams were exhausted from all that rushing and heavy contact, especially the team that crossed the bridge. In the worst possible time, this team cracked as they looked for cover from accurate Flak gun fire.
Taking advantage of the situation, a counterattacking Granatwerfer team re-captured the South Approach VL and immediately blew the bridge.
It was an absolutely dramatic contest. From the seeming ease with which the textbook bridge attack was executed to the elation of its capture, to the downright despondence when the bridge is blown.
They better bring up some of that Bailey crap now.
| Description: |
| Notice the counterattacking German team |
|
| Filesize: |
128.25 KB |
| Viewed: |
8987 Time(s) |
|
|
|
|
| Back to top |
|
| |
sigeena
Rep: 14.2
votes: 1
|
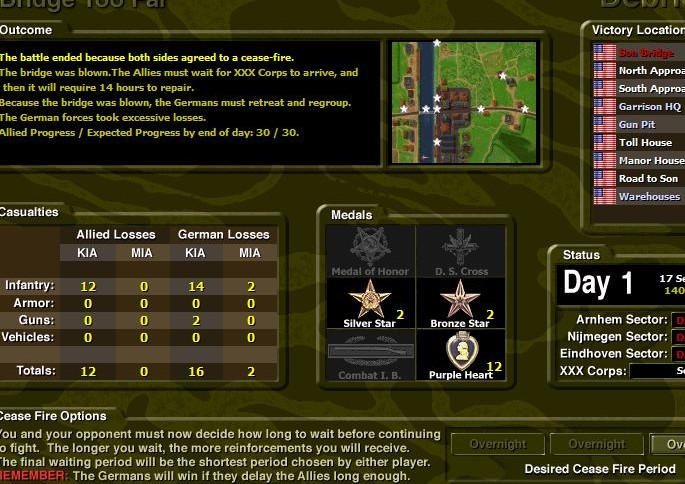
| Posted: Thu Aug 26, 2010 2:53 pm Post subject: Son Bridge blown but captured! |
|
|
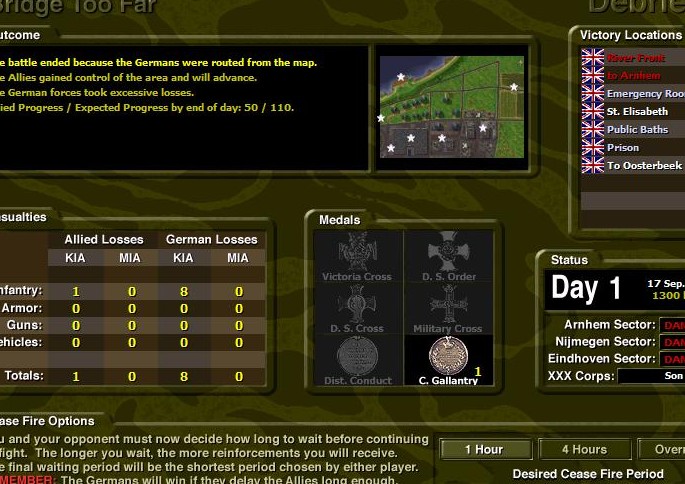
Of the 4 Silver and Bronze Stars given out, 3 were posthumously awarded.
Both sides took a beating. The Germans pulled out with the destruction of the bridge.
Allies Germans
Soldiers 33 27
Losses 12 16
Remaining 21 11
Overnight as the 101st waits for XXX Corps. Once the bridge is ready, the 101st will advance to the next map to further secure the bridge. It is anticipated that XXX Corps can only move off by the 3rd day.
An Overwhelming Victory by the Allies (where XXX Corps links up with the 1st Airborne at Arnhem Bridge by 4th day) is no longer possible.
| Description: |
| Victory but the implications of the 14hrs delay will be felt further down the line |
|
| Filesize: |
122.94 KB |
| Viewed: |
8984 Time(s) |
|
|
|
|
| Back to top |
|
| |
vonB

Rep: 32.6
votes: 5
|
| Posted: Thu Aug 26, 2010 3:40 pm Post subject: Re: CC2 ABTF GC |
|
|
| Nice AAR...
|
|
|
| Back to top |
|
| |
sigeena
Rep: 14.2
votes: 1
|
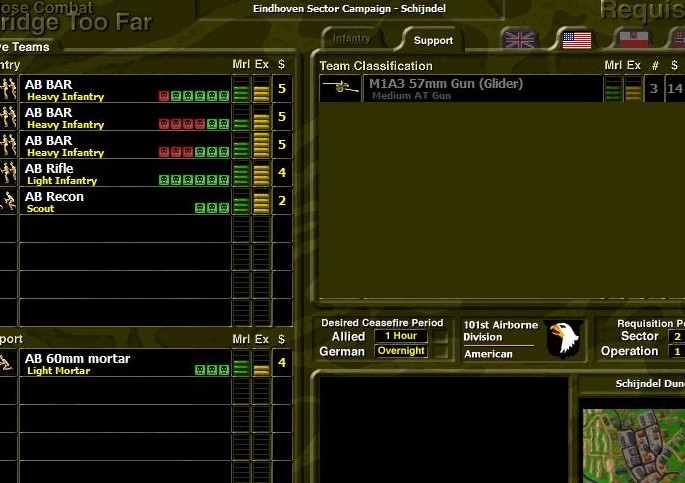
| Posted: Fri Aug 27, 2010 12:23 pm Post subject: Schijndel Team List |
|
|
In the next map, we return back to Schijndel Op and Schijndel Dunes
A rather depleted team list since we've added nothing. However its expected that the Germans were more roughly handled in the preceding map and their teams would be weak as well.
| Description: |
| No additional teams were added |
|
| Filesize: |
92.13 KB |
| Viewed: |
8968 Time(s) |
|
|
|
|
| Back to top |
|
| |
sigeena
Rep: 14.2
votes: 1
|
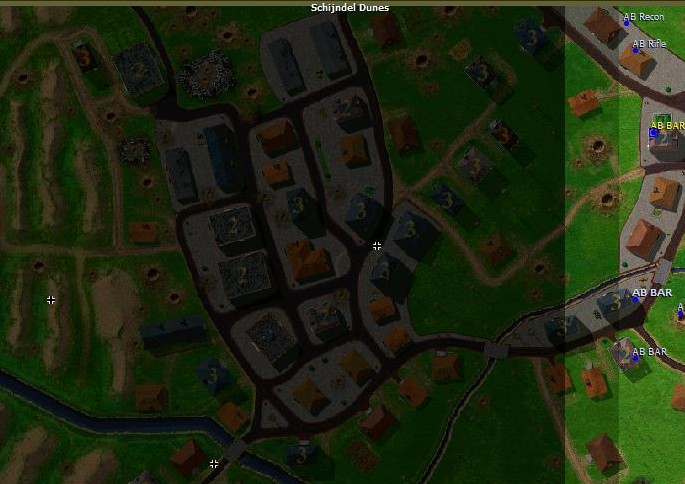
| Posted: Fri Aug 27, 2010 12:31 pm Post subject: Schijndel Dunes Map Assessment and Planning |
|
|
Map Assessment
It's a map with lots of buildings in close proximity and there'll be alot of opportunities to get close and personal with the enemy. Off to the German end of the map are the sand dunes that give this map the name Schijndel Dunes.
From the Allies start line of the map, the route by the bottom would be exposed by movement across a small bridge. The route by the upper half would be comparatively more covered by buildings.
It's important to keep the teams close to lend mutual support.
Plan
The weaker BAR teams will be providing covering fire from buildings on the Allied side. The Recon and Rifle team will attempt to flank the enemy front by moving along the upper half. When the enemy is found, they will try to slide on to the side and continue pressing their flank. Once we drive the enemy from the town and into the sand dunes, it'll be over.
| Description: |
| Initial Deployment before Begin |
|
| Filesize: |
90.95 KB |
| Viewed: |
8967 Time(s) |
|
|
|
|
| Back to top |
|
| |
sigeena
Rep: 14.2
votes: 1
|
| Posted: Fri Aug 27, 2010 12:36 pm Post subject: Schijndel Dunes- Contacted |
|
|
The enemy had prepared their positions to cover the flanks. Here, the Recon team reacts to an enemy Panzerschreck team across in the next building , shooting at less than 30 metres. The Rifle team is directly behind them and ready to add their heavier rifle fire to suppress the enemy.
Some smart shooting by both teams and the enemy flank is in the air. We press on and the enemy bugs out to avoid total loss.
| Description: |
| Recon team moving ahead of Rifle team |
|
| Filesize: |
146.1 KB |
| Viewed: |
8965 Time(s) |

|
|
|
|
| Back to top |
|
| |
sigeena
Rep: 14.2
votes: 1
|
| Posted: Fri Aug 27, 2010 12:42 pm Post subject: Schijndel Dunes Captured! |
|
|
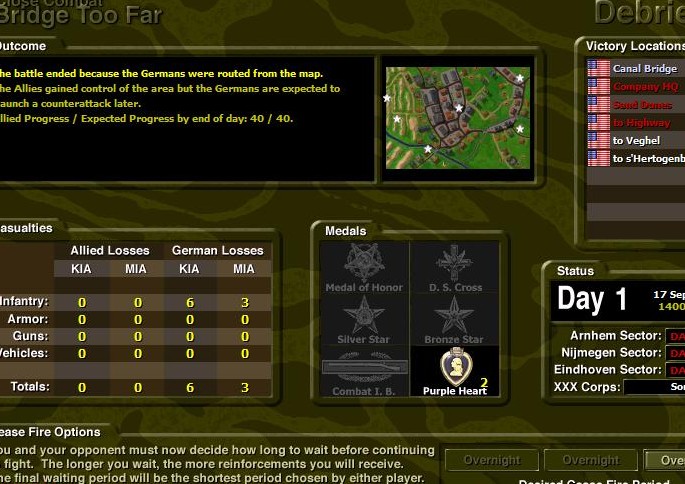
A much better skirmish, compared to the one at Schijndel Road. No casualties suffered and we knocked the enemy well off the LZ for the Eindhoven Sector.
Allies Germans
Soldiers 22 15
Losses 0 9
Remaining 22 6
The 101st will be able to be supplied by air for the 2nd day. The enemy is driven off but can be expected to counterattack once organised.
| Description: |
|
| Filesize: |
113.97 KB |
| Viewed: |
8963 Time(s) |
|
|
|
|
| Back to top |
|
| |
sigeena
Rep: 14.2
votes: 1
|
| Posted: Sun Aug 29, 2010 1:05 pm Post subject: Veghel Team List |
|
|
Still staying in the Eindhoven Sector, next up is Veghel Town of Veghel Op.
The swift completion of Veghel Op is going to be critical for XXX Corps to exit Eindhoven and step off into Nijmegen. Every map is mission critical.
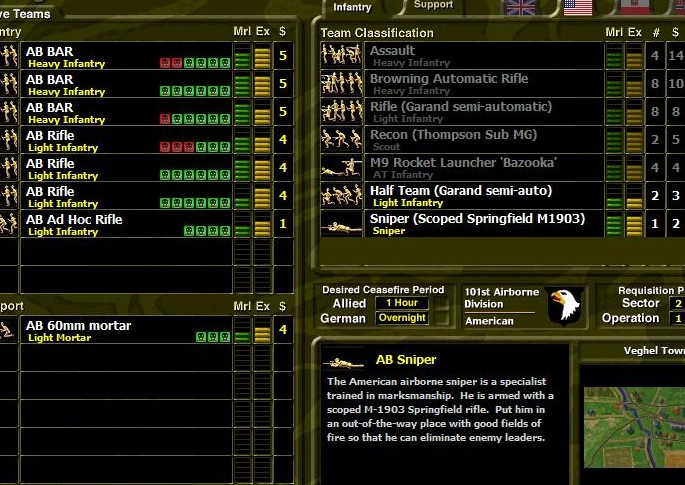
Here no changes were made to the team line-up. Looking forward, our team should be more than sufficient.
| Description: |
| Quite a substantial team so nothing was added |
|
| Filesize: |
132.66 KB |
| Viewed: |
8948 Time(s) |
|
|
|
|
| Back to top |
|
| |