Posted: Sun Aug 29, 2010 1:14 pm Post subject: Veghel Town Map Assessment and Planning
Assessment
Most of the town lies on the near side of the canal that bisects the map from top to bottom. Capture of the town can develop swiftly since most of the buildings will provide adequate cover. Like island hopping, we'll be conducting house hopping.
If the enemy is in force on the far side of the canal, they will be limited in preventing our quick capture of the town but they'll be in good positions to prevent us from crossing the canal, provided they can cover all 3 bridges.
It's more likely that they'll be in positions in and around the town on the near, rather than on the far side.
Plan
We'll push through the town, 3-up. With control of the row of 3-storey buildings as the immediate objective (Doktor's Office VL), we'll be packing the centre element with most of the teams. Will try to keep it a narrow and forceful thrust.
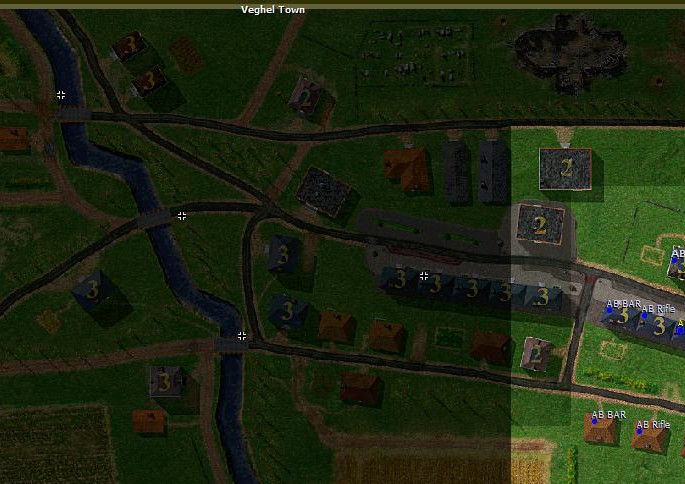
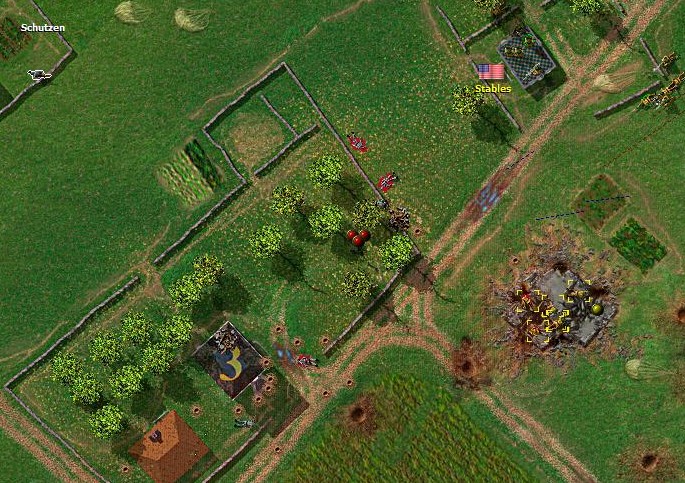
1 Start.jpg
Description:
Starting positions, a couple of teams are off-pic to the right.
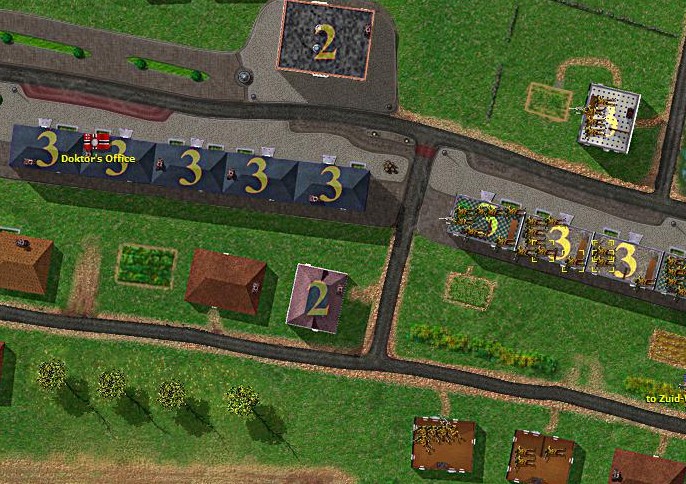
Posted: Sun Aug 29, 2010 1:18 pm Post subject: Veghel Town- 3 up
Here's a closer look at the immediate objective (Dokter's Office VL).
Soon after taking this screenshot, the enemy was spotted in trying to occupy the 2 storey building in the centre. This team didn't last long with converging BAR fires
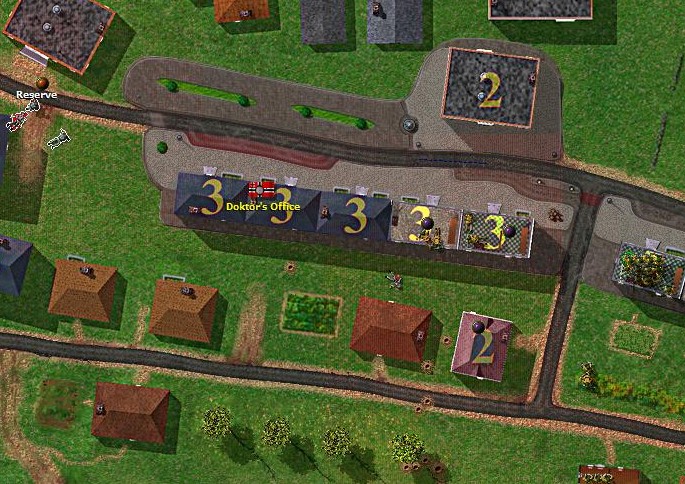
Posted: Sun Aug 29, 2010 1:23 pm Post subject: Veghel Town- Enemy trying to flank
Something I enjoy of CC2, the AI often tries to outflank, rather than a direct straightup shootup. Here we catch a Reserve team, in the top left corner, moving to our flanks.
Of course this movement is also covered by our BAR team that cuts down the commander of this Reserve team. Since Reserve teams typically have low command and morale, knocking out the commander has the effect of suppressing the rest of the team out of the firefight.
3 Reserve.jpg
Description:
The enemy reacts to our push through the row of buildings in the centre
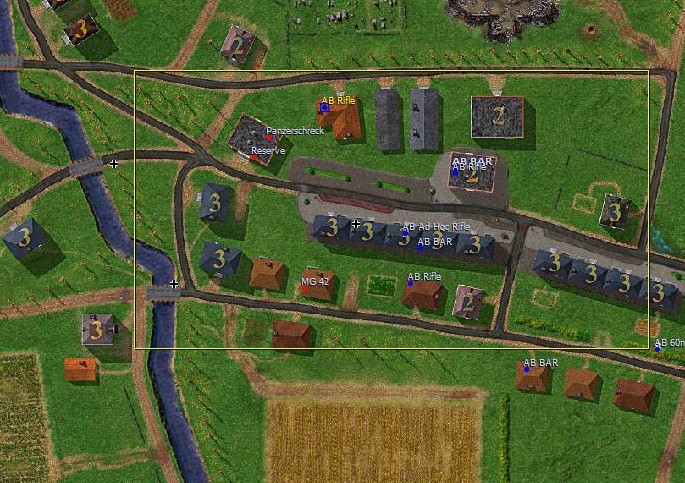
Posted: Sun Aug 29, 2010 1:28 pm Post subject: Veghel Town- Mid to End phase of fight
Not much to say, this screenshot was taken near the end.
We suppressed the MG42 team, maneuvred the BAR team to take the Doktor's Office VL and was ready to assault towards the MG team when the enemy pulled out.
To the upper half of the map, we were opposed by a 2 man Panzerschreck team while the remnants of the Reserve team cowered in cover. The Rifle team broke forward and captured that bunker.
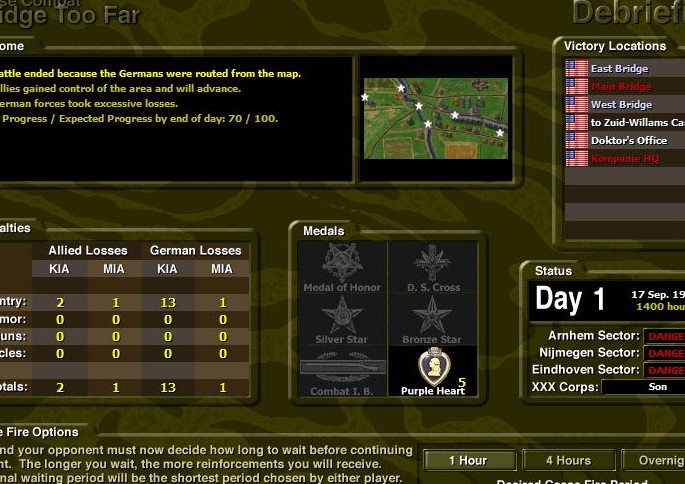
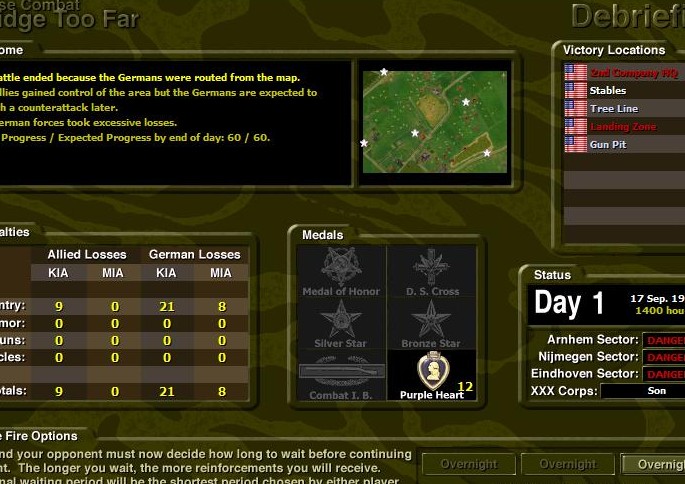
Posted: Sun Aug 29, 2010 1:33 pm Post subject: Veghel Town captured!
The enemy had decent numbers in this fight and map have fared better in deploying behind the canal. Attempting to cross the canal while under fire would have been challenging.
Instead, with the intent to oppose our capture of the town, they had their share of unfortunate close encounters. 2 Aufklarer teams were lost to us in close melees.
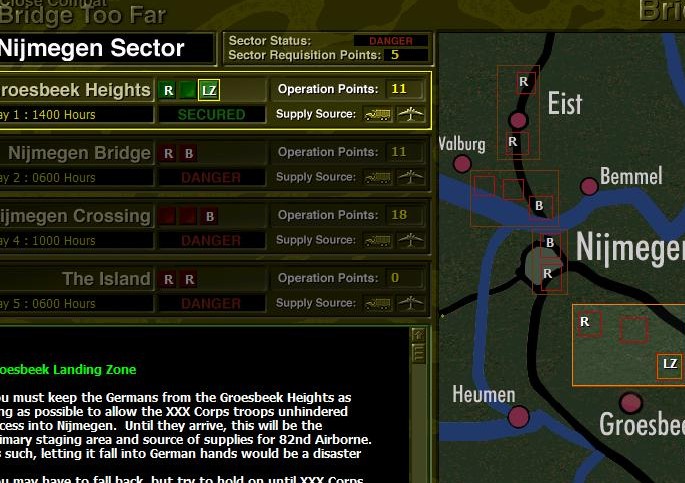
Posted: Sun Aug 29, 2010 1:39 pm Post subject: Nijmegen Sector 1st Day
Next up is Nijmegen Sector. For the 1st day, only Groesbeek Heights Op.
We'll be defending the LZ to secure supplies for our push into Nijmegen Bridge Op, which will take place early on the second day. In the first day, the enemy will likely be all infantry while from 2nd day on, they'll be able to deploy halftracks and assault guns. Alot of the terrain will favour armour.
If the LZ is lost, then it's mission critical to hold on to the road map, to prevent the Germans from interdicting into XXX Corps supply line.
From this screenie, you can also note the earliest start times for Nijmegen Crossing and The Island operations.
Posted: Thu Sep 02, 2010 2:25 pm Post subject: Groesbeek Heights Team List
With sufficient infantry teams in the starting line-up, I decided to req. for 2 additional Light Mortars. The Groesbeek Heights Op tends to have very long LOS, and very little built up area, encouraging mortars to be sited far, but still retaining good observation to enemy movements.
Posted: Thu Sep 02, 2010 2:38 pm Post subject: Groesbeek LZ Map Assesment and Planning
Assesment
This LZ map is a relatively open terrain. There are a number of wall structures that will only provide cover if used in defilade cover. Most of the area is high grass and units can remain concealed as long as they do not reveal themselves by firing.
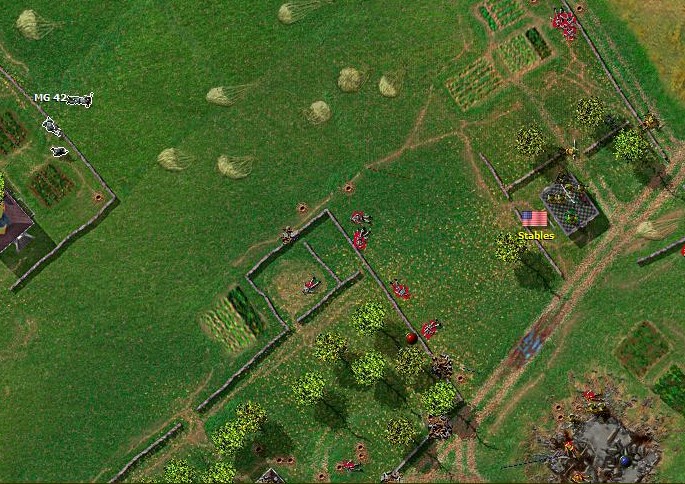
The German attack will have the advantage of buildings to launch from, notably the 2nd Company HQ VL at the left edge of the map. Furthermore, the 3-storey building (Villa) to the bottom of the map is a good form up point to infiltrating our left flank, if we're not careful.
In the middle, the house (Stables VL) and the long wall running across the middle of the map will form a natural obstacle to hold against enemy advance.
Plan
Unlike all the other Ops taken so far, this will kick-off as a defence, rather than attack. As long as we retain this map, we will protect XXX Corps flank when they head north, as well as, continue its use as a LZ for supplies to reach the 82nd in Nijmegen Sector.
The Mortar teams are placed well-back, but retain good fields of view to spot targets. We form a strong point in the Stables VL. Anticipating enemy movement to take place in and around the 3-storey Villa, 2 additional Rifle teams hold the line, while 2 BAR teams form a tactical reserve to plug enemy incursions.
That map can be hell. I remember getting constantly slaughtered by Mark IVs...
You know, I'm just a normal guy like everyone else. Why, my friends say, "Andreus you're just so cool because you're normal just like everyone else." Yep, normal that's me. - Fallout 2
Interesting. I would not want Gerry to have that 3 story building. I would be tempted to hit that hard, and try and take it fast. Gaining control of that and the area around would give the Allies a good base to defend and mobilise any assault from (being the shortest route to their VL), and make life harder for the Germans. In the Germans hands, it just seems to give them too much leverage on the Left Flank, commanding the entire bottom edge of the Map, and give them a base for controlling the centre and bottom.
The wall line running from the centre to the north with the building anchored at the base seems an ideal means to force any german advance into a killing ground in the open areas which they would have to cross, and could provide useful base of fires to support any allied advance over that area too.
In fact, I would hope that they direct their intentions towards that house in the centre. We could let them get quite close and let rip at close range while they were exposed in the open.
The weakness would be the north edge leading to the right flank, and the whole battle could rotate clockwise if Gerry developed that, but it would also reduce their resources to defend their VL. But you can't be everywhere at once!
Hope you don't mind the comments; and I am no master tactician.
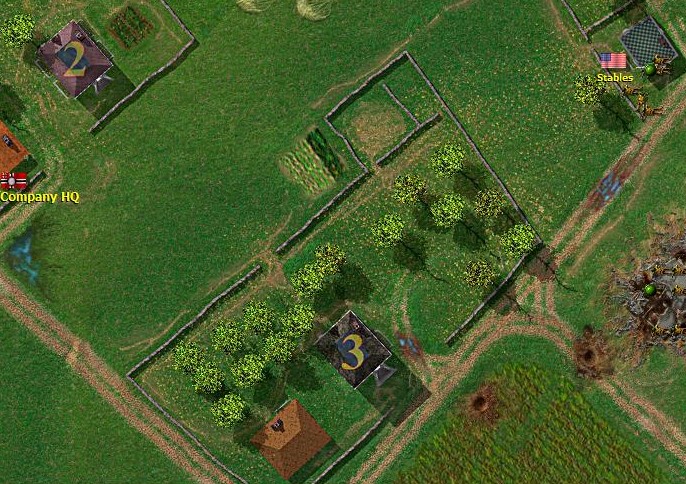
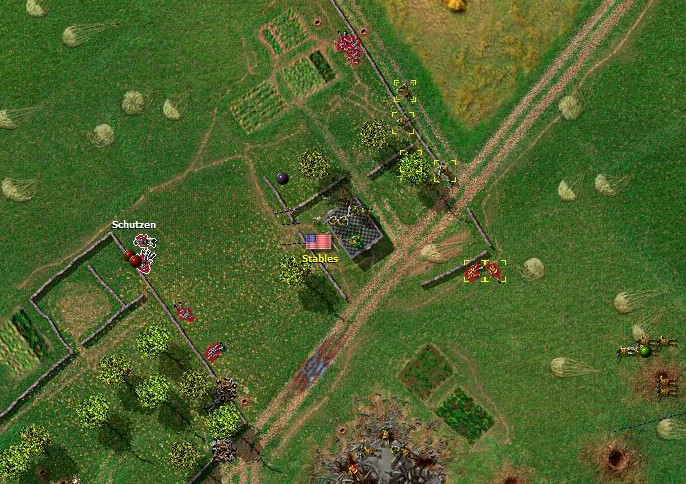
Posted: Fri Sep 03, 2010 12:13 am Post subject: Groesbeek Heights- 3 storey Villa
In reference to vonB's comments, here we have a clearer view of the 3 storey Villla that he was concerned about.
Off the right edge of this screenie, you'll be able to note the positions of the teams that are sited to cover any enemy advance from the walled yard. Range is about 25-50 metres. If we meet only Schutzen teams, we'll be able to dominate the firefight with heavier firepower.
If they manage to get a MG42 team into the villa, then we'll have to rely on the Mortars to keep a steady suppressive fire.
In any case, this will be the enemy Form Up Point for their assault on us.
Posted: Fri Sep 03, 2010 12:19 am Post subject: Groesbeek Heights- Fire discipline
Despite observing heavy enemy movement in and around the villa, we held off on engaging them until when it was clear that our fire would have the best effect, i.e., as they begin to traverse the open ground.
I try to hold off some teams from engaging as well, so that they do not reveal themselves unnecessarily.
Here, 2 Schutzen teams probe forward, 1 heading towards the Stables VL and the other covering their flank, moving from the villla to the ruins in the middle. Both positions are occupied by our teams, beating off their advances.
Posted: Fri Sep 03, 2010 12:25 am Post subject: Groesbeek Heights- 1 more Schutzen team top left
In the intermittent firefight, some losses were taken by both sides. The German commander, perhaps thinking that that's all there is to the Airborne teams, push forward another Schutzen team to take us from a new angle.
We quickly adjust our line a little, recalling the most forward Rifle team, in the ruins, to pull back.
Also note the effect of mortars on the 3 storey villa. It's beginning to tell as enemy fire is slackening.
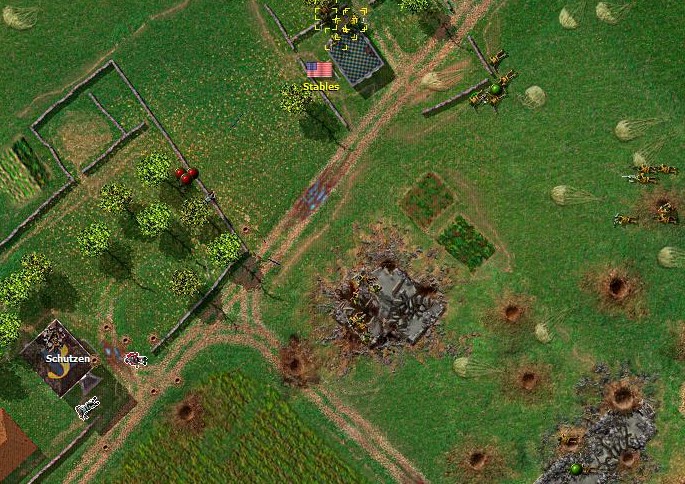
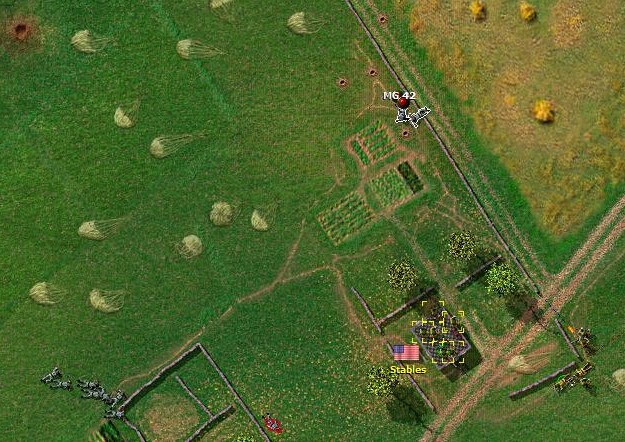
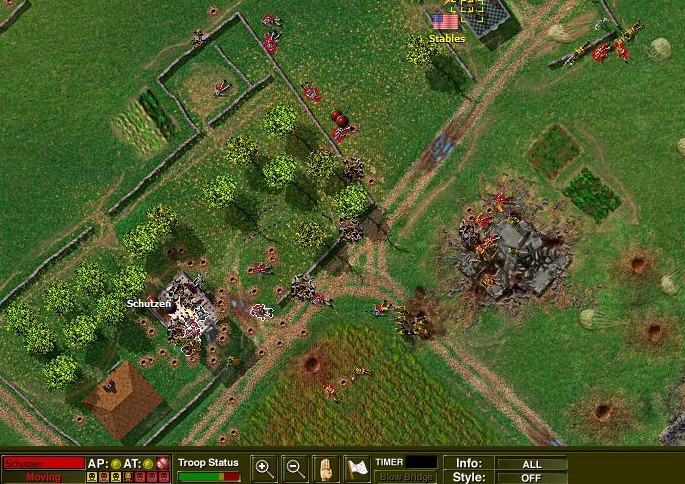
Posted: Fri Sep 03, 2010 12:31 am Post subject: Groesbeek Heights- MG Fire
Up till then, all we encountered was heavy rifle fire. The enemy MGs have yet to reveal themselves.
And it came as no surprise when we finally located some enemy MGs. However, the surprise is that they have been used as a flanking element to unhinge our right. They have been using the wall to conceal their movement.
The bad news for them, we've got both sides of the wall covered with enfilading fire.
Taking opportunity as the Allies attended to their new found threat, the Schutzen team presses forward to a closer position for assault.
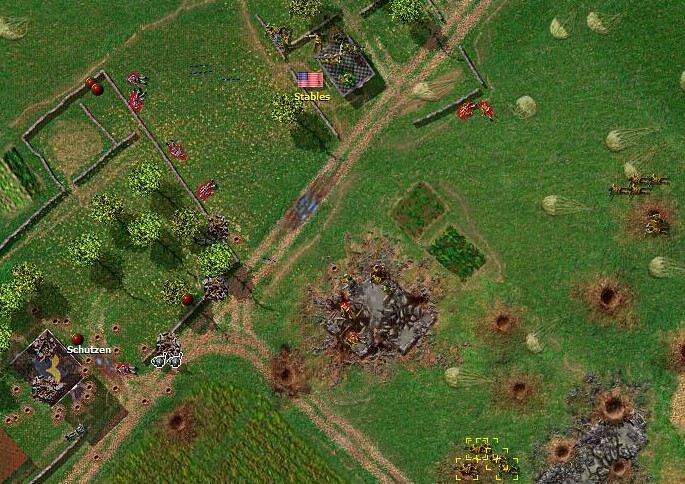
Posted: Fri Sep 03, 2010 12:35 am Post subject: Groesbeek Heights- Taking out the MG, then the Schutzen
To quickly stabilise our right, a quick attack was made by the reserve BAR team, supporting the Stables VL. We first hit the MG team to remove the direct threat, then forward to pour heavier volume of fire on the Schutzen team.
It seems that the Germans have exhausted all their options. It's about time to counter attack and finish them off.
8 Flank is stabilised.jpg
Description:
Our reserve BAR team springs forward to attack the MG42
Posted: Fri Sep 03, 2010 12:40 am Post subject: Groesbeek Heights- Step Off
To initiate a counter attack, we move the Rifle team at the bottom edge forward. This team will continue to advance till it's in good position to assault the villa.
The other teams will generally provide covering fire to assist their movement. Mortars are about all out now. Maybe, not more than 4-5 bombs left per Mortar team.
Even as we begin our counter attack, the enemy still puts up credible resistance from the villa.
9 Counter Attack.jpg
Description:
The enemy still putting up resistance from the Villa
Posted: Fri Sep 03, 2010 12:43 am Post subject: Groesbeek Heights- Moving the Right flank forward as well
To support the assault from our left flank, we try to move the teams on the right to provide additional cover fire. This was quickly disrupted when another MG strongpoint was revealed.
There'll be little support from our teams on the right flank for the counter attack. Hopefully, the enemy will be suppressed heavily enough for the guys to punch through.
Posted: Fri Sep 03, 2010 12:47 am Post subject: Groesbeek Heights- Enemy surrender
The last screenie before the battle ends.
What happened was that enemy fire noticeably slackened as our fire grew. The German teams in the villa are probably heavily suppressed and a forceful assault by our Rifle elements was unstoppable.
Posted: Fri Sep 03, 2010 12:58 am Post subject: Groesbeek LZ- Victory and Overnight
There was a mass surrender at the end as we entered the villa. It transformed a good result to an excellent one. Only 1 MG team managed to escape unscathed.
In the ensuing battles to follow in this Op, it is expected that the Germans will bring on heavier weapons. We can expect Halftracks, Self-Propelled Guns, Infantry Guns, the works. Since this map is defended, there's nothing to advance on and Overnight ceasefire occurs.
13 End of Battle.jpg
Description:
End of battle, note that the Germans have taken excessive losses
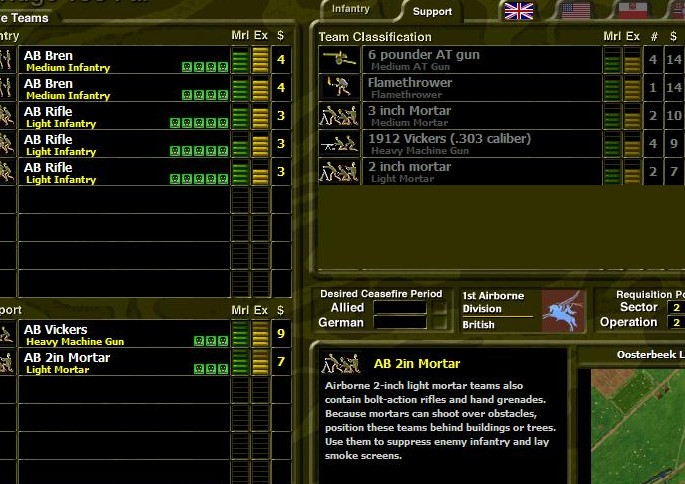
Posted: Fri Sep 03, 2010 1:35 pm Post subject: Oosterbeek Team List
After clearing Groesbeek Heights Op in Nijmegen Sector, we jump over to defending the Oosterbeek Op in the Arnhem Sector.
Here we added additional firepower in the form of Vickers MG and Light Mortar teams. The first day should only be light infantry attempting to infiltrate the Oosterbeek LZ.
You cannot post new topics in this forum You cannot reply to topics in this forum You cannot edit your posts in this forum You cannot delete your posts in this forum You cannot vote in polls in this forum You cannot attach files in this forum You can download files in this forum
In August of 2004, Zappi, Homba, Bambam887, RedScorpion and MOOXE all pitched
in to create this Close Combat site. I would to thank all the people who have visited
and found this site to thier liking. I hope you had time to check out some
of the great Close Combat mods and our forums. I'd also like to thank
all the members of our volunteer staff that have helped over
the years, and all our users that contributed to this site!