sigeena

Rep: 14.2  
votes: 1
|
 Posted: Fri Sep 03, 2010 1:50 pm Post subject: Oosterbeek LZ Map Assesment and Planning Posted: Fri Sep 03, 2010 1:50 pm Post subject: Oosterbeek LZ Map Assesment and Planning |
 |
|
Assessment
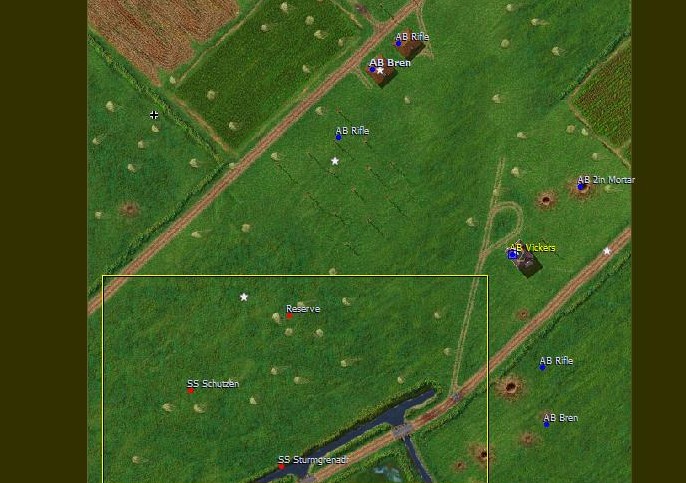
This map is rather similar to the one in Groesbeek LZ, where there's large tracts of open terrain. Alot of it is also high grass, and though we should be able to spot enemy movement, it can get difficult to pick out targets for good shooting. Sudden close contacts can end quickly and disastrously.
There's a gully running along the bottom edge of the map that will provide concealed approach for the Germans to launch attacks from. In the middle, the Woods VL provides ample concealment coming into the middle of the map. The Cottage VL is a 3 storey building that overlooks alot of open ground.
Plan
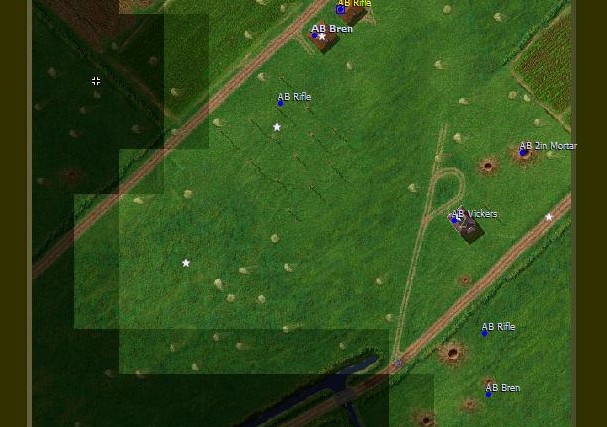
We'll keep the Bren teams in opposing flanks to provide cover. Since the centre is relatively open, the Vickers MG and Light Mortar should have sufficient firepower to stop most advances, the Vickers MG will be emplaced in the Cottage VL (3 storey) and the Light Mortar takes advantage of cover in a bomb crater.
We place 1 Rifle team as trip wire in the Woods VL while the remaining 2 Rifle teams are kept back as reserve on the flanks. As long as the flanks are steady, the Vickers team will continue to pour it on.
| Description: |
| Shows team positions before curtain rises |
|
| Filesize: |
82.89 KB |
| Viewed: |
7255 Time(s) |
|
|
|
|
| Back to top |
|
| |
|
|
vonB

Rep: 32.6
votes: 5
|
| Posted: Fri Sep 03, 2010 3:13 pm Post subject: Re: CC2 ABTF GC |
|
|
| Good work! I am enjoying your AAR's. Many thanks.
|
|
|
| Back to top |
|
| |
Pzt_Kanov

Rep: 14.2
votes: 9
|
| Posted: Fri Sep 03, 2010 4:56 pm Post subject: Re: CC2 ABTF GC |
|
|
Yes, these AAR's are great.
I am of the ones that goes all out frontal attack on the villa at Groesbeek Heights as soon as the battle starts, usually with a lot of casualties, it is great to see other approaches to the same tactical dilemmas.
|
|
|
| Back to top |
|
| |
sigeena
Rep: 14.2
votes: 1
|
| Posted: Sun Sep 05, 2010 3:20 am Post subject: Re: CC2 ABTF GC |
|
|
Thanks for the compliments. Though I'm thinking if my overall progress may be too slow. Maybe, I'll shrink events to per Op per day. Right now, there's another 3 more battles to go through before end of 1st day, and looking at the average post progess, it'll take us to page 10 easily.
There are no perfect tactical solutions to problems. I'm sure, if the enemy managed to push MG teams into the Villa, they'll have made it more costly for us.
|
|
|
| Back to top |
|
| |
sigeena
Rep: 14.2
votes: 1
|
| Posted: Sun Sep 05, 2010 3:29 am Post subject: Oosterbeek LZ- 1st Enemy movement spotted |
|
|
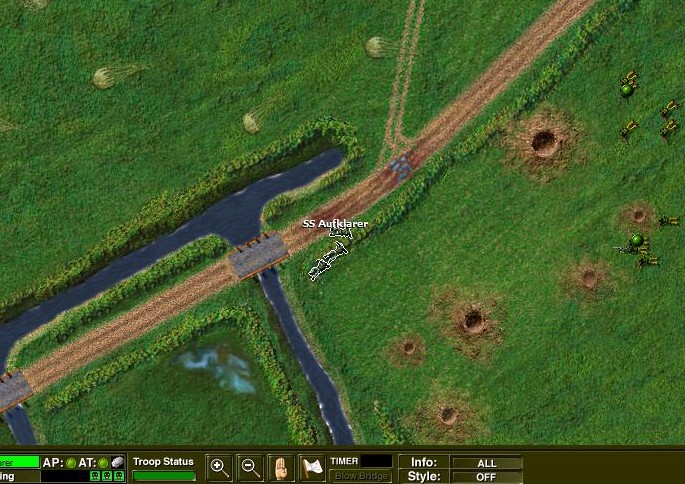
We didn't have to wait too long for the enemy to reveal their intentions.
The Germans probe forward with an Aufklarer team.
This area would see the heaviest enemy concentration throughout the fighting ahead. It's a natural concealed position to stepoff from.
| Description: |
| Most of the enemy will be creeping along this hedgerow/ gully. |
|
| Filesize: |
140.92 KB |
| Viewed: |
7239 Time(s) |
|
|
|
|
| Back to top |
|
| |
sigeena
Rep: 14.2
votes: 1
|
| Posted: Sun Sep 05, 2010 3:35 am Post subject: Oosterbeek LZ- First Shots |
|
|
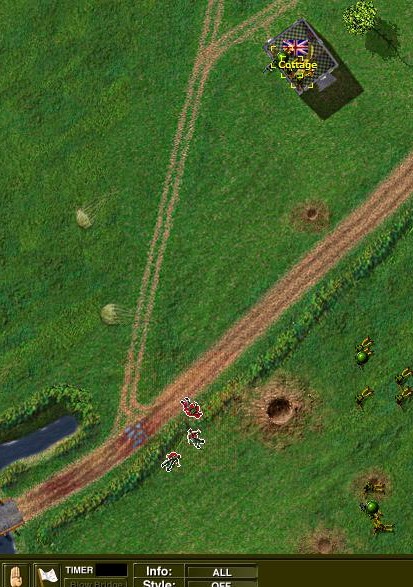
We waited patiently till the enemy was in our sights for Close Range, and therefore, higher probability of accurate fire. We opened up first with the Vickers from the Cottage VL, and as the enemy spun around to take cover, with heavy accurate fire from the Bren team. We knocked out the enemy team within the first 20 shots. Good shooting!
| Description: |
|
| Filesize: |
103.38 KB |
| Viewed: |
7238 Time(s) |
|
|
|
|
| Back to top |
|
| |
sigeena
Rep: 14.2
votes: 1
|
| Posted: Sun Sep 05, 2010 3:39 am Post subject: Oosterbeek LZ- Concealment |
|
|
Here's a screenie I took intending to show how easily it is to sneak around in the map without being observed. These guys are spotted but without seeing actual bodies on the map, I generally hold off on engaging them with direct fire.
Firing at them would not be effective, given the long range and lack of proper observation. And as I mentioned earlier, there's alot of tall grass in this map.
| Description: |
| These teams are all spotted but unable to observe |
|
| Filesize: |
106.64 KB |
| Viewed: |
7237 Time(s) |
|
|
|
|
| Back to top |
|
| |
sigeena
Rep: 14.2
votes: 1
|
| Posted: Sun Sep 05, 2010 3:44 am Post subject: Oosterbeek LZ- Alot more teams spotted |
|
|
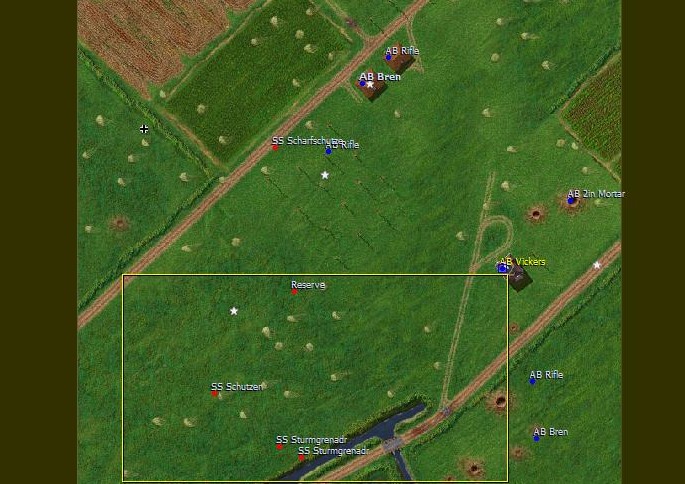
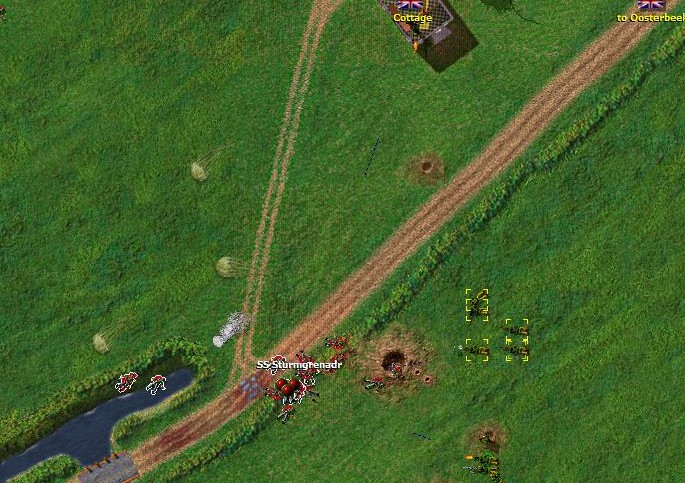
Holding off on engaging them at this range, we note more enemy teams probing forward.
The Woods VL will soon be contested by the enemies. We'll have to support the Rifle team in there soon.
Another 2 Sturmgrenadr teams are spotted heading towards our left flank, perhaps to investigate the whereabouts of their scouting Aufklarer.
| Description: |
| The Scharfschutze and Reserve teams heading towards the Woods VL |
|
| Filesize: |
109.74 KB |
| Viewed: |
7236 Time(s) |
|
|
|
|
| Back to top |
|
| |
sigeena
Rep: 14.2
votes: 1
|
| Posted: Sun Sep 05, 2010 3:48 am Post subject: Oosterbeek LZ- Right Flank |
|
|
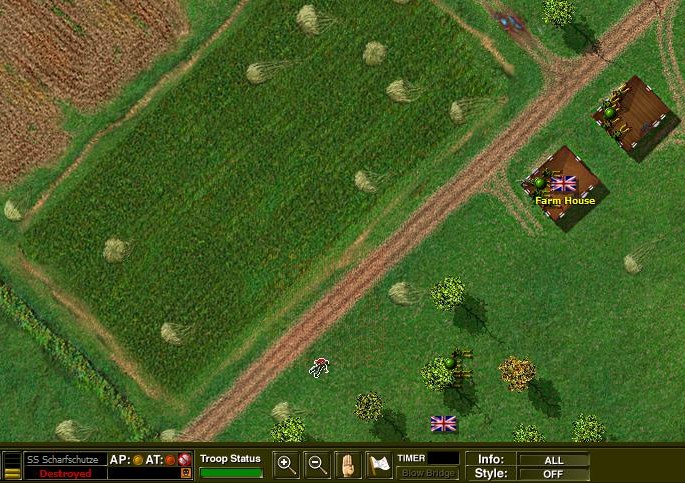
We allowed the Scharfschutze team to close to within Point Blank before opening up. He probably never knew what hit him.
Having revealed our positions, we quickly re-align this Rifle team to cover towards the centre of the Woods VL, to set up another ambush position.
| Description: |
| We destroy the Scharfschutze team first before re-aligning our Rifle team |
|
| Filesize: |
140.43 KB |
| Viewed: |
7235 Time(s) |
|
|
|
|
| Back to top |
|
| |
sigeena
Rep: 14.2
votes: 1
|
| Posted: Sun Sep 05, 2010 3:53 am Post subject: Oosterbeek LZ- Woods VL |
|
|
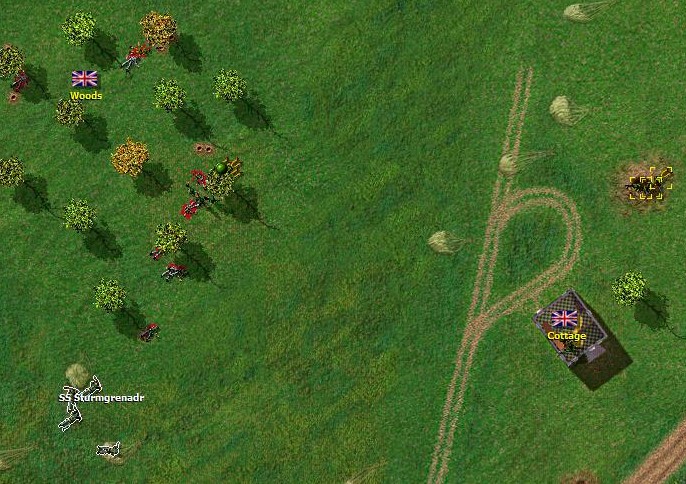
We also moved the reserve Rifle team on the right flank forward to support the Woods VL. As the enemy begin to cross from the gully towards the Woods VL, they came into open observation by our Vickers team. We opened fire on them from range (Vickers and Mortar) to distract them.
While they continued to move forward into the Woods VL under heavy fire, they came into sudden close range rifle fire from the Woods VL Rifle team. We quickly knock out the Reserve and Schutzen team.
Without further support, the Sturmgrenadr team in the open, cowers under heavy fire from converging angles.
| Description: |
| 1 Reserve, 1 Schutzen, 1 Sturmgrenadr |
|
| Filesize: |
142.86 KB |
| Viewed: |
7234 Time(s) |
|
|
|
|
| Back to top |
|
| |
sigeena
Rep: 14.2
votes: 1
|
| Posted: Sun Sep 05, 2010 3:57 am Post subject: Oosterbeek LZ- Final enemy incursion |
|
|
The enemy tries one more time to take out left flank. They pop some smoke to obscure the Vickers team's observation and creep into the hedgerow where the Aufklarer died.
Here, we open up with all 3 teams (Bren, Rifle, Vickers), and added Mortar bombs into the mix. The end result was another wrecked Sturmgrenadr team.
| Description: |
| The enemy repeats its mistake |
|
| Filesize: |
135.85 KB |
| Viewed: |
7345 Time(s) |
|
|
|
|
| Back to top |
|
| |
sigeena
Rep: 14.2
votes: 1
|
| Posted: Sun Sep 05, 2010 4:06 am Post subject: Oosterbeek LZ- Victory and Overnight |
|
|
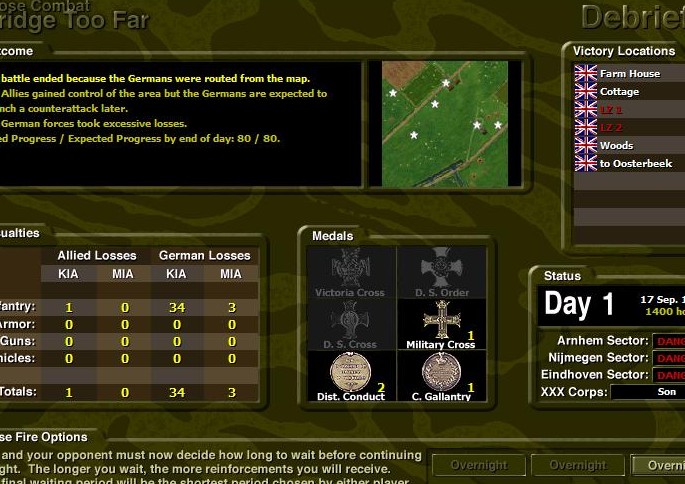
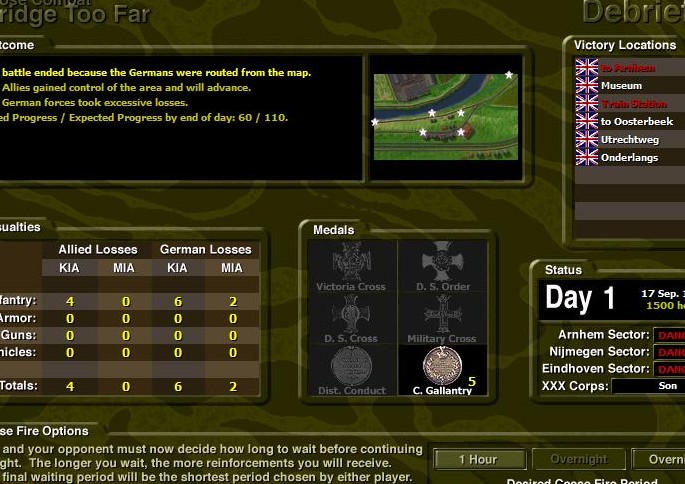
Such results are rare but always welcome. We encountered heavy enemy numbers but they were used poorly, with too much emphasis given towards our left flank but without proper tactical consideration.
We counted 3 Sturmgrenadr, 1 MG42, 1 Schutzen, 1 Aufklarer, 1 Reserve, 2 Scharfshutze and 1 Panzerschreck team in all. A formidable setup.
Allies Germans
Soldiers 29 42
Losses 1 37
Remaining 28 5
The Military Cross was awarded to the Vickers team. They alone, accounted for 18 enemy kills.
With the Oosterbeek LZ defended, we can expect air supply to be delivered for 1st Airborne.
| Description: |
| End of battle, we whipped some ass |
|
| Filesize: |
115.45 KB |
| Viewed: |
7343 Time(s) |
|
|
|
|
| Back to top |
|
| |
sigeena
Rep: 14.2
votes: 1
|
| Posted: Sun Sep 05, 2010 4:35 am Post subject: Arnhem Tree Road Map Assessment and Planning |
|
|
Assessment
This is a relatively challenging map.
Towards the upper half of the map, there's a river preventing the Allies from crossing and clearing the factory buildings. All of that allows the Germans to position teams to observe and overlook our positions and movement along the Arnhem Tree Road.
In the middle, the buildings are dominated by the Train Station VL, the large brownish 3 storey building in the centre.
Once clear of the built-up area, there are trees lined along the roads that provide some level of cover and concealment.
Planning
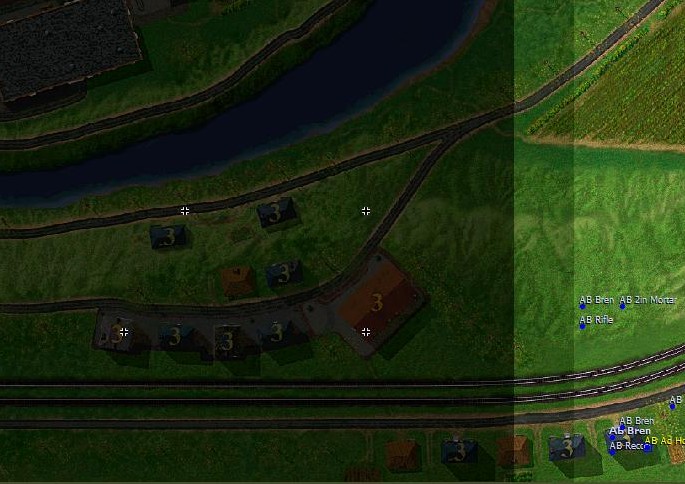
Our starting positions are not terribly good. We'll have to clear the row of buildings along the bottom edge, before we can attempt entering the Train Station VL. I've tasked 4 teams to achieve this.
The remainder are placed along the start line to provide some semblance of covering fire as the main teams clear the houses.
| Description: |
| Shows the disposition of forces before start |
|
| Filesize: |
95.88 KB |
| Viewed: |
7341 Time(s) |
|
|
|
|
| Back to top |
|
| |
sigeena
Rep: 14.2
votes: 1
|
| Posted: Sun Sep 05, 2010 4:37 am Post subject: Arnhem Tree Road- Assaulting the House |
|
|
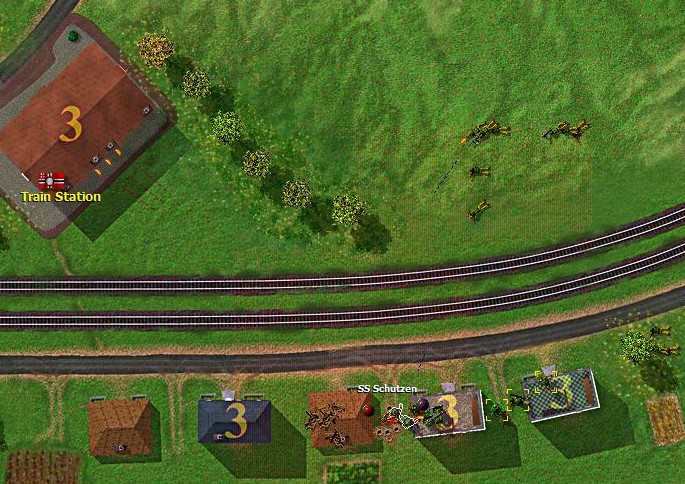
It was a brutal straightup and and at 'em kinda fight. We rushed forward and had a brief contest of the houses.
After knocking out 1 Schutzen team, the enemy decided it had enough and pulled out.
| Description: |
| Note enemy fires from the Train Station VL |
|
| Filesize: |
153.18 KB |
| Viewed: |
7340 Time(s) |
|
|
|
|
| Back to top |
|
| |
sigeena
Rep: 14.2
votes: 1
|
| Posted: Sun Sep 05, 2010 4:43 am Post subject: Arnhem Tree Road captured! |
|
|
We had pushed very hard and got the enemy to run out before taking more losses. In consideration, we had lost 1 AdHoc Rifle team. Not a bad exchange overall, and hopefully not one that will haunt us later. We are running very low on assaulting teams, 1 Rifle and 1 Recon team left, both 2 men teams.
Allies Germans
Soldiers 23 14
Losses 4 8
Remaining 19 6
We need to push on despite our losses. We can only take 1 hr ceasefire and continue to thrust hard towards the Arnhem Bridge objective.
| Description: |
| End of battle, the enemy is trying to hit and run |
|
| Filesize: |
113.96 KB |
| Viewed: |
7339 Time(s) |
|
|
|
|
| Back to top |
|
| |
sigeena
Rep: 14.2
votes: 1
|
| Posted: Mon Sep 06, 2010 2:34 am Post subject: Veghel Team List |
|
|
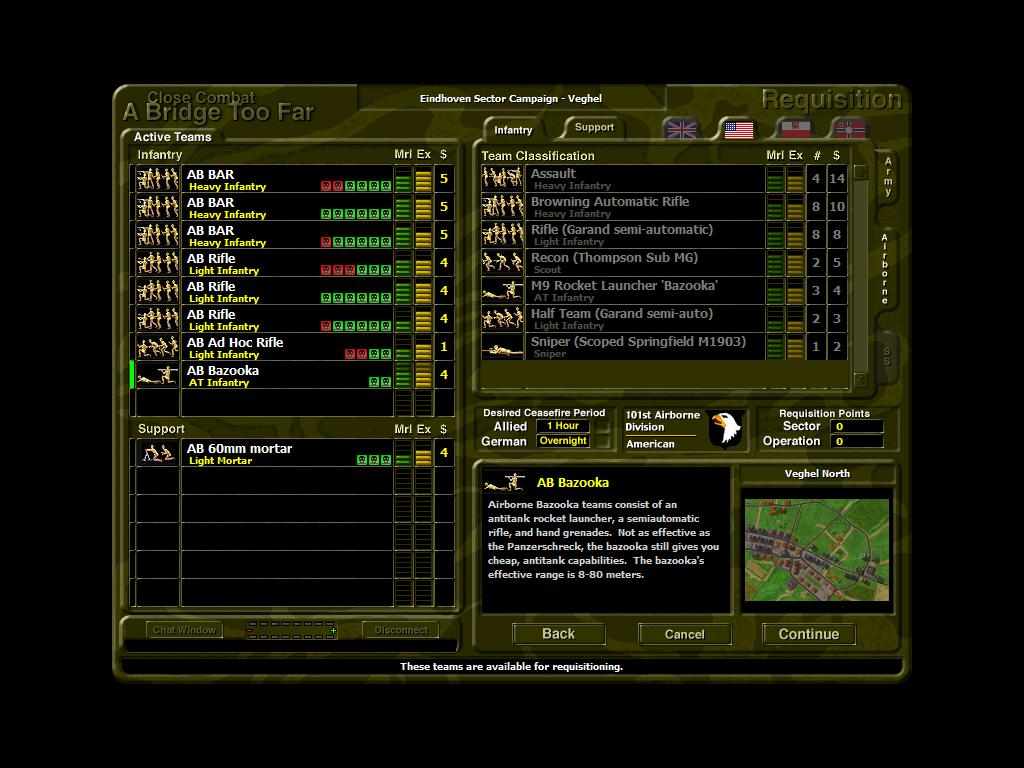
We quickly head back to Veghel Op in the Eindhoven Sector. We've got the enemy on the run since Veghel Bridge. They've opposed us with token resistance and fled prompty once they figured out it's better to live another day.
With the limited points available, I decided to add a Bazooka team to the lineup. Veghel North map is heavily built-up and bazookas can be used in a pinch to punch holes through houses.
| Description: |
|
| Filesize: |
119.65 KB |
| Viewed: |
7261 Time(s) |
|
|
|
|
| Back to top |
|
| |
sigeena
Rep: 14.2
votes: 1
|
| Posted: Mon Sep 06, 2010 2:39 am Post subject: Veghel North- Firing cracked all around |
|
|
Alluded to earlier, Veghel North represents one of the more densely built-up maps. It's basically an infantry battleground and as long as there's covering positions that overlooks the next house, it's pretty easy to move forward and take control.
I forgot to take a screenshot before pressing Begin. Here's the first screen I remembered to take. I had placed most of the infantry teams in the buildings on the Allied start line and upon starting the battle, found that the enemy had poorly placed its Schutzen team in the woods not 30metres from where 4 BAR/Rifle teams had immediate range of.
Quick barrage of grenades and this team was no longer effective.
| Description: |
| Schutzen caught in the open from 3 different directions. |
|
| Filesize: |
169.25 KB |
| Viewed: |
7260 Time(s) |
|
|
|
|
| Back to top |
|
| |
sigeena
Rep: 14.2
votes: 1
|
| Posted: Mon Sep 06, 2010 2:42 am Post subject: Veghel North- Enemy reserves |
|
|
The Germans quickly figured out that the mass of Allied teams to the front represents the greatest threat and dispatched a Panzerschreck team to shift towards our flank.
Perhaps they intend to draw us in like a sack. There must be a MG team somewhere that's going to hit us soon.
| Description: |
| Panzerschreck team bounding forward |
|
| Filesize: |
177.45 KB |
| Viewed: |
7259 Time(s) |
|
|
|
|
| Back to top |
|
| |
sigeena
Rep: 14.2
votes: 1
|
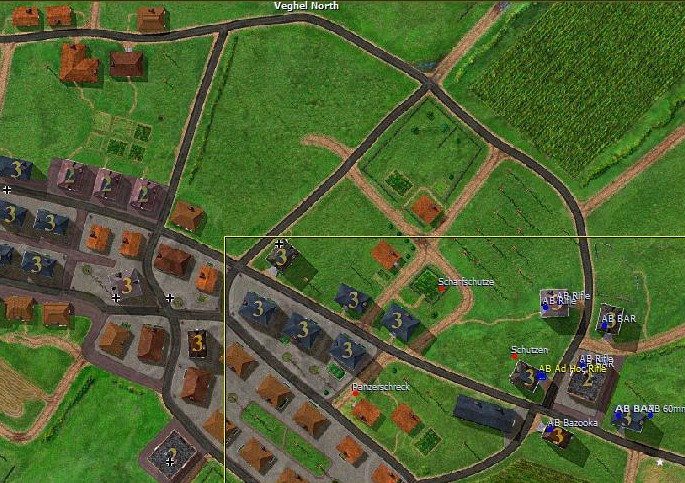
| Posted: Mon Sep 06, 2010 2:47 am Post subject: Veghel North- Enemy positions |
|
|
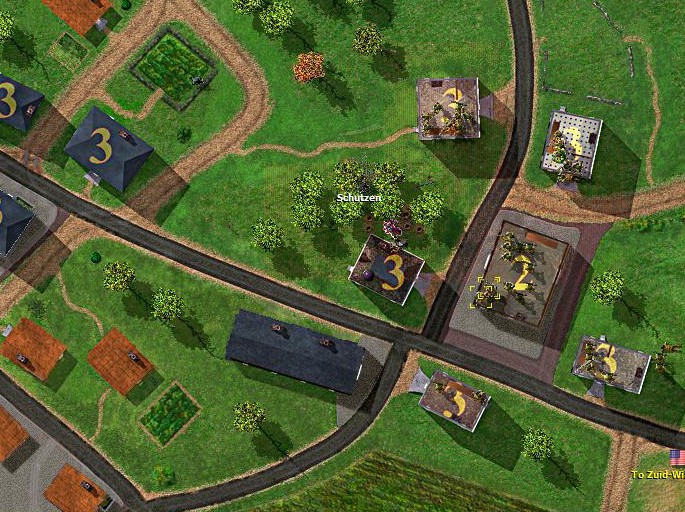
Here we have a better overview of the map. Most of the VLs are in the buildings to the middle of the map.
No sign of heavy enemy presence so far, other than the Schutzen team that's cowering in the woods. We rush a Ad-Hoc team forward to take prisoners, if any.
Above the Scharfschutze is a barn-like building with low fence. We'll need to secure this building to guard our flank before pushing the rest of the teams forward to capture the other VL positions in the centre.
| Description: |
|
| Filesize: |
161.09 KB |
| Viewed: |
7258 Time(s) |
|
|
|
|
| Back to top |
|
| |
sigeena
Rep: 14.2
votes: 1
|
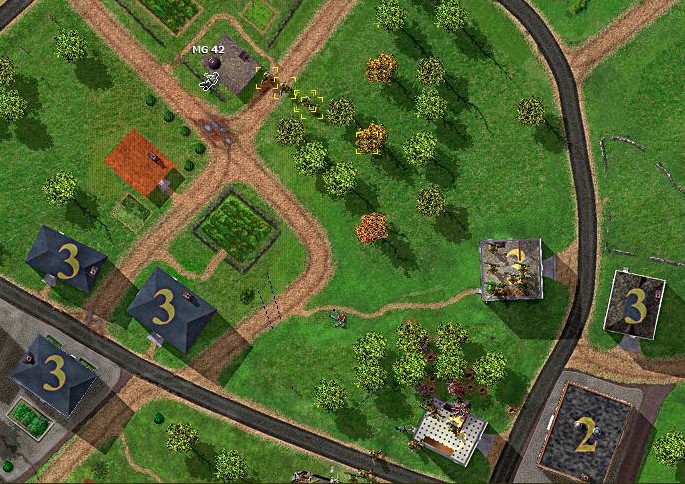
| Posted: Mon Sep 06, 2010 2:52 am Post subject: Veghel North- Pushing through the woods |
|
|
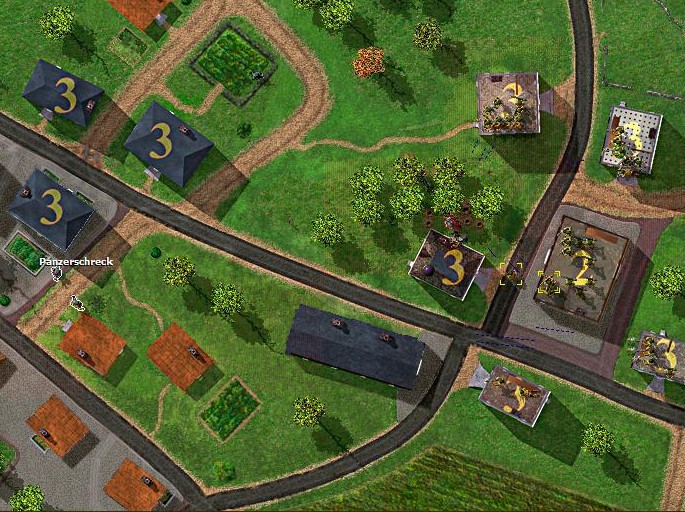
We position the rest of the teams to overlook while a Rifle team takes advantage of concealment by progressing through the woods. A few quick shots rang out and the enemy MG 42 is located heading to the same barn.
We'll need to double up and seize the building before the MG team can get set-up.
The MG team decides to quit the game of chicken and try to move back down the line to the next building. Our Rifle team rushes the enemy with rapid rifle fire and grenades. The MG commander surrenders once his team is destroyed.
| Description: |
| Rifle team rushing through the cover of woods |
|
| Filesize: |
169.1 KB |
| Viewed: |
7257 Time(s) |
|
|
|
|
| Back to top |
|
| |