sigeena

Rep: 14.2  
votes: 1
|
 Posted: Thu Sep 16, 2010 2:39 am Post subject: Arnhem Bridge- Fix Bayonets! Posted: Thu Sep 16, 2010 2:39 am Post subject: Arnhem Bridge- Fix Bayonets! |
 |
|
The command given was loud and succinct. Fix bayonets and charge them! The German Schweres MG immediately surrendered once they realise the hardened intentions of the rushing troopers.
| Description: |
|
| Filesize: |
125.09 KB |
| Viewed: |
7773 Time(s) |
|
|
|
|
| Back to top |
|
| |
|
|
sigeena
Rep: 14.2
votes: 1
|
| Posted: Thu Sep 16, 2010 2:54 am Post subject: Arnhem Bridge remains in Col. Frost's control |
|
|
This morning, we met with the attack of a SS Recon Bn. They had assumed that their attack will be easy with the support of their light armour. However, once the Command HT was destroyed within the first 2 minutes of the battle, their odds took a big dip as they no longer had the ability to coordinate a successful assault against heavily fortified positions.
Allies Germans
Soldiers 28 62
Losses 5 47
Remaining 23 15
Situation is under control. Col. Frost holds the bridge.
| Description: |
|
| Filesize: |
115.59 KB |
| Viewed: |
7772 Time(s) |
|
|
|
|
| Back to top |
|
| |
sigeena
Rep: 14.2
votes: 1
|
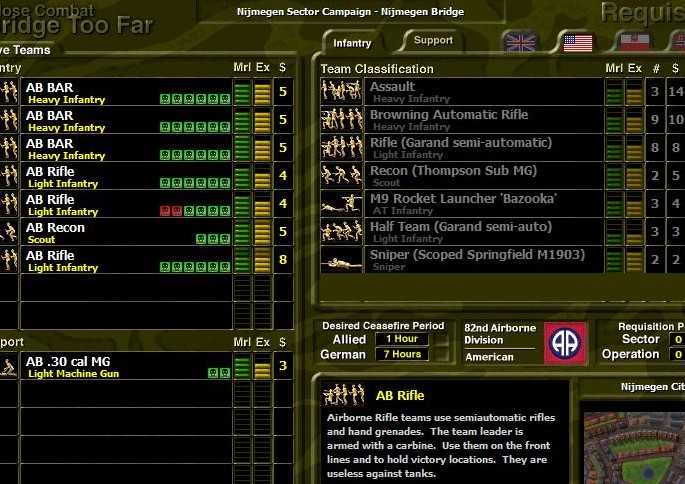
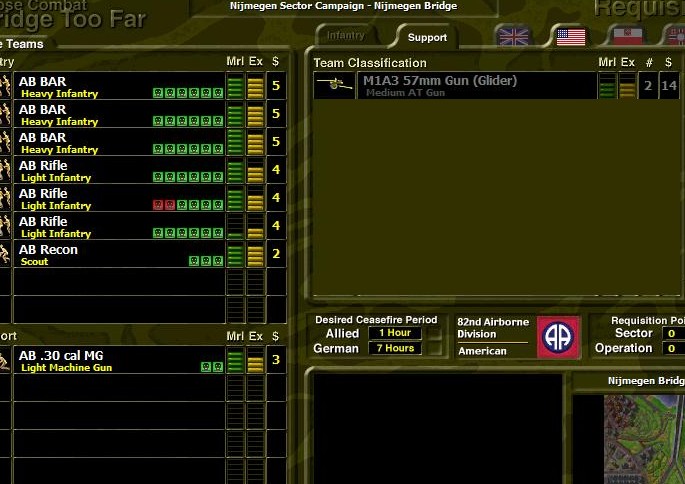
| Posted: Thu Sep 16, 2010 2:57 am Post subject: Nijmegen Bridge Team List |
|
|
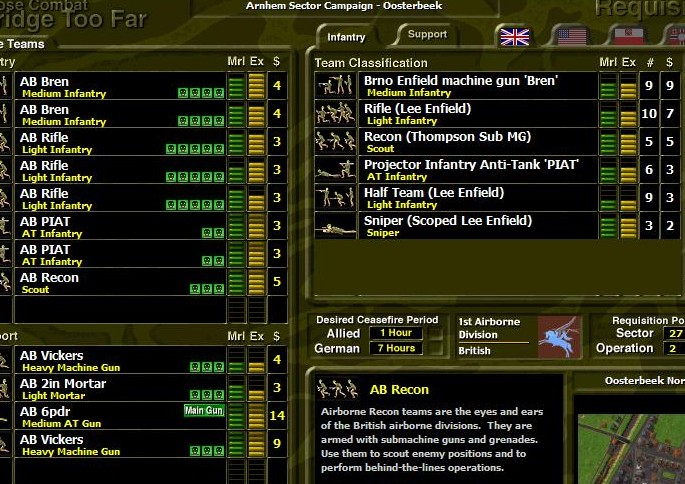
Heading back to unfinished business in the attack of Nijmegen City. We took the 1 hr ceasefire to req. Recon and Rifle teams for extra assault manpower.
| Description: |
| Added Recon and Rifle team |
|
| Filesize: |
130.44 KB |
| Viewed: |
7771 Time(s) |
|
|
|
|
| Back to top |
|
| |
sigeena
Rep: 14.2
votes: 1
|
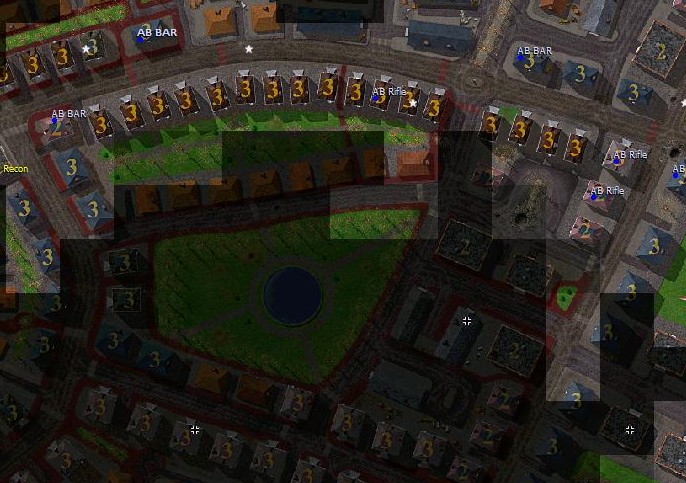
| Posted: Thu Sep 16, 2010 3:00 am Post subject: Nijmegen City Map Assessment and Planning |
|
|
Assessment
Control of the corner buildings provide control of entire streets.
Plan
We drop our teams in various covered positions. We'll attempt to go down both flanks, left and right of this map and hem the enemy in, away from lines of communication.
| Description: |
|
| Filesize: |
118.37 KB |
| Viewed: |
7770 Time(s) |
|
|
|
|
| Back to top |
|
| |
sigeena
Rep: 14.2
votes: 1
|
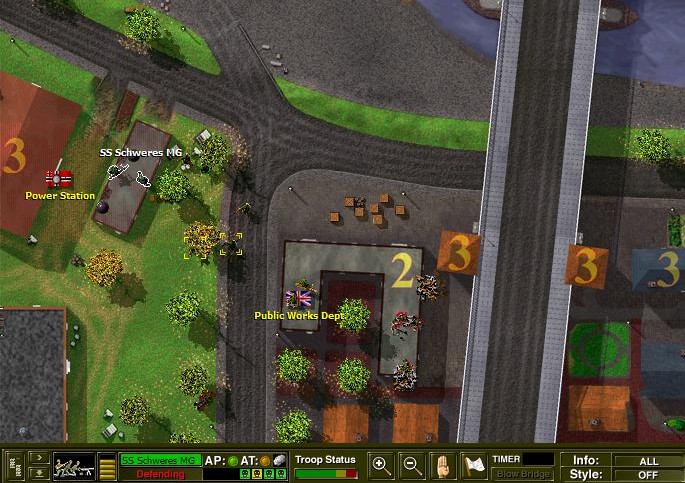
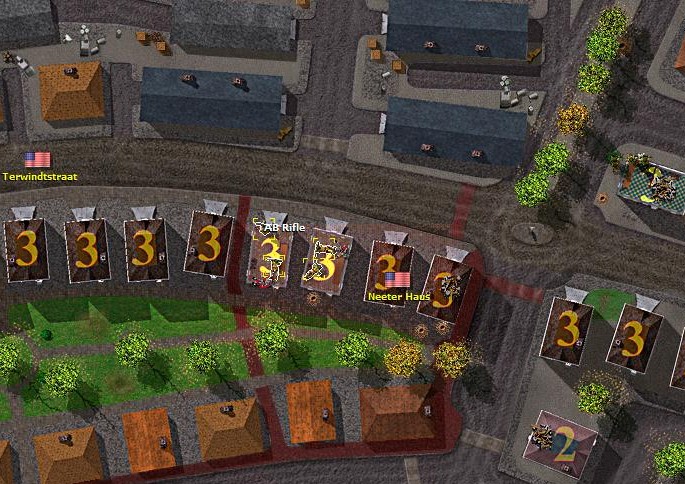
| Posted: Thu Sep 16, 2010 3:03 am Post subject: Arnhem City- Enemy blunder |
|
|
Perhaps the enemy hadn't realised that the ceasefire was up. They wandered into our positions and were duly dispatched with barrage of grenades and small arms fire.
| Description: |
| The MG42 blundered into our Rifle team |
|
| Filesize: |
147.54 KB |
| Viewed: |
7769 Time(s) |
|
|
|
|
| Back to top |
|
| |
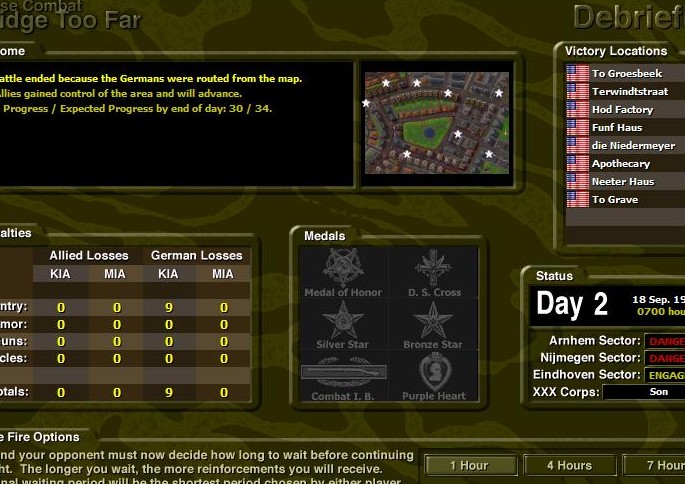
sigeena
Rep: 14.2
votes: 1
|
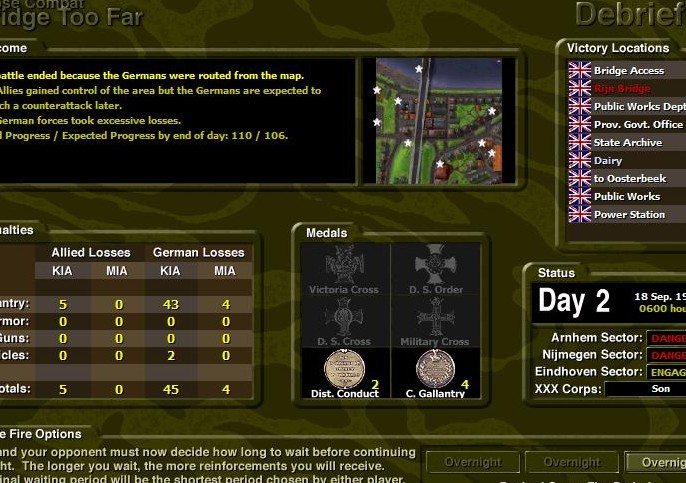
| Posted: Thu Sep 16, 2010 3:07 am Post subject: Nijmegen City Captured! |
|
|
A brief and sporadic action. We were fortunate to have come through a number of close actions without loss.
Allies Germans
Soldiers 30 18
Losses 0 9
Remaining 30 9
1 hr ceasefire, we'll continue to march on Nijmegen Bridge.
| Description: |
| Advancing to the Nijmegen Bridge |
|
| Filesize: |
111.8 KB |
| Viewed: |
7984 Time(s) |
|
|
|
|
| Back to top |
|
| |
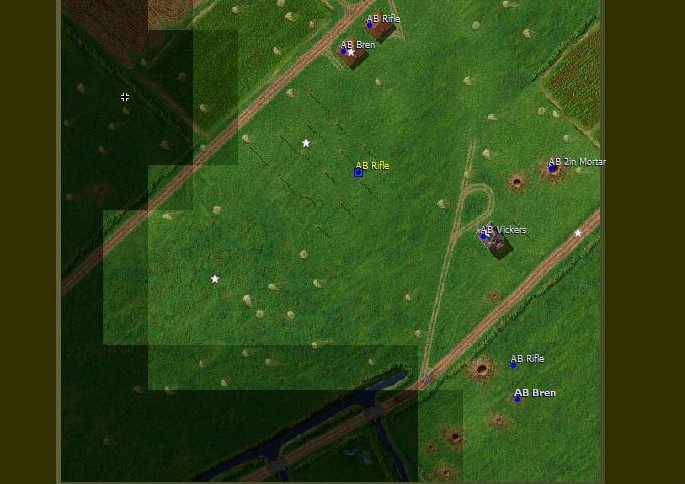
sigeena
Rep: 14.2
votes: 1
|
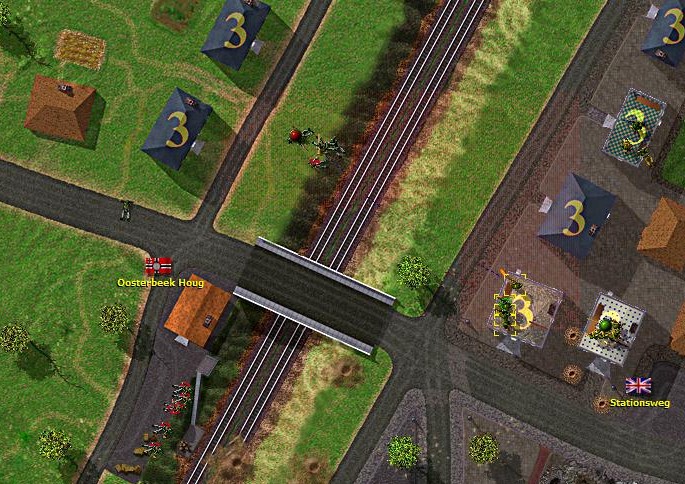
| Posted: Thu Sep 16, 2010 3:11 am Post subject: Oosterbeek LZ |
|
|
We took up the same positions as previously. We heard that there may be tanks and have been given orders to withdraw if we meet them. 4th Brigade won't be due till afternoon, so we can always pull back and counter-attack the Germans on better ground.
| Description: |
|
| Filesize: |
91.17 KB |
| Viewed: |
7985 Time(s) |
|
|
|
|
| Back to top |
|
| |
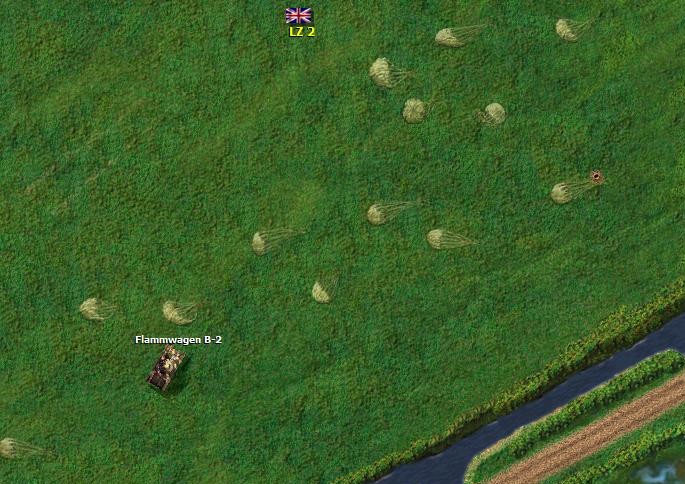
sigeena
Rep: 14.2
votes: 1
|
| Posted: Thu Sep 16, 2010 3:13 am Post subject: Oosterbeek LZ- Enemy armour to our front |
|
|
We had anticipated the enemy to attack with tanks and once we spotted it, the order was given, to silently withdraw. We'll keep ourselves in better shape to fight them.
| Description: |
| French tank with flamethrower adapted |
|
| Filesize: |
120.86 KB |
| Viewed: |
7986 Time(s) |
|
|
|
|
| Back to top |
|
| |
sigeena
Rep: 14.2
votes: 1
|
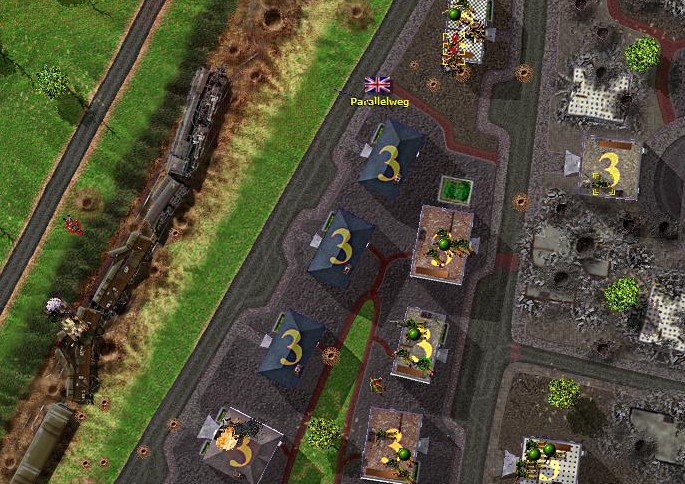
| Posted: Thu Sep 16, 2010 3:18 am Post subject: Oosterbeek North |
|
|
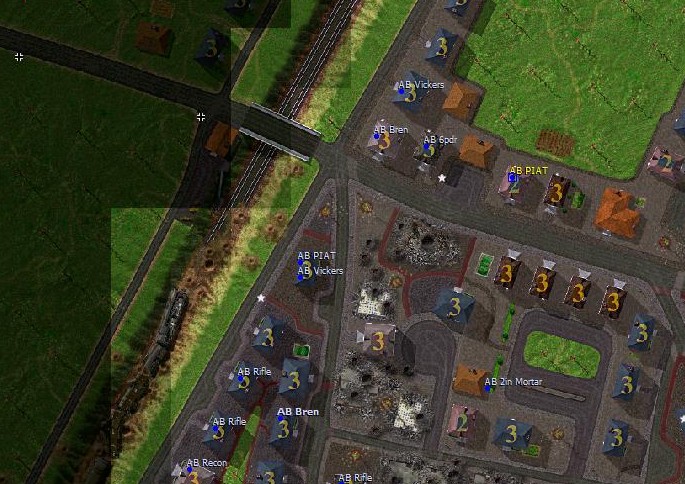
Pulling back into Oosterbeek North, we were reinforced by several anti-tank teams.
The ground in Oosterbeek North is much better for a stand up fight. We start with the advantage of buildings for cover, whereas the enemy has to cross the open ground to the left before coming to some cover in the railway cutting.
Even if they should capture the first line of buildings, we can always continue to fall back and take up secondary positions. They will have to continuously root us out of our fortified locations.
| Description: |
|
| Filesize: |
136.87 KB |
| Viewed: |
7987 Time(s) |
|
| Description: |
| Added 6pdr, Vickers, 2 PIATs and 1 Recon |
|
| Filesize: |
143.32 KB |
| Viewed: |
7987 Time(s) |
|
|
|
|
| Back to top |
|
| |
sigeena
Rep: 14.2
votes: 1
|
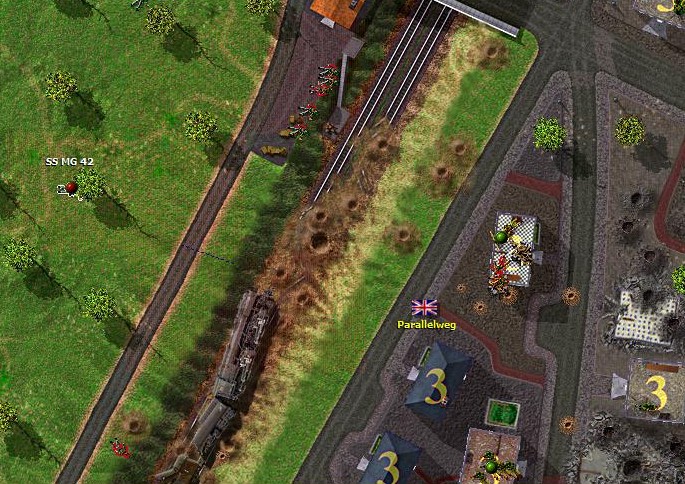
| Posted: Tue Sep 21, 2010 12:44 pm Post subject: Oosterbeek North- Enemy caught in open |
|
|
Once the battle started, we found the enemy command team not more than 60 metres from our Parallelweg VL. Here we have converging fires from 2 Vickers, 1 in the upper right corner, the other in the lower right corner, both in 3 storey buildings with excellent unobstructed fields of fire to the enemy.
We made short work of the enemy here.
| Description: |
| Enemy commander leading from the front? |
|
| Filesize: |
163.84 KB |
| Viewed: |
7978 Time(s) |
|
|
|
|
| Back to top |
|
| |
sigeena
Rep: 14.2
votes: 1
|
| Posted: Tue Sep 21, 2010 12:49 pm Post subject: Oosterbeek North- Our left is being threatened |
|
|
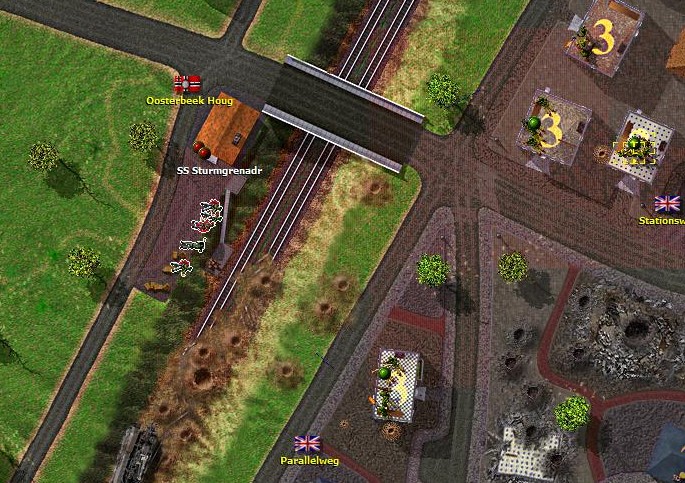
The enemy attempts to press their right to cross the railway cutting. This is heavily supported by the German tank. As the enemy begins to cross the cutting, our Command Bren opens up. This Bren team is undetected and obstructed from the tank. The enemy Flammenwerfer mustn't close with our first line.
The enemy tank noticed our firing to their front, but are unable to bring itself to approach closer.
| Description: |
| Only the Bren team, in concealed position, opens up. |
|
| Filesize: |
154.41 KB |
| Viewed: |
7895 Time(s) |
|
|
|
|
| Back to top |
|
| |
sigeena
Rep: 14.2
votes: 1
|
| Posted: Tue Sep 21, 2010 12:52 pm Post subject: Oosterbeek North- Enemy attacks our right as well |
|
|
The enemy repeats a similar attack on the opposite flank. In their attempt to cross the railway cutting, we allowed them to move into open and opened from 60 metres. It was quick work, as the enemy beat a retreat, leaving their lifeless comrades behind.
| Description: |
| Crossing open ground and getting slaughtered |
|
| Filesize: |
157.84 KB |
| Viewed: |
7899 Time(s) |
|
|
|
|
| Back to top |
|
| |
sigeena
Rep: 14.2
votes: 1
|
| Posted: Tue Sep 21, 2010 12:56 pm Post subject: Oosterbeek North- Enemy tank advance |
|
|
After beating off the combined armour/ infantry attack, the enemy decided to keep up a steady and suppressive fires on our buildings. We decided to vacate the first line of buildings and take up new positions in the 2nd row.
Here, you may note the effects of the enemy flamethrower tank on the first building to the left bottom. Our guys have Gammon bombs but they are only good from around 15 metres or so.
| Description: |
| We have pulled our guys back. |
|
| Filesize: |
159.69 KB |
| Viewed: |
7900 Time(s) |
|
|
|
|
| Back to top |
|
| |
sigeena
Rep: 14.2
votes: 1
|
| Posted: Tue Sep 21, 2010 1:02 pm Post subject: Oosterbeek North- Bait and Hook |
|
|
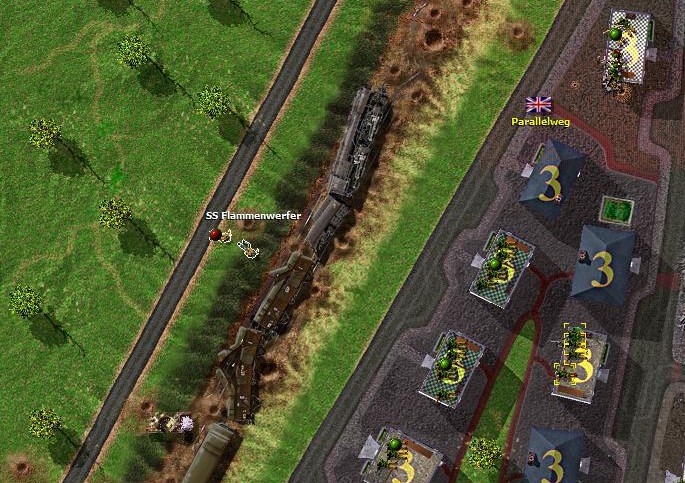
With only the tank preventing us from advancing, it is time to consider how we should destroy this mechanical enemy.
In this screen, our Vickers MG (reduced to 1 man) takes up position in the building towards the right bottom corner. From this vantage point, he is able to fire at the MG42 team hiding amongst the trees. At the same time, our PIAT team remains in concealed cover in the house just above the Parallelweg VL.
As we take the MG42 under fire, the enemy tank began to make its move towards the Parallelweg VL to investigate the source of incoming fire on the MG42. Once it comes into 30 metres range, our PIAT team has very low probability of missing such a point blank shot and destroys the enemy tank.
| Description: |
| We'll attract the tank up towards the position of Parallelweg |
|
| Filesize: |
164.97 KB |
| Viewed: |
7901 Time(s) |
|
|
|
|
| Back to top |
|
| |
sigeena
Rep: 14.2
votes: 1
|
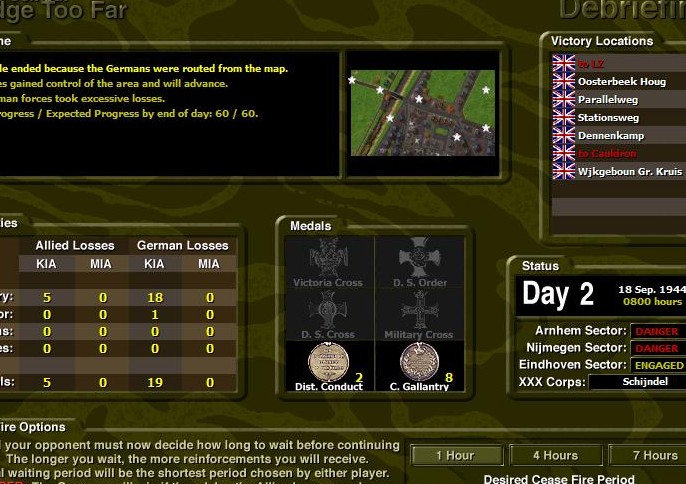
| Posted: Tue Sep 21, 2010 1:06 pm Post subject: Oosterbeek North won and advance |
|
|
Once the enemy tank was destroyed, the enemy fled the ground. We better hurry to reopen the LZ.
Allies Germans
Soldiers 43 26
Losses 5 18
Remaining 38 8
Taking 1 hr ceasefire, we proceed back to Oosterbeek LZ
| Description: |
| We take a quick 1 hr ceasefire and push hard to regain our LZ. |
|
| Filesize: |
113.1 KB |
| Viewed: |
7900 Time(s) |
|
|
|
|
| Back to top |
|
| |
sigeena
Rep: 14.2
votes: 1
|
| Posted: Thu Sep 23, 2010 1:27 pm Post subject: Nijmegen Bridge Map Assessement and Planning |
|
|
We head over to Nijmegen Bridge for our 1st attack to secure the bridge. We carry over our losses from the last battle. Nonetheless, we still have pretty good firepower.
Assessment
To properly secure the bridge, it is necessary to capture the buildings in the vicinity to control access. The enemy is expected to have its command HQ in and around the Valkenhof ruins at the top left corner with 4 VLs.
The enemy's positions are well-fortified. In comparison to ours, we have to cross open ground before entering the built-up urban areas. Without suppressive firepower, it will be a futile attempt to close with the enemy.
Planning
Control of VLs cannot be secure unless the buildings around the VLs are first captured. We will therefore attempt to feint our forces towards the Bridge Ramp VL first and then send our main force and enter the buildings along the bottom edge. Since our forces are limited, we will attempt to capture this map via phases, firstly to consolidate on the bottom edge and subsequently, to work our way up towards the enemy command HQ.
| Description: |
|
| Filesize: |
95.82 KB |
| Viewed: |
7891 Time(s) |
|
| Description: |
|
| Filesize: |
72.3 KB |
| Viewed: |
7891 Time(s) |
|
|
|
|
| Back to top |
|
| |
sigeena
Rep: 14.2
votes: 1
|
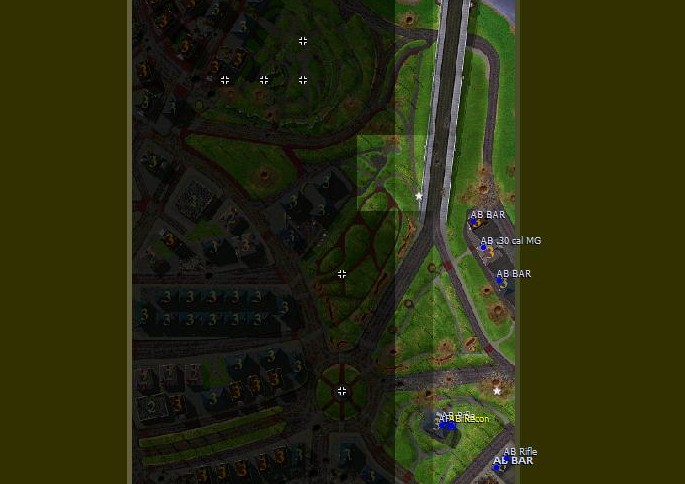
| Posted: Thu Sep 23, 2010 1:32 pm Post subject: Nijmegen Bridge- Making the feint |
|
|
Our feint attack with 2 BAR teams have the noticeable effect of drawing enemy attention to shift towards the upper section (off-map). Here the enemy can be seen moving troops up, draining the areas to the bottom edge of manpower. Our .30 Cal MG has excellent fields of fire on the open streets and take the enemy troops under fire.
| Description: |
| Enemy begin to shift their attention towards the upper map section. |
|
| Filesize: |
163.48 KB |
| Viewed: |
7900 Time(s) |
|
|
|
|
| Back to top |
|
| |
sigeena
Rep: 14.2
votes: 1
|
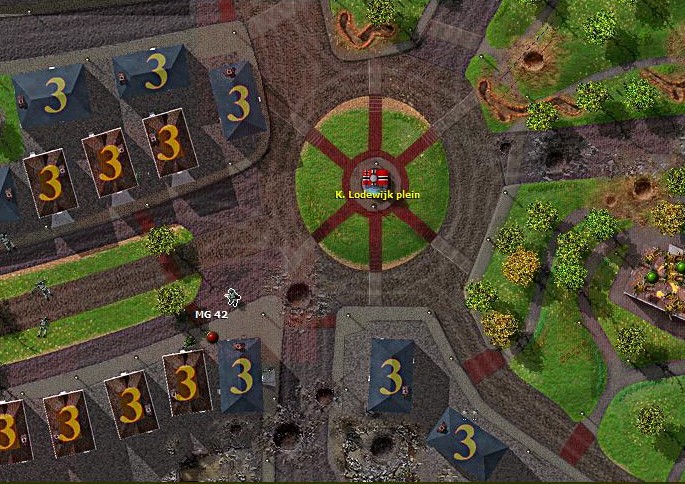
| Posted: Thu Sep 23, 2010 1:35 pm Post subject: Nijmegen Bridge- Attacking the left (bottom edge) |
|
|
Once we have asserted fire superiority along the bottom edge, we begin our assault with Recon and Rifle teams, crossing the open ground quickly to reach the next house.
Until we capture the bottom edge, we're going to suffer losses.
| Description: |
| We push our team forward by bounds |
|
| Filesize: |
167.49 KB |
| Viewed: |
7901 Time(s) |
|
|
|
|
| Back to top |
|
| |
sigeena
Rep: 14.2
votes: 1
|
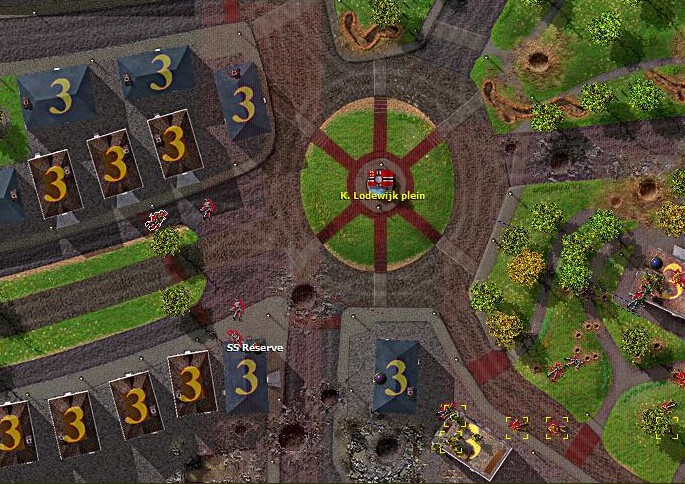
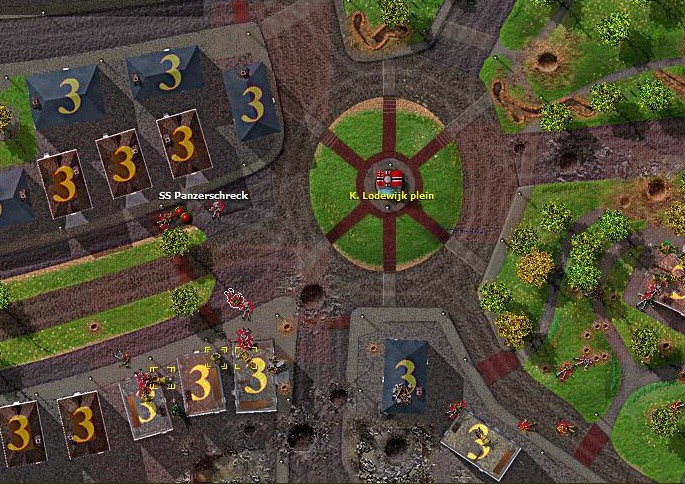
| Posted: Thu Sep 23, 2010 1:39 pm Post subject: Nijmegen Bridge- Clearing the buildings |
|
|
We move fast and hard, not allowing the enemy to catch their breath and reorganise a full-scale counter attack.
Here the enemy riposte of 1 Panzerschreck team is decisively destroyed as it tries infiltrate into our positions.
| Description: |
| Enemy tries to re-capture our positions |
|
| Filesize: |
168.69 KB |
| Viewed: |
7900 Time(s) |
|
|
|
|
| Back to top |
|
| |
sigeena
Rep: 14.2
votes: 1
|
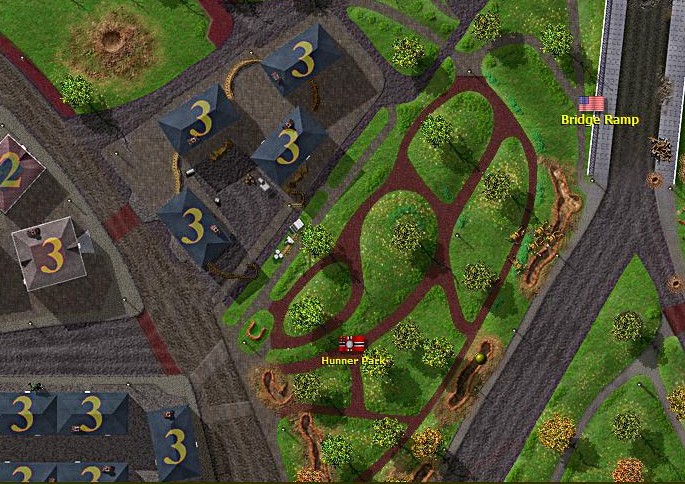
| Posted: Thu Sep 23, 2010 1:42 pm Post subject: Nijmegen Bridge- Feint attack makes good |
|
|
As the enemy attention remains transfixed to our efforts to the left, our feinting attack makes good and captures the Hunner Park VL, with the cluster of 4 buildings.
Shortly after this, we decide to call a halt to our attacks with an offer of ceasefire. Our teams are exhausted and near out of ammo.
| Description: |
| Enemy unable to react to our secondary attack |
|
| Filesize: |
156.02 KB |
| Viewed: |
7899 Time(s) |
|
|
|
|
| Back to top |
|
| |


